Windows, Bars, Buttons, Pointers and Palettes
This portion of the manual describes the graphical elements you see on screen for controlling Nisus Writer Pro. Features of Nisus Writer Pro windows, palettes and the buttons they contain, are fully explained. Also included is a description of the various pointers you see when you perform different tasks. Finally, you can learn about how Nisus Writer Pro allows you to manipulate dialog boxes.
The Nisus Writer Pro icon in the Dock 8
Display a different group of palettes 24
Palettes affect your document 26
Nisus Writer Pro’s window resembles those of other Macintosh applications.
☞ Not all screenshots in this document depicting the Toolbar show the default item set. To customize your own Toolbar see “Make the Toolbar Your Own“ on page 611.
Figure 12
The Nisus Writer Pro window when first opened
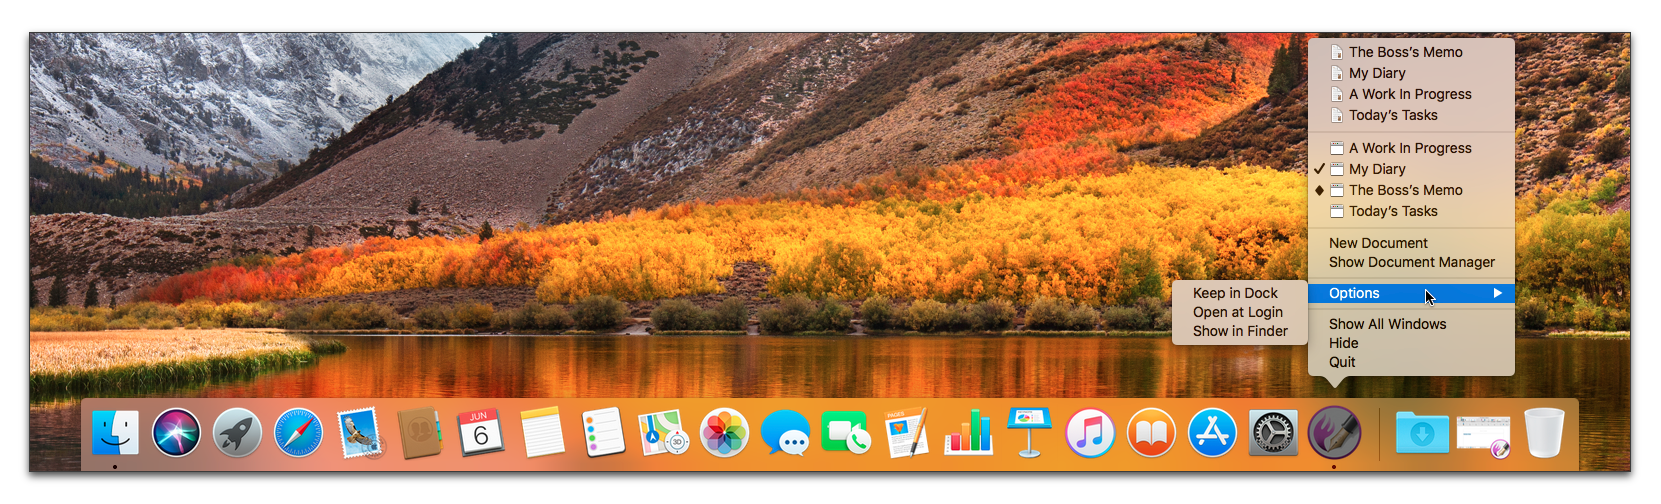
The Nisus Writer Pro icon in the Dock
Figure 13
The Nisus Writer Pro icon, and its menu, in the Dock
The Nisus Writer Pro Dock icon also has a special menu that appears when you right-click the icon, as illustrated in Figure 13. From it you can choose any of your open windows as well as choose from recently opened documents (above the list of open windows).
The menu also indicates:
• which document window is active (the check mark)
• which is in the Dock (the diamond).
From this menu you can also use commands to open a new document or show the Document Manager (along with the standard Dock commands).
If you click and hold your mouse or trackpad down the Mac system displays the open windows (as if using Exposé. The menu offers the opportunity to Quit Nisus Writer Pro, Hide Nisus Writer Pro and additional Options including Keep in Dock/Remove from Dock, Open at Login and Show in Finder. Press ⌥ to choose Hide Others and Force Quit.
Figure 14
The Nisus Writer Pro Menu Bar
The menu bar lists the menus available in Nisus Writer Pro. Click your pointer on a menu title to display the list of available commands.
• If a command is gray (disabled) that command is not available in the current situation.
Or, it serves as a label and is not actually a command at all. In such cases:
• The item is always either at the top (of a menu, or list within that menu).
• If it is not at the very top it always follows a gray line.
• It always ends with a colon.
• It is alway bold, which means it takes up a tiny bit more horizontal space (which may not be noticeable).
• If a wedge ▸ appears to the right of a command additional commands (in a “submenu”) are available.
• A check ✓ appearing to the left of a command indicates that the designated command is in force for the entire selection or document.
• A dash - appearing to the left of a command indicates that the designated command is in force for only a portion of the selection or document.
The list below reviews the menus available in Nisus Writer Pro and briefly describes when to use which menu. Each menu command is described in more detail in Appendix I beginning on page 657.
Nisus Writer Pro
Use the Nisus Writer Pro menu to access commands that control the entire application, not one portion of it: Preferences, Services, Hide/Show, Quit. A complete listing and description of the commands of this menu begins on page 657.
File Use File to open, close, save, merge and print files. A complete listing and description of the commands of this menu begins on page 659.
Edit Use Edit to change text as well as undo or redo actions and use Cut Copy, Paste, Clear, Select All, Convert, Sort, Find, Spelling, Clipboards. A complete listing and description of the commands of this menu begins on page 661.
Insert Use Insert to put Page Break, Column Break, Section Break, Automatic Numbers, Styles, Footnotes and Endnotes, Images and Hyperlinks. A complete listing and description of the commands of this menu begins on page 670.
View Use View to alter the manner in which Nisus Writer Pro displays your document and its window. A complete listing and description of the commands of this menu begins on page 675.
Format Use Format (with its many submenus) to change the way your text appears in your document. A complete listing and description of the commands of this menu begins on page 682.
Table Use Table to insert and modify tables. A complete listing and description of the commands of this menu begins on page 692.
Tools Use Tools to insert and work with comments, track changes to your document, develop tables of contents, indexes and bibliographies, maintain automatic content, insert a watermark and create and modify images and shapes. A complete listing and description of the commands of this menu begins on page 692.
Macro Use Macro to write and run Perl scripts and Command menu macros. A complete listing and description of the commands of this menu begins on page 701.
Window Use Window to choose among active windows and manage the Palette Library and the Document Manager. A complete listing and description of the commands of this menu begins on page 702.
Help Use Help to get Nisus Writer Pro Help which gives you extensive explanations and hints regarding all of the features found in Nisus Writer Pro. A complete listing and description of the commands of this menu begins on page 703.
The title bar, which appears across the top of every document window consists of three parts. The left side contains three buttons. Click to close (red/left), minimize (to the Dock) (amber/center), and zoom (green/right). Drag the title bar to move a window.
► Click the green button to cause Nisus Writer Pro to switch into Full Screen mode. Press ⌥ as you click the green button to maximize the window without entering Full Screen mode.


Figure 15
The Nisus Writer Pro title bar (Untitled, Saved and Edited)
When you save a file the Nisus Writer Pro document icon appears to the left of the document’s name in the title bar. As you work on the document, the word “Edited” appears to the right which disappears once again on saving.
Other things you can do with the document’s icon in the title bar
• You can press ⌘ and click the icon (or area of the of the file’s name) to see a pop-up menu indicating the file’s location on your computer.
• You can drag the document’s icon to any location on your hard drive, creating an alias that leads back to the file.
• You can drag the document’s icon into another Nisus Writer Pro document causing its contents to appear there.
• You can drag the document’s icon into a Mail.app email message causing it to be sent as an attachment.
• You can click any portion of the text on the title bar to open a sheet as illustrated in Figure 16 that enables you to:
◦ Determine Where the file should be saved.
◦ Set whether the file is Locked or not
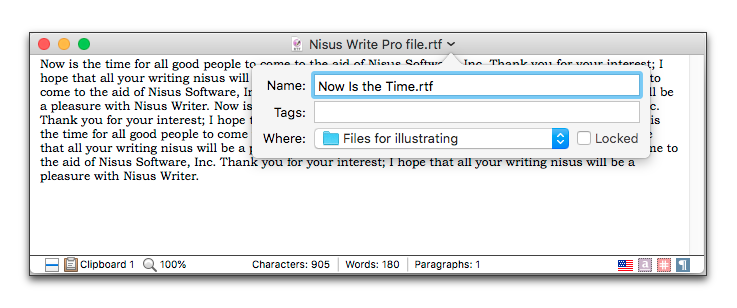
Figure 16
Renaming a Nisus Writer document from the title bar
You can open as many Nisus Writer Pro documents as you like. You can have them open in separate windows, or as tabs in one (or more) window(s). You can learn more about tabs in Nisus Writer Pro in the section “Tabs“ beginning on page 358. As you work with multiple windows or tabs…
• The pointer is an arrow  in all window regions not allowing text entry. Exceptions to this include when the pointer hovers over one of the gray lines that determine the margins or the size of the headers or footers.
• Dialog sheets apply to the window. in which they appear.
• Press ⌥ and click the Minimize button to minimize all open Nisus Writer Pro windows.
• Press ⌥ and click the Close button to close all open Nisus Writer Pro windows.
• Right-click anywhere on the Toolbar to alter the display of the Toolbar. You can show
◦ Manage Custom Toolbar Items…
You can learn more about customizing your Toolbar in the section: “Make the Toolbar Your Own” beginning on page 611.
• Press ⌘` (tilde, the key at the far left of the “numbers row”) to circulate through open Nisus Writer Pro windows.
• To control an inactive window, press ⌘. You can, scroll, move and resize inactive windows in this way without activating them. You cannot click inside the text editing area of the window without activating it.
• The Nisus Writer Pro document window displays either as it would appear on paper (Page View), as a continuous scroll (Draft View (or Full Screen, in which the window covers everything on the monitor)), or the various styles in the document (Style Sheet).
• Your Nisus Writer Pro document can display…
◦ as tabs in one window (as is common in Web browsers). Working with tabs is described in the section: “Tabs“ beginning on page 358
◦ with sidebars on either or both sides as introduced in the section: “Sidebars” on page 360
◦ with splits displaying various additional views of your documents as explained in the section: “Splits” on page 363.
◦ You can scroll multiple Nisus Writer Pro windows synchronously as explained in the section: “Synchronized Scrolling” beginning on page 361.
The term insertion point refers to the text caret (aka I-beam), a vertical bar that appears within your document text. When you type on your keyboard the insertion point is the place where fresh text appears– the point of insertion. You can control aspects of the insertion point in the Appearance Preferences, including its color, width, and whether or not it blinks.
This is separate from the mouse cursor, another term that is sometimes confused with the insertion point. To control aspects of the mouse cursor consult your system Accessibility preferences.
The mouse cursor (aka mouse pointer) changes shape to give you feedback as you complete different tasks. You should be familiar with some of these from your previous activities on the Macintosh. The list that follows describes Nisus Writer Pro pointer shapes.
 Arrow Pointer The left-slanting arrow points to images, icons, menu commands and buttons you can choose or click. It also indicates that you have text to drop elsewhere. Select what you want to move then click and drag the pointer.
 Arrow Pointer with Plus
This variant of the Arrow Pointer points to images, or text you can choose or click. It appears after you begin to drag something and press ⌥ to indicate that you have something to duplicate elsewhere. Select what you want to move then click and drag the pointer, then press ⌥.
 I-Beam The I-beam indicates where you can enter text. When you click in the text it changes to an insertion point.
 or
or Margin Mover When your pointer hovers over one of the margin lines or lines that separate the header or footer from the writing area, or the lines of a table or an image.
 Cross Hairs When create a Canvas in your document to work on images your pointer displays as Cross Hairs for you to drag the Canvas to the desired proportions.
 Resizer When your pointer hovers over the “handle” of a selected image the double-pointed arrow indicates that you can resize the graphic.
 Grabbing Hand When your pointer hovers over a selected image the grabbing hand indicates that you can move the image.
 Paste Spot When in a shape Canvas, the paste spot indicates where a pasted image’s upper left corner will appear.
 Macro Script While a macro is running, the mouse pointer turns to a macro or “script” icon.
Nisus Writer Pro enables you to use both the mouse and/or the trackpad. If you have set your System Preferences correctly and have a Macintosh with a multi-touch capable trackpad, you can use pinch gestures to zoom the document in/out as well as a three-finger swipe gesture should scroll up/down by a whole page in Page View.
As with other Mac apps, Nisus Writer Pro supports a large number of contextual menus. These are menus that can pop-up in special circumstances when you right-click a particular element (for example: a hyperlink). This action is also sometimes called a “secondary click”.
If your mouse or trackpad lacks a native right-click button, you can instead hold down the Control key on your keyboard as you use a regular click.
This documentation will make note of situations where you can use right-click, but won’t again describe in detail how to initiate such a click.
You can use the keyboard for more than entering text and numbers. You can use it to give instructions to the computer to perform certain tasks.
Macintosh keyboards include a variety of modifier keys and function keys. The four modifier keys are ⌘ (Command), ⇧ (Shift), ⌥ (Option), and ⌃ (Control).
You can assign almost any key to any command in the menus of Nisus Writer Pro. Each time you look at the menus you can see the menu key shortcut along the right column opposite the command. As you become familiar with the commands you can also learn the shortcuts. To learn more about this see “Menu Keys for Menu Commands” on page 578.
Dialogs are used to get information from you. Dialogs in Nisus Writer Pro appear from the title bar of the window to which they refer.
Dialogs can have a variety of controls, including checkboxes, buttons, pop-up menus & text boxes.
• A checkbox (  ) is referred to as checked when there is a “✓” a check mark in it (
  ). You click a checkbox to check or uncheck it. It is possible to check multiple checkboxes in a dialog.
• A radio button (  ) is referred to as selected when it is “blued” (
  ). You can only select one radio button in any single portion of a dialog. Click a button to select it; click an alternate button to deselect the first one and select the other.
• Pop-up menus, indicated by a menu name and an arrow, list options in the form of a menu.
 or
or 
Figure 17
Pop-up menu indicators
Click and hold to display the menu, then choose an option.
• Text boxes, indicated by a rectangular box, allow you to enter text in a dialog.
To type in a text box, click in the box and begin typing. To move between text boxes, press ⇥.
Nisus Writer Pro allows you to copy, cut and paste in all the dialog text boxes.
Figure 18
The Nisus Writer Pro Toolbar
► Choose the menu command: View > Toolbar > Show Toolbar.
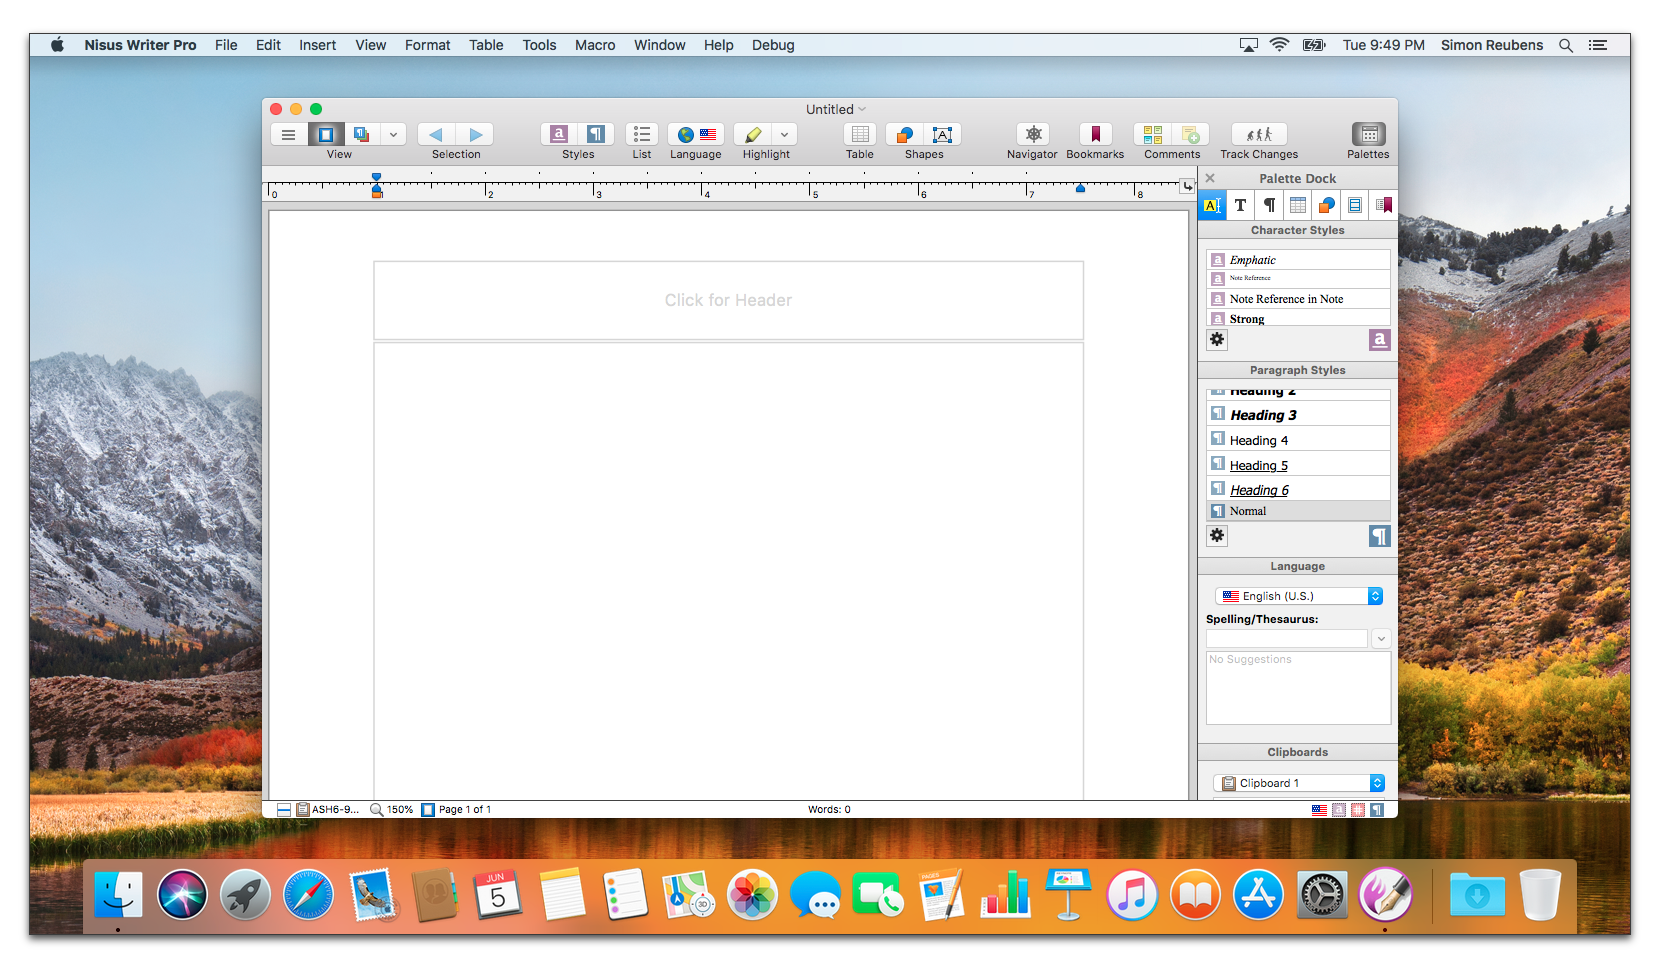
Nisus Writer Pro keeps the vast majority of the tools you need to control your text close at hand. Nisus Writer Pro opens with the Toolbar visible at the top of each window (immediately below the title bar) and the Palette Dock (see page 13) opens on the right side of the window. From the Toolbar you can
• Switch from Page View to Draft View or Style Sheet view and back to Page View. A reveal triangle to the right of the button offers quick access to a menu offering other views.
For more information on Page and Draft View see pages 112, 185, and 424. For more information on Style Sheet view see page 136. For a full discussion of the various ways you can view your document see the section: “Views, Tabs, Sidebars, Splits & Focus” beginning on page 354.
• Move your selection to prior (or subsequent) locations (see page 51).
• Apply predefined styles to selected characters or paragraphs (see page 136).
• Create a list and modify its style (see page 59).
• Change the language of your text (see page 40).
• Highlight selected text (see page 431).
Toward the right side of the Toolbar are buttons you can use to
• Insert a table with a click and a drag (see page 265).
• Insert a shape in your document (see page 224).
• Insert a text box in your document (see page 225).
• Turn on or off display of the Navigator sidebar on the side of your document to see your bookmarks or table of contents entries and see the structure of your document (see page 360).
• Add a bookmark or a cross-reference your document (see page 299 and page 313).
• Add a comment to your document (see page 497).
• Track the changes made to your document (see page 521).
• Open and close the Nisus Writer Pro Palette Dock with one click (see page 24).
► Right-click anywhere on the Toolbar of the active window. A contextual menu appears with many of the same commands as appear on the submenu: View > Toolbar.
☞ Not all screenshots in this document depicting the Toolbar show the default item set. To customize your own Toolbar see “Make the Toolbar Your Own“ on page 611.
Immediately beneath the Toolbar and above the text editing area the Horizontal Ruler appears.

Figure 19
The Nisus Writer Pro Horizontal Ruler in Page view showing inches
The Horizontal Ruler is explained in detail in the section “Format Paragraphs” beginning on page 112.
You can display a Vertical Ruler along the left edge of the document window.
• When in Page View, the ruler counts from zero at the top of the page through to the full length of the page. It scrolls with each page beginning anew at the top of each page.
• When in Draft View and Style Sheet view, the ruler counts from zero at the top and counts to the bottom of the displayable area much the same way the horizontal ruler displays in draft view.
• If your rulers display when you switch to Full Screen view they remain visible.
You can turn the display of the rulers on or off at any time when in Draft View, Page View or Style Sheet view.
► Check, that is: choose the menu command: View > Rulers > Show Rulers. This command toggles on and off.
You can display either the horizontal or vertical ruler, or both by checking the one(s) you want in that submenu.
► Check the menu command: View > Rulers > Horizontal Ruler to display the horizontal ruler.
► Check the menu command: View > Rulers > Vertical Ruler to display the vertical ruler.
These commands toggle on and off. Only the ruler checked displays when you turn on Show Rulers.
You can also display “Paragraph Formatting Icons” which show a ruler icon next to any paragraphs that have customized ruler settings. These icons are shown in the “gutter” or closest margin of your document as illustrated in Figure 20.
To enable these icons use the menu command: View > Show Paragraph Formatting Icons.

Figure 20
Paragraph formatting icons shown along right and left margins
You can drag and drop these icons elsewhere in your document (in the desired text, not the gutter or margin area) thereby applying the relevant formatting elsewhere. Clicking the icon selects the paragraph(s) controlled by that ruler a second click displays the same menu as clicking its matching icon on the Status Bar which is explained on page 17.
The paragraph style icon ( ) appears next to a paragraph only if both:
• The applied paragraph style is not the “Normal” paragraph style.
• The preceding paragraph has a different paragraph style.
Clicking the icon selects the paragraph(s) formatted by that paragraph style and displays the same menu as clicking its matching button on the Toolbar and the corresponding tag on the Status Bar.
Hovering your pointer over the icon displays a help tag that indicates the name of the paragraph style in force, as illustrated in Figure 21.
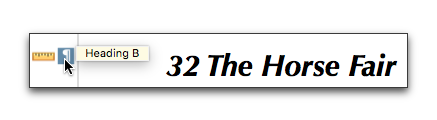
Figure 21
A paragraph formatting icon with its help tag
The ruler icon ( ) appears next to a paragraph only if both:
• The paragraph formatting differs from (overrides) that of the applied paragraph style.
• The preceding paragraph has different paragraph formatting.
Clicking the icon selects the paragraph(s) formatted by that ruler; and displays the same menu as clicking its matching icon on the Status Bar.
Hovering your pointer over the icon displays a help tag that indicates the attributes of the ruler in force (that differ from the preceding paragraph), as illustrated in Figure 22.
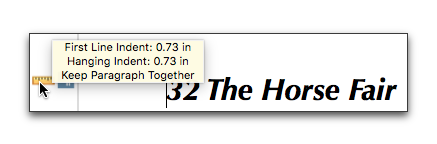
Figure 22
A ruler icon with its help tag
At the bottom of the document window, Nisus Writer Pro displays a “Status Bar”. This bar gives you information (displayed in “tags”) about the document and any selection within the document. In addition it gives you easy access to a variety of formatting tools.
You can turn the display of the Status Bar on and off.
► Choose the menu command: View > Status Bar.
Figure 23
The Nisus Writer Pro Status Bar
Each item on the Status Bar offers additional easy-to-reach tools and/or information for working in your document. The items on the Status Bar are separated into three groups: left, center and right. Depending on the contents of your document and the view you are using, these are:
On the far left of the Status Bar Nisus Writer Pro displays tags that enable you to interact with your document in various ways.
•  or
or  The Document Split View Tags
Click to control splits in your document. Splits are discussed in detail in the section: “Splits” beginning on page 363. The tag indicates whether the split will be horizontal or vertical. The commands here duplicate those in the submenu: View > Split View.
•  The Comments Tag
Appears whenever your document has comments. Click to control comments in your document. The commands here duplicate most of those in the submenu: Tools > Comments. Comments are discussed in detail in the section: “Use Comments” beginning on page 497.
•  or
or  The Tracked Changes Tag
Appears whenever your document has changes that are tracked (and highlighted whenever they are being tracked). Click to control tracked changes in your document. The commands here duplicate most of those in the submenu: Tools > Track Changes. Tracked changes are discussed in detail in the section: “Track Changes” beginning on page 521
•  The Clipboard Tag
Offers quick access to the Clipboard related commands of the Edit menu. When the pointer hovers over the Clipboard tag a help tag appears indicating which Clipboard is active. To its right, the first, up to, approximately 30 characters of the contents of the current Clipboard appear (in plain text). You can double-click the help tag to open the Clipboard. In addition a Tag Display Mode submenu is available which allows you to choose between:
◦ Icon Only
which removes the space for the text of the Clipboard
◦ Clipboard Name
which displays only the name of the current Clipboard
◦ Short Preview
which displays only approximately 10 characters
◦ Medium Preview
which displays approximately 20 characters
◦ Long Preview
which displays approximately 30 characters
Nisus Writer Pro is shipped with Short Preview selected. For more information on the Clipboards see the section “Using the Clipboards” on page 56.
•  The Page Zoom Tag
Displays the current percentage of magnification of your document. Click to change the zoom setting. For more information on magnifying the view of your documents see the section: “Use the Page Zoom palette” on page 374.
•  The Page Number Tag
Displays only when in Page View. It indicates the current (displayed) page number of the total pages of the document.
☞ Jump to a particular page by clicking the display and typing the page number you want in the text box that appears. If you have multiple sections in your document or you have begun your page number counting at something other than 1, you can choose to Show Physical Page Numbers or Show Logical Page Numbers from the pop-up menu that appears there. You can learn more about quickly moving between distant pages of your document in the section: “Jump to a particular page” on page 379.
The center of the Status Bar Nisus Writer Pro displays four different messages regarding your text.
• Nisus Writer Pro is shipped so that the center of the Status Bar displays a continuously updating word count of your document.
► Click the area of the word count to choose to display a variety of statistics regarding your document. You can learn more about how Nisus Writer Pro counts words, etc. in the section: “Word counts & text statistics” beginning on page 400. You can turn on or off any one or more of the menu commands available to mix and match other options:
◦ Show Paragraph Count
“Paragraphs” refers to the number of Return characters selected, not the number of (partial) paragraphs.
◦ Include Footnotes & Endnotes
◦ Include Empty Paragraphs in Count
◦ Copy
which copies the displayed information to the current Clipboard
◦ Text Analysis…
You can learn more about your text in the section “Text analysis” on page 407.
If you have a selection, the Status Bar displays only the characters, words and/or paragraphs in the selection. When you hover your pointer over the Info area of the Status Bar a help tag showing the same information as that displayed in the Status Bar as well as the statistics for the entire document appears.
• When the macOS is busy autosaving your file a progress bar appears along with the text “Autosaving document…”.
• When you explicitly save the file a progress bar appears along with the text “Saving document…”.
You can learn more about saving your documents in the section: “Save Files” on page 74.
• When you run a macro a progress bar appears along with the text “Running macro ‘Macroname’”. If the macro takes little time to complete its task, you might not see the message. You can learn more about macros in the section: “Macros, an Introduction” beginning on page 629.
The far right of the Status Bar Nisus Writer Pro displays tags that enable you to control the formatting of your document. Some of the tags have two (or more) states, others only appear under specific circumstances.
By using the tags (and their respective pop-up menus) you can
• Choose to apply a different defined format.
• Remove that format from selected text.
• Redefine the selected text based on the selected text (if you have modified the text in the document).
• Edit the style of the text where the insertion point appears.
• Select the next string of text that shares that formatting.
• Select all text in the document that shares that format.
help tags on the tags indicate the formatting applied to text at the insertion point.
From right to left, they are:
•  or
or  The Paragraph Style Tag
This has two states. If a Paragraph Style is absent from the selection, the tag is dimmed.
▷ Click the tag to display a menu that lists all the paragraph styles in your document as well as the commands: Remove Style, Redefine From Selection, Edit Style…, Select Next in Style, and Select All in Style.
•  or
or  The List Tag
This has two states. If a list style is absent from the selection, the tag is dimmed.
▷ Click the tag to display a menu that lists all the list styles in your document as well as the commands: Restart Numbering or Continue Numbering from Previous, Use None, and Increase Indent and Decrease Indent, in addition to Redefine From Selection, Edit Style…, New List Style…, Select Next in Style, and Select All in Style.
•  or
or  The Character Style Tag
This has two states. If a Paragraph Style is absent from the selection, the tag is dimmed.
▷ Click the tag to display a menu that lists all the character styles in your document as well as the commands: Remove Style, Redefine From Selection, Edit Style…, Select Next in Style, and Select All in Style.
•  The Notes Tag
Appears only if you have notes in your document.
▷ When in the main text of your document you can choose the commands:
▷ When you are in the footnotes or endnotes of your document a checkmark indicates whether you are viewing footnotes or endnotes. This enables you to change an Endnote to a Footnote, or the reverse.
You can also choose the commands:
• Remove Custom Note Reference
•  The “flag” (Language Tag)
Indicates the language of the text at the insertion point (and offers quick access to the Languages preferences of Nisus Writer Pro).
• For more information on writing in multiple languages see page 40.
☞ The flag implies no political allegiance or association. The flag is of the entire people (and it represents the language of that people), not a particular party. This is an Apple convention. (The Input Sources of the Keyboard System Preference lists many more flags (and other symbols) that attempt to iconographically represent a linguistic group.) macOS 10.13, High Sierra sometimes uses a character from the relevant language to represent that language.
The remaining tags represent other formatting of your selection. These also have two states. (If a format is present the tag appears; if absent, it does not appear.) The presence of these tags indicate a manual override of the formatting controlled by the styles of your document. You can learn more about manually overriding the formatting in the section “Manually override formatting“ on page 111.
By using the tags (and their respective pop-up menus) you can remove that format from selected text, select the next string of text sharing that formatting, or extend the selection to select all text in the document that shares that format.
•  The Font/Character Format Tag
In addition to the usual tag menus, you can choose the commands:
For more information about font and character formatting in your documents see page 428.
•  The Highlight Tag
For more information on highlighting text in your documents see page 431.
For more information applying color to the text of your documents see page 431.
For more information on background color in your documents see page 432.
•  The Ruler Tag
In addition to the usual tag menus, you can choose the commands:
For more information about using the ruler and shaping the paragraphs in your documents see the section beginning on page 112.
The Nisus Writer Pro Palette Dock holds a wide variety of tools to ease the manipulation of your text.
• Almost all of the tools available in palettes have counterparts on the menus.
• Nonetheless, there are more tools that are available in the menus that do not have counterparts in the palettes of the Palette Dock.
Figure 24
The Nisus Writer Pro Palette Dock at first startup.
The palettes hold most of the tools available in Nisus Writer Pro to work on your document.
When you first start Nisus Writer Pro, the Palette Dock opens on the right side of your document window. You can change this setting in Preferences. For more information on Nisus Writer Pro’s General Preferences, see “General Preferences Control the Application” page 566. You can override the choice on a document basis by turning the menu command: View > Palette Dock > Palette Dock Placement > Attach to Document Left. You can also have your Palette Dock float anywhere you want on your screen(s) by choosing the menu command: View > Palette Dock > Palette Dock Placement > Floating Window.
☞ If the Palette Dock is embedded as a sidebar in a window the palettes of that Dock affect only the window to which it is attached. You might close the Dock for a particular window in which you are working and still see the palettes of another window immediately behind it. Clicking a control in one of those palettes, thinking that it will modify something in the document you’re working on will only activate that other document and bring it to the front. A floating Palette Dock and “free floating” palettes on the other hand control whatever window is active.
The palettes are designed to give you an uncluttered working environment, while, at the same time giving you quick access to information about your document and the tools to manipulate it.
☞ The Palette Dock is not available in Full Screen view though individual palettes removed from the Palette Dock are.
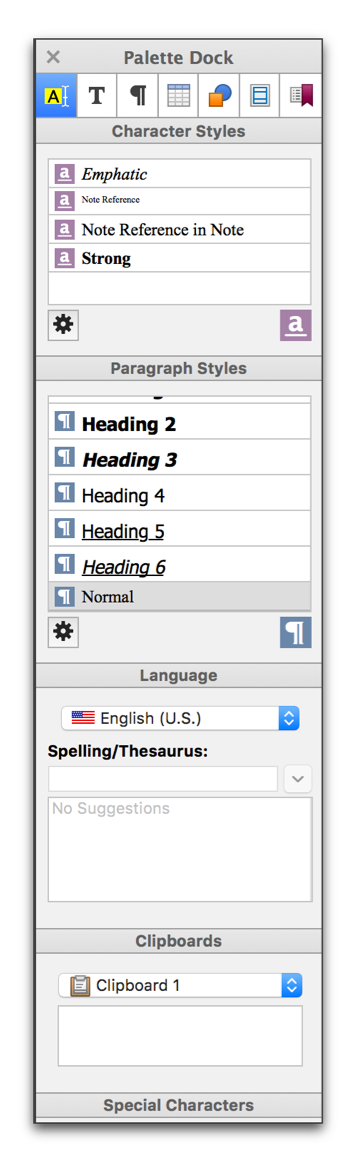
The Nisus Writer Pro Palette Dock holds a number of palettes to ease the manipulation of your document and its text.
The “…” (Ellipsis, or Options menu) on the right edge of the Palette Dock’s title bar offers commands that control the way the Palette Dock functions. You can:
• Customize Palette Dock…
Customizing the Palette Dock is explained in detail in the section: “Customize the Dock and its Palettes” beginning on page 622.
• Determine Palette Dock Placement, either as a
▪︎ Choose whether or not the Palette Dock Resizes Automatically, to be tall enough to show all palettes in the current palette group, ie: the total height of all visible palettes. It is, of course, limited by the available screen size.
▪︎ Show Floating Palettes
If you have any palettes floating that outside the Palette Dock, this turns them all on/off with one command.
▪︎ Floating Palettes
Offers quick access to the entire list of palettes. Those that are currently floating appear checked in the menu. Choosing those, closes them.
Palettes are grouped according to task. You can switch among the various groups using the seven buttons at the top of the Palette Dock. You can rearrange the layout of the palettes by dragging them around within the Palette Dock. You can drag any or all palettes out of the Palette Dock creating floating palettes that you can place anywhere you like on your screen(s). When you close a floating palette it returns to its original location in the Palette Dock.
► Choose:
▷ the menu command: View > Palettes > Show Palettes, or
▷ click the Palettes button on the Toolbar, or
▷ click the “Close Button” designated as an “x” on the left edge of the Palette Dock’s title bar.
Open/close a palette in the Palette Dock
► Click the “Reveal” triangle on the left edge of the palette’s title.
Move a palette in the Palette Dock
► Grab the palette’s title and move it above or below its current location or out onto the desktop.
Delete a palette from the Palette Dock
► Click the “…” (Ellipsis, or Options menu) on the right edge of the palette’s title and choose Remove Palette… from the menu that appears. An alert appears asking “Are your sure you want to remove this palette?” The action cannot be undone, but you can replace any removed palettes using the menu command: View > Palettes > Customize Palette Dock….
Customizing the Palette Dock is explained in detail in the section: “Customize the Dock and its Palettes” beginning on page 622.
Return a floating palette to the Palette Dock
► Click the x “close” button on the left edge of the palette’s title bar.
Display a different group of palettes
► Click the palette group you want from the display at the top of the Palette Dock.
☞ You can modify the palettes and their groups to your heart’s delight. See “Customize the Dock and its Palettes” on page 622 for a thorough explanation.
.png)
Figure 25
The Nisus Writer Pro Palette Dock palette group selection buttons.
When the mouse cursor hovers over the title bar you will see the ellipsis options button.
The palette group buttons are, from left to right
• Writing
• Formatting
• Paragraph
• Tables
• Shapes
• Sections
Using the Palette Dock and its palettes
The Nisus Writer Pro Palette Dock’s palettes offer point and click access to tools.
Each palette has two states:
• When the pointer hovers over a palette
• When the pointer does not hover over a palette
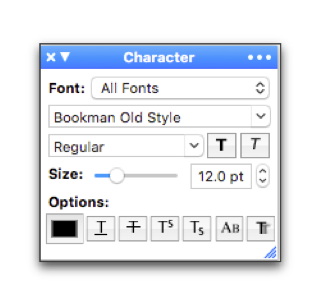
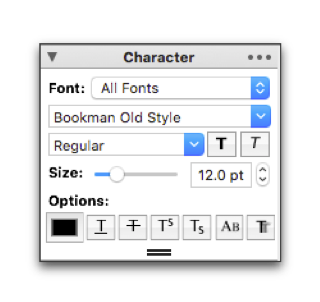
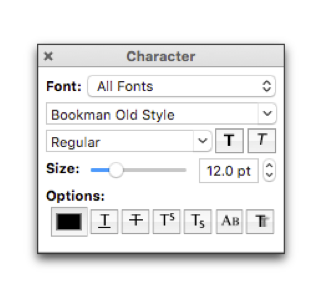
Figure 26
Three states of a palette (from left to right): floating with the pointer (not shown) hovering, not hovering, and in the Palette Dock (hovering)
When your pointer hovers over a palette’s title bar
• Its title bar inverts so that
◦ the bar is blue and the title is white,
◦ a “reveal” triangle appears near the left edge,
◦ an “…” (Ellipsis, or Options menu) appears along the right edge.
When the pointer hovers over the Ellipsis, or Options menu, the ellipsis itself inverts indicating that a menu is available.
Each palette has different commands in this menu. However, each has the commands:
◦ If the palette is in the Dock:
◦ If the palette is floating outside the Dock:
◦ A resize grabber appears in the lower right corner if the palette is floating, at the bottom if it is in the Dock.

Figure 27
The palette resize grabbers when in the dock (left” “drag bar”) and floating (right: “enlarge corner”)
When you start Nisus Writer Pro, the Palette Dock appears with the Writing group of palettes visible.
• Writing
◦ Character Styles
enables you to change the font, size, options and color of the characters of your text using Styles;
◦ Paragraph Styles
enables you to change the font, size, options and color line wrap area, line spacing, borders and more of the paragraphs of your text using Styles;
◦ Language
checks spelling and definitions of words you use with the built-in dictionary and the Nisus Thesaurus, and change the language in which you write (with all its associated dictionaries and keyboard input methods);
◦ Clipboards
gives you quick access to the Clipboards, showing the contents of the current Clipboard, enabling you to switch to a different Clipboard, and (by double-clicking) open the current clipboard where you can edit the contents.
◦ Special Characters
gives you quick access to various sets of characters that are not easily accessible from the keyboard. One click on a character in the palette enters it into the text at the insertion point.
Change the of palettes in the Palette Dock
You can rearrange the palettes that appear in any particular group. You can have a palette appear in multiple groups, thereby making those tools available in more contexts.
All the groups and their “default” palettes available include:
• Writing
◦ Character Styles
◦ Paragraph Styles
◦ Language
◦ Clipboards
◦ Special Characters
• Formatting
◦ Character
◦ Formatting Examiner
• Paragraph
◦ Paragraph
◦ Lists
◦ Paragraph Borders
◦ Paragraph Shading
• Tables
◦ Table
◦ Table Cells
◦ Table Cell Borders
◦ Table Cell Shading
• Shapes
◦ Shapes
◦ Shape Wrap
◦ Shape Stroke
◦ Shape Fill
◦ Shape Shadow
◦ Shape Metrics
• Sections
◦ Section (#)
◦ Margins
◦ Columns
◦ Headers/Footers
◦ Line Numbers
• Reference Tools
◦ Table of Contents
◦ Indexing
◦ Bookmarks
Other palettes that are not part of groups include
• Statistics
You can display these at any time by choosing them from the menu Window > Palettes > Floating Palettes or View > Palettes > Floating Palettes. You can also add these to existing palette groups… or create a special group with the palettes of your choosing.
☞ The Headers and Footers palette the Tables palette group and the Shapes palette group appear automatically whenever you click your insertion point in a header/footer, click your insertion point in a table, or select an image in your document respectively (unless you have added the palette to a set in the Palette Dock… in which case that group displays if the Palette Dock is open).
The following describes some of the generalities in using palettes to alter your document. Specific capabilities are discussed in greater detail in other sections like “Format Text”.
Palettes inspect your selection
Nearly all palettes show you information about the current selection. Usually that means the text you’ve selected in your document. However you may also see information regarding the selection’s enclosing context. For example, the Margins palette shows you information about the document section containing the current selection.
Sometimes your selection may contain non-uniform, or mixed, values. For example, consider a selection including text that uses both 12 point and 15 point font sizes; Nisus Writer cannot show you both values at once. The mixed state is instead indicated in palette controls using diagonal stripes.
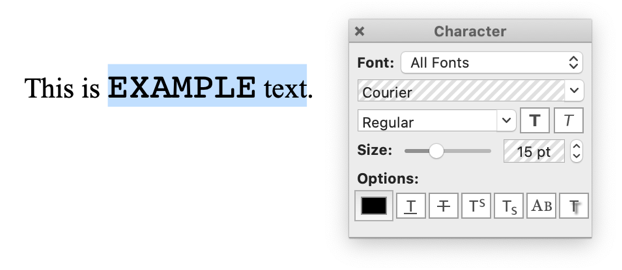
Figure 28 A text selection with mixed fonts and mixed font sizes.
You can adjust the color of these mixed values stripes, or hide it entirely if you find it confusing, in the Appearance preferences using the “Palette mixed selection” setting.
To correct non-uniform formatting and enforce a consistent value you will need to apply a new value to the mixed selection. If you don’t want to enter a new value and instead just want to enforce the current value consistently you can press special keys during text entry, or hold the Command ⌘ key when clicking stepper arrows.
The majority of interface elements you’ll see in the palettes are standard buttons, menus, and other controls that should feel familiar to users of macOS. However some types of controls have refinements that expert users may appreciate.
In text fields where keyboard entry is available, a newly typed value takes effect once the focus changes. Usually this is accomplished by clicking back into the main document text. However, you can also enact a new value via the keyboard using the following keys:
|
Palette Text Entry Confirmation Keys |
||
|
Key Press |
Apply Value? |
Change in Focus |
|
Only if the new value differs from the old value |
Move to next control |
|
|
Always enforce value |
Return to document |
|
|
Always enforce value |
No change |
|
Table 2
Result of pressing confirmation keys in Nisus Writer palettes
As you can see from the table above the Enter ⌤ and Return ⏎ keys always apply the value currently shown in the text field. In this way they are useful both to confirm a change in value, but also to clear mixed values and consistently enforce a current value.
☞ On keyboards lacking the Enter ⌤ key you can usually augment the Return ⏎ key’s capability by holding down the Function (fn) key. This produces the effect of the Enter ⌤ key.
Several palette controls include “stepper” arrow buttons alongside the controls that display the current value.

Figure 29
Stepper arrows to the right of the font size field.
As you’d expect the up arrow increases the current value, while the down arrow decrease it.
For selections with mixed values each value is adjusted separately. For example, consider a selection that contains text using both 10 point and 14 point font sizes. Clicking the up stepper arrow once will result in text using 11 point and 15 point font sizes.
When you click an up or down stepper arrow you can adjust its behavior by holding down one of the following modifier keys:
|
Stepper Arrow Modifier Keys |
|
|
Key |
Effect |
|
Change values by a larger amount (eg: 5 points) |
|
|
Change values by a smaller amount (eg: 0.1 points) |
|
|
Clear mixed values and consistently enforce the new value |
|
Character and Paragraph palettes
The Character palette, illustrated in Figure 84, Figure 85 and Figure 86 on page 104, indicates the font family, typeface, options, color and size of selected text. It also presents the tools to modify each of those formats.
1. Select the text you wish to change.
2. Choose the set of fonts you want from the Font pop-up menu in the Character palette. This is usually set to display All Fonts, but you can narrow this down using one of the other sets.
3. Click the arrow to the right of the font family display and choose the font you want from the menu that appears.
If you have many fonts available, a scroll bar appears. You can drag this scroll bar to display additional fonts.
Scroll through a longer list of fonts
► Drag the resize tab at the bottom of the Character palette down to display a longer list of available fonts.
If you know the name of the font you want, you can click and select the font name in the Family display and type the first few characters. Nisus Writer Pro uses “auto-fill” to sense which font you want, displaying the closest match (in alphabetical order). When you see the font you want, press ⏎ to confirm your choice.
☞ To learn more about using fonts (how to install them, where they belong in your System, etc.) see pages 684 and (for non-Roman text) 40.
If you want to change the typeface and/or size, you can press ⇥ to confirm and select the next field in the palette.
1. Select the text you wish to change.
2. Click the arrow to the right of the Font face display (beneath the Font Family pop-up menu) and choose the typeface you want from the menu that appears.
Not all fonts have all typefaces (for example Geneva does not support “italic”). In that case, Nisus Writer Pro can achieve this effect if you click one or more of the Options buttons available.
If you know the name of the typeface you want, you can click and select the typeface name in the display and then type the first few characters. Nisus Writer Pro uses “auto-fill” to sense which typeface you want, displaying the closest match (in alphabetical order). When you see the typeface you want, press ⏎ or to confirm your choice.
The options available include (the first two buttons are beside the Font face pop-up menu.
The last two buttons available expand the palette to display more options when clicked.
◦ Letter Case
displays a pop-up menu offering
◦ Shadow
displays a variety of controls offering
▪︎ the color and percent (opacity) of the shadow
▪︎ the amount of blur of the shadow (in points, from none [hard edge] to very [soft edge])
▪︎ the distance of the shadow from the original text
▪︎ source of the “light” causing the shadow (in points).
Color is an aspect of Options. Click the Color Picker to open the System’s Colors panel.
If you want to move on to change the size of your characters, you can press ⇥ to confirm and select the next field in the palette.
1. Select the text you wish to change.
2. Click and drag the Size slider to the size you want.
The Size box updates to display the actual size of the characters.
If you know the size you want, you can click and select (or double-click) the size display and type the size you want. Nisus Writer Pro uses only whole number sizes. When you are satisfied, press ⏎ or ⇥ to confirm your choice.
While the slider ranges from 6 pt. to 32 pt., you can enter any size you like in the size display text box, or increase the size by one point at a time using the “stepper” as illustrated in Figure 30.
☞ Press ⌘ when you click the palette stepper’s up or down arrow to apply the shown value uniformly to all selected text, instead of adjusting all selected values independently.
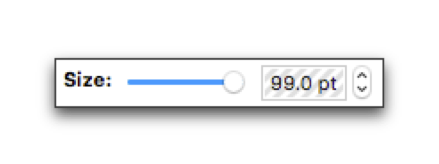
Figure 30
The “stepper” in the Size portion of the Character palette; shading in the text box indicates that text with more than one size is selected.
The Paragraph palette, illustrated in Figure 106 on page 121 enables you to modify the alignment, text direction, the space between lines and paragraphs, the indents (line wrap area) as well as offering controls for grouping your paragraphs. The palette has four sections, each controls a different aspect of your paragraphs. Extensive description regarding how to structure paragraphs begins in the section Format Paragraphs on page 112.
In addition to the usual commands, the “…” (Ellipsis, or Options menu) on the right edge of the palette’s title bar shows an Always Show Options submenu. These correspond to the three portions of the palette with “reveal” options.
While the alignment and text direction portion consists solely of clickable button controls, the remaining three have “reveal triangles” that display more controls.
The flow of your text’s placement relative to a page’s or column’s vertical edges (or similar situation, such as a table cell, or tab is called alignment. There are four kinds of alignment: left, center, right, and justified. Most contemporary writing systems flow text as if it rests on, or is suspended from an invisible horizontal line between these edges. Some writing systems flow text from right to left, while others have text flow in the opposite direction. Some ancient text even have text that flows back and forth across the writing surface (Nisus Writer Pro does not support this kind of writing).
Many East Asian writing systems, on the other hand are written vertically. The alignment and direction portions of the Paragraph palette are designed for horizontal writing systems. Vertical writing requires table or shapes tools of Nisus Writer Pro and is described in the section: “Use Text Boxes to write vertical East Asian text” beginning on page 229.
1. Select the text you wish to change.
2. Click the alignment button that illustrates the effect you want in your document.
Possible alignments are (from left to right) left justified, center justified, right justified and full justified.
Change the direction text flows (for right to left languages)
1. Select the text you wish to change.
2. Click the direction button that illustrates the effect you want in your document.
☞ Text direction is a function of the language selected. Each language has a “natural” or “normal” direction of its own. The first characters in a particular paragraph set the direction of that paragraph. You can override this direction of a paragraph within a section of text designated as being in a particular language (and flowing in a particular direction) by using this control.
Possible directions are (from left to right)
• left to right
• normal
• right to left.
Certain characters have ambiguous or indeterminate “directionality”. These include numerals and punctuation marks. Using these characters in mixed bidirectional text can create complications. For more information on right to left text editing see: “Enter right to left text” on page 44.
Spacing refers to the distance between the baselines of lines of text. Originally called “leading” (pronounced “ledding”), the word comes from when thin strips of lead were inserted into the forms to increase the vertical distance between lines of lead type.
Change the space between lines of text (“leading”)
Make sure the reveal triangle to the left of Spacing points down to show its options.
1. Select the text (lines or paragraphs) you wish to change.
2. Determine whether you want the lines of your paragraph to spread based on the height of the tallest character or maintain a precise distance between them.
Your lines can have either a Fixed Line Height or a fluid Line Spacing. Each of these refers to the vertical distance between the top of one line and the top of the following line.
a. To prevent the lines of paragraphs from spreading, regardless of the height of the characters, choose Fixed Line Height from the Spacing pop-up menu.
b. To permit the lines of paragraphs to spread based on the height of that line’s tallest character, choose Line Spacing from the Spacing pop-up menu.
3. Click the “stepper” to the space you want.
The Size box updates to display the actual size of the space.
If you know the size you want, you can click and select (or double-click) the size display and type the size you want. When you are satisfied, press ⏎ or ⇥ to confirm your choice.
☞ Press ⌘ when you click a palette stepper’s up or down arrow to apply the shown value uniformly to all selected text, instead of adjusting all selected values independently.
Change the amount of space that appears above (before) a paragraph
Make sure the reveal triangle to the left of Spacing points down to show its options.
1. Select the text (lines or paragraphs) you wish to change.
2. Click the “stepper” to the right of Space Before ¶ till you arrive at the space you want.
The Size box updates to display the actual size of the space.
If you know the size you want, you can click and select (or double-click) the size display and type the size you want. When you are satisfied, press ⏎ or ⇥ to confirm your choice.
☞ Press ⌘ when you click a palette stepper’s up or down arrow to apply the shown value uniformly to all selected text, instead of adjusting all selected values independently.
Change the amount of space that appears below (after) a paragraph
Make sure the reveal triangle to the left of Spacing points down to show its options.
1. Select the text (lines or paragraphs) you wish to change.
2. Click the “stepper” to the right of Space After ¶ till you arrive at the space you want.
The Size box updates to display the actual size of the space.
If you know the size you want, click and select (or double-click) the size display and type the size. When you are satisfied, press ⏎ or ⇥ to confirm your choice.
☞ Press ⌘ when you click a palette stepper’s up or down arrow to apply the shown value uniformly to all selected text, instead of adjusting all selected values independently.
An indent is usually an empty space that appears at the beginning of a line that indicates the start of a new paragraph. However, some indents display the inverse, and others indent the entire paragraph.
• A first-line indentation indents the first line.
• A hanging indent leaves the first line close to the margin and indents the rest.
• A block indent sets the entire block of text in from both margins.
The way in which you set the indents on the ruler determine how the lines of text will wrap. Therefore, the entire area within the indents is called the line wrap area.
Set the indents (line wrap area)
Make sure the reveal triangle to the left of Indents points down to show its options.
1. Select the text (lines or paragraphs) you wish to change.
2. Click the various “steppers” to the settings you want.
The controls available are:
☞ Press ⌘ when you click a palette stepper’s up or down arrow to apply the shown value uniformly to all selected text, instead of adjusting all selected values independently.
The last portion of the Paragraph palette holds controls that deal with the way paragraphs and their lines group.
Control for widows and orphans
Make sure the reveal triangle to the left of Grouping points down to show its options.
1. Click your insertion point in the paragraph (or select a range of paragraphs).
2. Click Prevent widow/orphan.
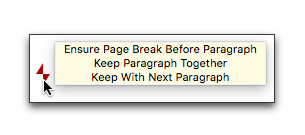
Figure 31
The Paragraph Grouping invisible character
The remaining three check boxes deal explicitly with whether or not selected paragraphs split across pages. When you turn on any one, or more, of these and have Show Invisibles turned on (as explained on page 589), a little icon appears in the left margin beside the relevant paragraph(s). When you hover your pointer over the icon a help tag appears indicating which options apply as illustrated in Figure 31.
Prevent a paragraph (or paragraphs) from splitting across pages or columns
Make sure the reveal triangle to the left of Grouping points down to show its options.
1. Click your insertion point in the paragraph (or select a range of paragraphs).
Keep one paragraph with the one that follows it
Make sure the reveal triangle to the left of Grouping points down to show its options.
1. Click your insertion point in the paragraph.
Make sure the reveal triangle to the left of Grouping points down to show its options.
1. Click your insertion point in the paragraph.
Two options appear with a pop-up menu before them. The default is for the checkbox to be unchecked. Choosing one or the other of the two options automatically checks the box and turns on that option.
2. Either
a. Click (turn on) the option shown or
b. Choose:
Nisus Writer Pro will always add a break no matter what, regardless of what comes before the selected paragraph. Even if there's a manual break character (Unicode: U+000C), a break will be added, resulting in two breaks.
or
Nisus Writer Pro will make sure (i.e. “ensure”) a page break exists before the paragraph. It will first check if there is a manually inserted break, and if so just let it stand. If no break character exists, then a break will be forced. No actual page break character (Unicode: U+000C) is inserted in the text.
☞ The other tool palettes will be described as they are needed for the specific tasks they control. In alphabetical order (the way they appear in the menu Window > Palettes > Floating Palettes or View > Palettes > Floating Palettes ) they are:
A list of all the palettes in Nisus Writer and where you can learn more about them follows, in alphabetical order.
The Bookmarks palette is described in detail beginning on page 306.
The Clipboards palette is described in the context of using the Clipboards beginning on page 57.
The Columns palette is described on page 175.
The Formatting Examiner palette
The Formatting Examiner palette is introduced beginning on page 101.
The Headers and Footers palette
The Headers and Footers palette is described beginning on page 181.
The Indexing palette is described on page 343.
The Language palette is described on pages 43 through 48 and 384 through 391.
The Line Numbers palette is described beginning on page 411.
The Lists palette is described on page 60.
The Margins palette is described on page 172.
The Page Borders palette is described on page 177.
The Page Zoom palette is described on page 373.
The Paragraph Borders palette is described on page 435.
The Paragraph Shading palette is described on page 437.
The Section palette is described on pages 174, 189 and 256.
The Shape Fill palette is described on page 242.
The Shape Metrics palette is described on page 244.
The Shape Shadow palette is described on page 243.
The Shape Stroke palette is described on page 235.
The Shape Wrap palette is described on pages 197, and 209 through 221.
The Shapes palette is described on page 224.
The Special Characters palette
The Special Characters palette is described on page 36.
The Statistics palette is described on page 400.
The Styles palette is described on page 137.
The Table palette is described on pages 268 through 272.
The Table Cell Borders palette
The Table Cell Borders palette is described on pages 288 through 292.
The Table Cell Shading palette
The Table Cell Shading palette is described on pages 292 through 295.
The Table Cells palette is described on pages 271, 272 and 287.
Table of Contents palette is described on page 321.
| Previous Chapter “The Grand Tour” |
<< index >> |
Next Chapter Create Documents |