You can have your lines numbered throughout your document or restart at the beginning of every page or every section of the document. The commands of the Line Numbers submenu are each exclusive of one another. Line numbers are “meaningful” and, therefore, display only in Page View. As there are no “hard” lines in Draft View and Full Screen View, line numbers do not display there. You can, however, display paragraph numbers in Draft View.
Line numbers do not display in footnotes, endnotes, headers or footers.
You can accomplish all the following five tasks (displaying or preventing the display of line numbers) by using the Line Numbers palette or the commands of the menu View > Line Numbers. Because the Line Numbers palette is not always visible, the instructions refer to the commands in the menus.
Because numbering lines is more common than numbering paragraphs, the following instructions deal with numbering lines. Nonetheless, the same procedures apply to numbering paragraphs. Remember that the relevant commands to begin and restart paragraph numbering are Show Paragraph Numbers This Section and Restart Paragraph Numbers This Section.
☞ You can cross-reference to line and paragraph numbers as explained in the section “About Cross-References”.
Number lines continuously throughout the entire document
► Choose the menu command: View > Line Numbering > Restart This Section.
If you have more than one section in the document you will need to put your insertion point in each section and:
▷ Choose the menu command: Insert > Line Numbering > Continue From Previous Section for each succeeding section of the document.
Number lines for particular sections
1. Select some text in those sections you want to show line numbers.
2. Choose the menu command: View > Line Numbering > Restart This Section.
Or, if you have a long document and you want to display line numbers for particular sections as you come to them:
► Place your insertion point in any particular section in which you want to display line numbers and choose the menu command: View > Line Numbers > Restart This Section.
Number lines so that they continue from the previous section
► Choose the menu command: View > Line Numbers > Continue From Previous Section.
If the immediately preceding section does not display numbers the numbers begin again at the number designated in the Line Numbers palette.
Number lines so that they restart numbering on each page
► Place your insertion point in any particular section in which you want to display line numbers and choose the menu command: View > Line Numbers > Restart Every Page.
Prevent line numbers from displaying
► Place your insertion point in any particular section in which you want to prevent line numbers from displaying and choose the menu command: View > Line Numbers > Not Shown This Section.
Change the way in which line numbers display
You can determine a variety of aspects of how the line numbers display in your document. While the previous tasks can be accomplished by using the menus or the Line Numbers palette, the following require the Line Numbers palette.
Display the Line Numbers palette
► Choose the menu command: View > Line Numbering > Line Numbers Palette.
Or:
► Choose the menu command: Window > Palettes > Floating Palettes > Line Numbers.
Or:
► Click the Section group button at the top of the Palette Dock where the Line Numbers palette appears at the bottom.
Those aspects of line numbers that can be controlled exclusively by the Line Numbers palette include:
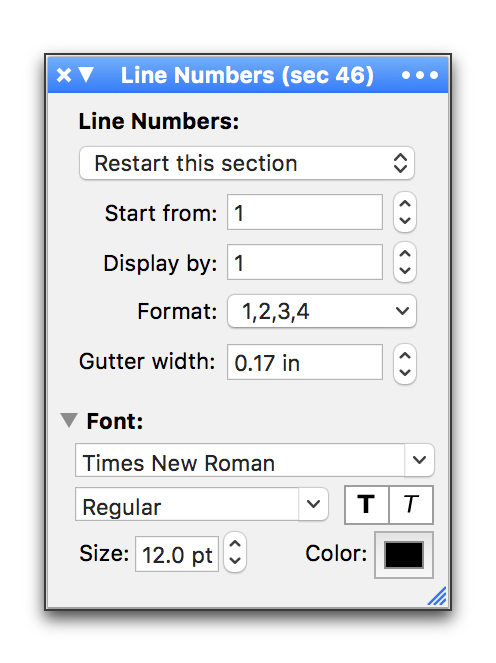
Figure 359
The Line Numbers palette
• the number at which they start (Start from);
• whether each line has a number, or only specific lines at regular determined intervals display (any number will work; Display by);
• the Format of the numbers (Arabic, Roman, Kanji, etc.);
• the space between your text and the numbers (Gutter width);
• the Font/face/size/color, etc.
☞ The “…” (Ellipsis, or Options menu) on the right edge of the palette’s title bar has a command that enables the Font portion of the palette to always display.
Set the starting number of line numbers
1. Place your insertion point in a section with line numbers.
2. Type the number from which you want to have the line numbers begin counting in the Start from text edit box in the Line Numbers palette (or click the “stepper” till you arrive at the number you want).
The default is set to 1.
Determine the interval at which the line numbers display
1. Place your insertion point in a section with line numbers.
2. Type the number of the interval you want to have line numbers display in the Display by text edit box in the Line Numbers palette (or click the “stepper” till you arrive at the desired number).
The default is set to 1.
Determine the format of the numbers displayed
1. Place your insertion point in a section with line numbers.
2. Choose the format you want from the Format pop-up menu in the Line Numbers palette as shown in “Automatic numbering formats”.
The default is set to Arabic numerals (1,2,3,4).
Determine the size of the gutter, (the space between the numbers in the margin and your text)
1. Place your insertion point in a section with line numbers.
2. Type the number of the measurement you want to have the line numbers display in the Gutter width text edit box in the Line Numbers palette (or click the “stepper” till you arrive at the number you want).
The default is set to .17".
☞ Press ⌘ when you click a palette stepper’s up or down arrow to apply the shown value uniformly to all selected text, instead of adjusting all selected values independently.
Determine the font/face/size/color, etc. of the numbers displayed
1. Place your insertion point in a section with line numbers.
2. Make your choices using the Font section of the Line Numbers palette the same way in which you use the Character palette as explained beginning in the section “Change the font of text” on page 103 (though only bold and italic are available for your line numbers).
☞ Nisus Writer Pro numbers each line of all the columns of a section. If the gutter between the columns is too narrow to display the numbers, be aware that any following numbers are added to the total and may not display correctly as illustrated in Figure 360, then corrected in Figure 361.
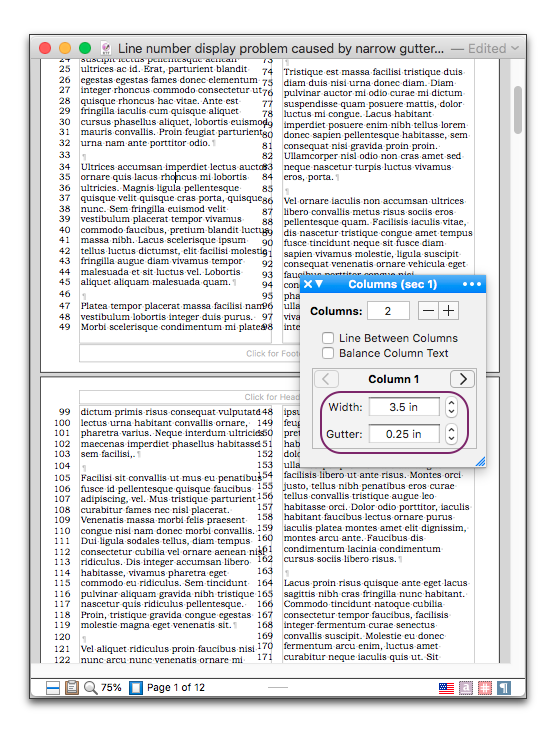
Figure 360
Line number display problem caused by narrow gutter
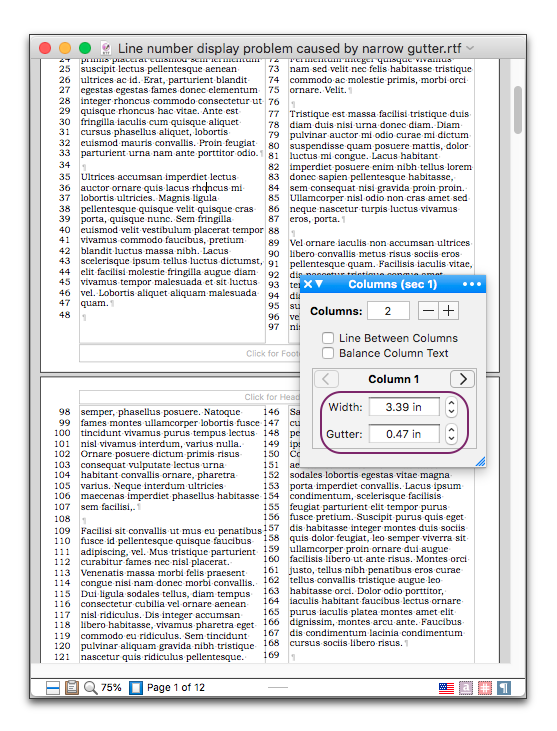
Figure 361
Line number display problem caused by narrow gutter, corrected
Number lines for legal documents (“Pleading Pages” or “Pleading Paper”)
Many lawyers require a vertical line that runs down the page between the line numbers and document body. According to <http://www.courts.ca.gov/cms/rules/index.cfm?title=two&linkid=rule2_108> Rule 2.108 (amended effective January 1, 2016; adopted effective January 1, 2007 ):
Line numbers must be placed at the left margin and separated from the text by a vertical column of space at least 1/5 inch wide or a single or double vertical line. Each line number must be aligned with a line of type, or the line numbers must be evenly spaced vertically on the page. Line numbers must be consecutively numbered, beginning with the number 1 on each page. There must be at least three line numbers for every vertical inch on the page.
Note that there are two options:
• Each line number must be aligned with a line of type.
• The line numbers must be evenly spaced vertically on the page.
Nisus Writer Pro supports each of these options using very slightly different settings as explained and illustrated below.
Set up your “Pleading Page” or “Pleading Paper”
To configure a pleading page you need to add borders and line numbers to the relevant document sections. There are two ways to do this:
• Use the option “Show pleading page this section”.
Line numbers must be evenly spaced vertically on the page the Line Numbers palette is set to Show pleading page this section.
• Manually configure borders and line numbering.
Each line number must be aligned with a line of type the Line Numbers palette is set to Restart every page.
The first method automatically shows a line along one edge of your page, and ensures that the numbers 1-26 always appear. The drawback is that the line numbers may not be aligned with your lines of document text, or that each page could have more or less than 26 lines of text.
The second method requires that you configure both the border and numbering manually. To add a line along the edge of your page use the Page Borders palette, explained in the section: “Use the Page Borders palette to put a line around the edge of your page” beginning on page 177, along with the Line Numbers and Paragraph palettes to prepare your document as illustrated in Figure 362 on page 418 and Figure 363 on page 419. If your pleading page requires the numbers 1-26 exactly then you need to choose fonts and spacing that exactly produce 26 lines of text on each page.
You can save either file as a “.dot” file (explained in “Understanding Template (Stationery) Documents” on page 586) so that it is always available to give you a fresh page of stationery.
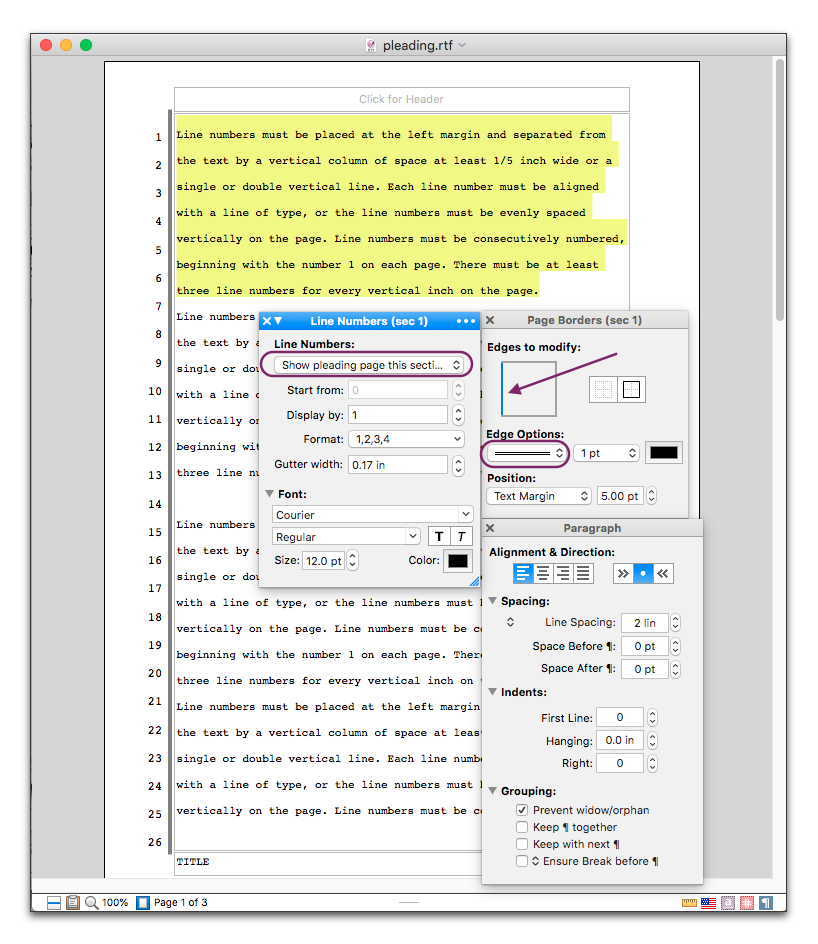
Figure 362
A “Pleading Page” or “Pleading Paper” document with line numbers be evenly spaced vertically
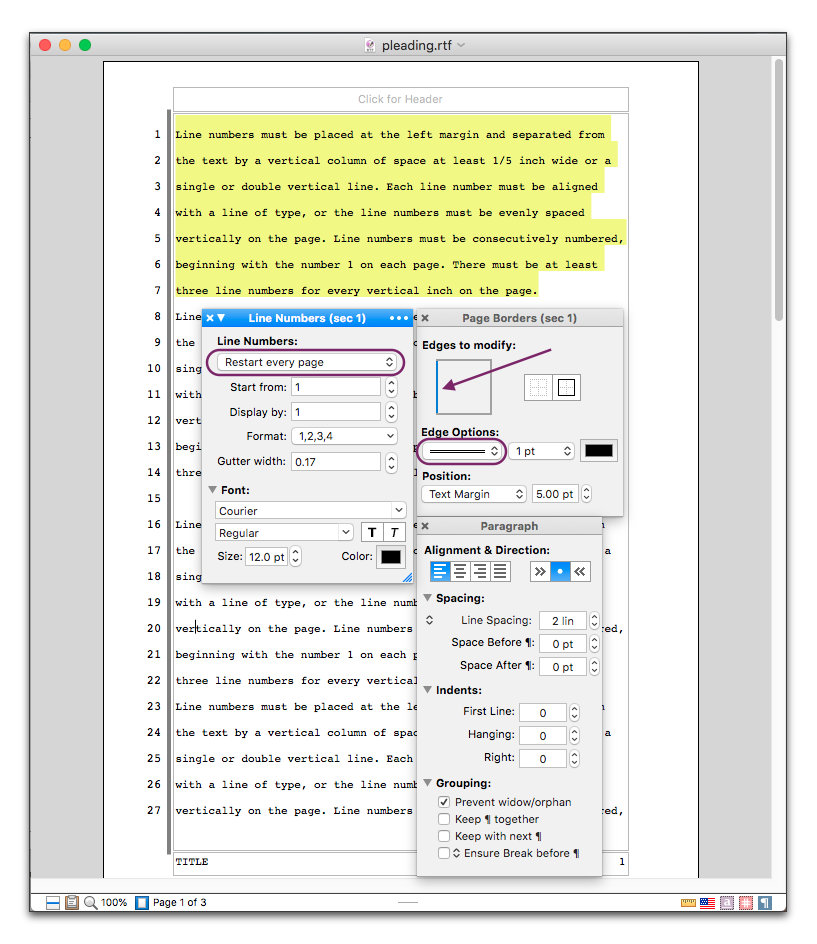
Figure 363
A “Pleading Page” or “Pleading Paper” document with each line number aligned with a line of type
| Previous Chapter Line Numbers |
<< index >> |
Next Chapter Paginate, Sort and More |