.png)
Bookmarks and Cross-references
Use bookmarks in your document as you would use a bookmark for quick access to a specific page in a book or a location on the World Wide Web.
You can also use bookmarks to insert “See also” cross-references in your document which Nisus Writer Pro keeps current for you.
The Bookmarks and Cross-references interface
Nisus Writer Pro offers a number of ways to work with your bookmarks and cross-references.
• The Insert menu has the Bookmarks and Cross-references submenus. These are described in the Appendix beginning on page 673 as well as in the sections “About Cross-References”.
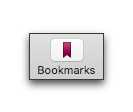
• A Bookmarks button on the Toolbar with an accompanying menu that offers point-and-click quick access to most of the commands of the Bookmarks and Cross-references submenus, illustrated in Figure 273.
Figure 273
The Bookmarks button on the Toolbar
The button has two states. The menu commands differ with each state:
◦ when there is no selection or plain text is selected (on the left)
▪︎ Show Bookmarks in Navigator
◦ when bookmarked text, a cross-reference is selected, or the selection is immediately to the right or left of such text (on the right)
▪︎ bookmarked text selected:
▫︎ Show Cross-References in New Window
▫︎ Show Bookmarks in Navigator
▪︎ cross-reference text selected:
• A Bookmarks palette illustrated in Figure 274 which also offers quick access to most of the commands of the Bookmarks and Cross-references submenus.
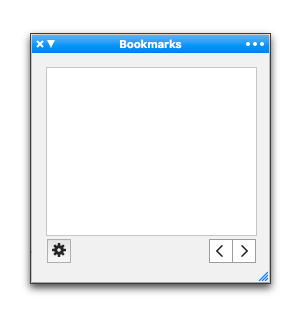
Figure 274
The Bookmarks palette with no bookmarks selected
• Contextual menus, depending on whether you select bookmarked or cross-referenced text similar to those of the Bookmarks button on the Toolbar.
• You can display all the bookmarks in your document in the Navigator sidebar (either in alphabetical order or in the sequence in which they appear in the document. A + and a - in the lower left corner enable you to add or remove bookmark(s) to/from selected text.
The following instructions begin by explaining the basics using the menu commands, though most of these commands are also available from the other tools described above.
1. Select the text you want to mark.
2. Choose the menu command Insert > Bookmarks > Add Bookmark.
This will add an automatically named bookmark to the selected text. Nisus Writer Pro will use the selected text as the bookmark’s name. This name will be continually and automatically updated if the marked text is edited in the future.
There are several ways to add automatically named bookmarks to the selection:
▷ from the main menu Insert > Bookmarks > Add Bookmark.
▷ from the Bookmarks button on the Toolbar,
▷ from the Gear menu in the lower left corner of the Bookmarks palette,
▷ the + in the lower left corner of the Navigator sidebar when it’s in bookmarks mode.
The names of automatically named bookmarks are shown in Nisus Writer Pro with a special suffix, so you can recognize them. You can customize this suffix by editing the “Automatically named bookmark suffix” option in the Appearance Preferences.
Add an explicitly named bookmark
Explicitly named bookmarks have a fixed name of your choosing. The names of these bookmarks do not update as their marked text is edited. A name uniquely identifies the bookmark in your document, though you can change it later as described below.
1. Select the text you want to mark.
2. Choose the menu command Insert > Bookmarks > Add Bookmark As…
This command is also available via other methods as explained above.

Figure 275
The Add Bookmark As sheet
You can type or paste copied text into the Bookmark Name box.
☞ While you can edit the bookmarked text of either, Add Bookmark and Add Bookmark As… bookmarks differ in one significant way.
◦ The “name” of an “automatic bookmark” (what appears in the list of bookmarks in the Navigator and in the Cross Reference dialog) changes as you edit it.
◦ The “name” of a “bookmark as bookmark” (what appears in the list of bookmarks in the Navigator and in the Cross Reference dialog) does not change.
The text each of them represents in any cross-reference where it appears in the document changes as you type.
Edit an explicitly named bookmark
1. Select any part of the bookmarked text.
2. Choose Rename Bookmark… from any of the options listed in [Paragraph has no list item.] of the section Add a Bookmark on page 300.
A sheet appears in which you can rename the bookmark.
3. Type the name you want for the bookmark.
◦ If you edit the bookmark name so it matches the name of another bookmark in the document, or
◦ If you edit the bookmark name but then revert it back to the original name so it conflicts with itself, you will see the message in red beneath the Bookmark Name field as illustrated in Figure 276.
☞ Be sure to give the bookmark a unique name, as illustrated in Figure 278.
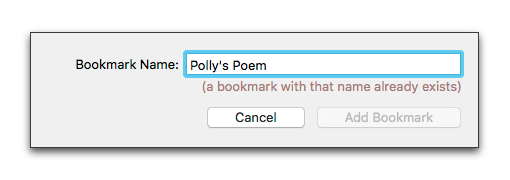
Figure 276
The pre-existing bookmark name message
As soon as you start typing your bookmark’s new (unique) name, the Rename Bookmark button becomes enabled as illustrated in Figure 277.
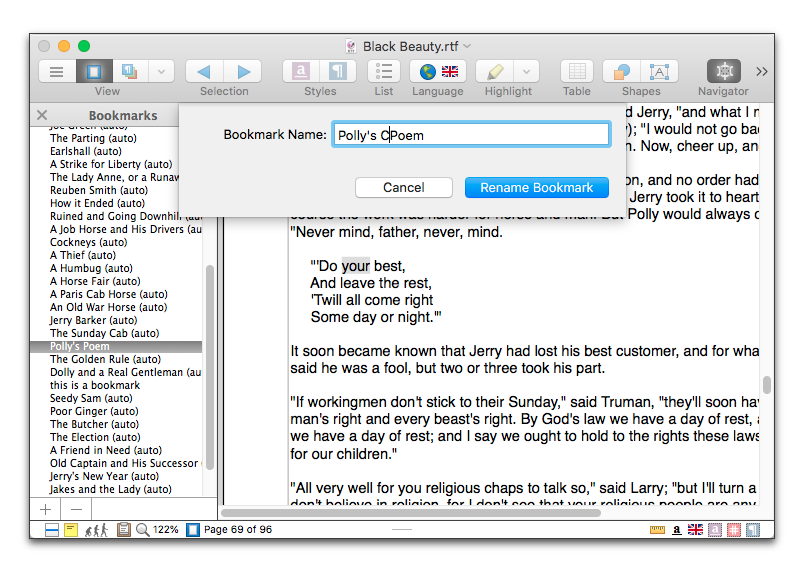
Figure 277
Renaming a bookmark
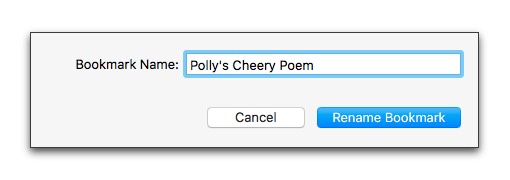
Figure 278
The rename bookmark dialog
Your bookmark appears, renamed in the Navigator window.
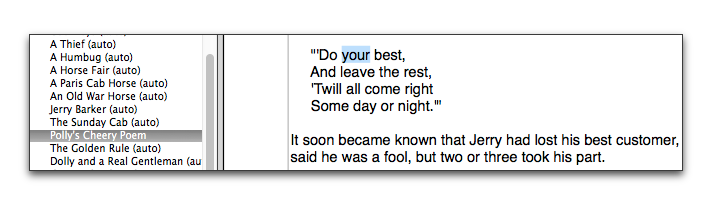
Figure 279
Renamed bookmark in the Navigator
Bookmark many disparate paragraphs simultaneously
You can automatically bookmark multiple disparate paragraphs of your text, all at once. This can be useful if you want to bookmark paragraph headings, or the first few words of every paragraph.
1. Create a multipart selection.
You can learn about creating multipart selections in the sections: “Select text from different places in the document (multipart selection)” on page 51 and “Other methods of creating a multipart selection” on page 52.
2. Choose the menu command: Insert > Bookmarks > Add Bookmark.
Nisus Writer Pro can specially highlight bookmarked text on screen, to distinguish it from regular text during editing. See the setting “Bookmarked” in the Appearance Preferences.
You can see a list of all bookmarks in your document by showing the Navigator sidebar set to bookmarks mode. To do so use any of the following methods:
► Use the menu Insert > Bookmarks > Show Bookmarks in Navigator.
► Use the menu View > Navigator > Show Bookmarks.
► Click the Bookmarks button on the Toolbar and choose contextual menu Show Bookmarks in Navigator.
You can close the Navigator by clicking the “x” on the left edge of the Navigator sidebar’s title bar or choosing the menu command: “…” (Ellipsis, or Options) > Hide Navigator on the upper right edge of the Navigator sidebar. From there you can also choose either:
• Rename Bookmark… (if it is a Bookmark as… bookmark).
You can modify the appearance of the Navigator sidebar.
• By default it appears on the left side of your document. To display Navigator sidebar on the right side of your document:
► Choose (uncheck) the menu command: View > Navigator > Attach on Left Side.
• You can customize the Navigator sidebar font, Navigator background color, and Navigator text color in the Appearance Preferences.
View bookmarks in alphabetical order
► Choose “…” (Ellipsis, or Options menu) > View by Name at the top of the Navigator sidebar.
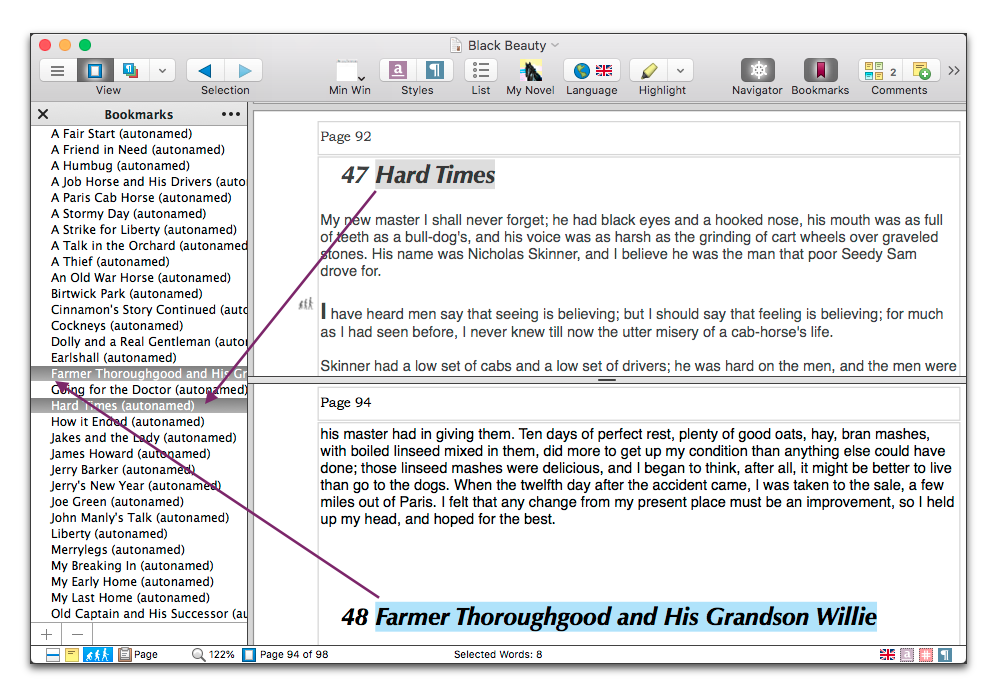
Figure 280
The Navigator sidebar displaying bookmarks by name (in alphabetical order)
View bookmarks according to their location in the document
► Choose “…” (Ellipsis, or Options menu) > View by Location at the top of the Navigator sidebar.
☞ You can jump back and forth to any marker in the footnotes/endnotes and the main portion of your document. You cannot bookmark text in your headers and/or footers.
☞ If you add a bookmark by selecting text and choosing the menu command: Insert > Bookmarks > Add Bookmark and later change the text of the bookmark (as explained above), Nisus Writer Pro automatically updates the name of the bookmark in the Navigator. However, if you add a bookmark using Add Bookmark As… Nisus Writer Pro does not update the name of the bookmark in the Navigator.
Jumping to a bookmark is quick and easy if you have the Navigator sidebar set to bookmark mode; just click the bookmark’s name in the navigator listing.
If you want to jump to a bookmark without using the Navigator, or need to search for a bookmark by name, use the menu Insert > Bookmarks > Go to Bookmark…. A special version of the Go to Content dialog will appear, allowing you to search for a particular bookmark.
The Bookmarks palette can help you work with your bookmarks and cross-references in a number of ways:
• Add bookmarks to text.
• See if the selected text has any applied bookmarks, and rename them (if they are Bookmark as… bookmarks.
• Find any cross-references using the selected bookmark.
• Copy a cross-reference to the selected bookmark as explained in the section: “Copy a new cross-reference”.

Figure 281
Bookmarks and their cross-references listed in the Bookmarks palette
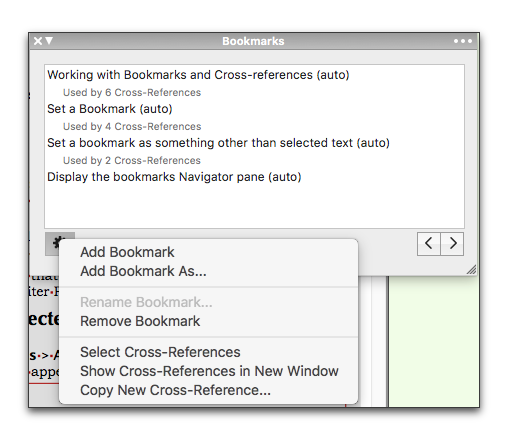
Figure 282
The Gear menu of the Bookmarks palette
1. Select and cut the bookmarked text.
2. Paste the passage in another part of the document.
You can even paste bookmarked text into another document making the marker available in the second document.
1. Select any portion of the bookmarked text
2. Choose the menu command: Insert > Bookmarks > Remove Bookmark.
If you have multiple bookmarks associated with the same string of text, a sheet appears with all bookmarks in the selection highlighted. You can remove them all, or press ⇧ to deselect specific bookmarks you want to retain.
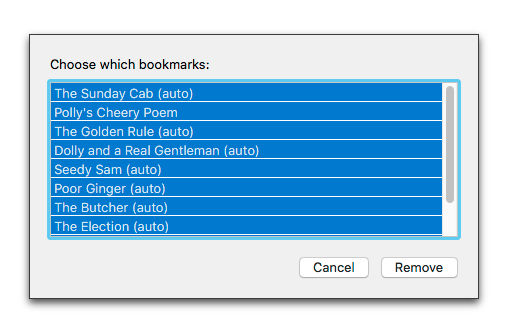
Figure 283
The Remove Multiple Bookmarks sheet
3. Select the bookmark(s) you want to remove (or deselect the one(s) you want to retain).
☞ You can also easily delete a bookmark from selected text when the Navigator sidebar is open and set to Bookmarks.
► click the - in the lower left corner of the Navigator sidebar.
Cross-references are special pieces of information that refer to other content in your document. Cross-references are inserted in your document and behave like other text, but they are automatically created and updated by Nisus Writer Pro.
For example, a cross-reference may display the page number for a particular heading. We say that the cross-reference targets that heading, or that the cross-reference is using that heading as its source. As the targeted heading changes pages, Nisus Writer will automatically update the number displayed by the cross-reference.
ⓘ Cross-references are not always updated immediately as editing occurs. For performance reasons the update may be delayed until later. However, whenever you finally create a printout or PDF of your document, rest assured that Nisus Writer will ensure cross-references display accurate information. For more details and options see the section “Update stale automatic content”.
To insert a new cross-reference into your text:
1. Place the insertion point where you want the cross-reference to appear.
2. Choose the menu command: Insert > Cross-references > Insert Cross-Reference…
→ The cross-reference insertion dialog will appear as in Figure 284 below.
3. Select a target from the list; your cross-reference will display information about this target.
4. Configure display options to control what information will be shown.
→ The generated cross-reference will be inserted into your text.
ⓘ An inserted cross-reference will always behave as an atomic unit in your text, as if it were a single character, for the purposes of selecting and formatting, even if it displays many words.
ⓘ Whenever you insert a cross-reference it will ultimately target a single Bookmark. Internally Nisus Writer Pro always applies a bookmark to the targeted text, no matter what kind of target you selected. Don’t be surprised if you see these bookmarks in The Bookmarks palette and elsewhere. You should not delete or remove these bookmarks, otherwise the cross-reference will break.

Figure 284 The Cross-Reference insertion dialog
The cross-reference insertion dialog provides many options, which will be described in the following sections:
The Insert Reference to pop-up button at the top-left corner of the dialog controls which cross-reference targets are listed and made available for targeting.
Cross-reference targets are content like bookmarks, endnotes, or footnotes. For a full description of the available content types see the section “Go To” destinations; the cross-reference insertion dialog can list all of the same content types. Figure 284 above shows a target list of headings in the TOC (Table of Contents).
The search field in the upper-right corner of the dialog allows you to filter the list of displayed targets. The Sort by buttons allow you to view the list alphabetically, or by their location in your document text.
☞ Sometimes it’s easier to come at this problem from the other end. Instead of trying to find a target in the cross-reference insertion dialog, you can just select the target in your actual document and then copy a cross-reference for pasting elsewhere.
Often a cross-reference displays the target’s page number or original text. However, many types of information are available for automatic display. The following is an exhaustive list of the information a cross-reference can display, as chosen from the Display Text pop-up button:
◦ Page Number
the page number of the target.
◦ Paragraph Number
the paragraph number of the target.
◦ Line Number
the line number of the target.
◦ Section Number
the section number of the target.
◦ List Item Number
the list number used by a paragraph of the target, as governed by the automatic numbering of List styles; you can use this to refer to that list number without mentioning the text itself.
◦ Marked Text
the targeted text itself. For example, the text marked in a particular style.
◦ “Above” or “Below”
display the standalone word “above” or “below” to describe the relative location of the target, as described in the section Append “above” or “below” after number.
The above display options are generally available for all target types. The following display options are only available for particular targets:
◦ Bookmarked Text
This option is only available for bookmark targets. It displays the text to which the bookmark is applied.
◦ Paragraph Text
This option is only available for list item targets. It displays the text of the paragraph, but without its list item number.
◦ Note Number
This option is only available for footnote and endnote targets. It displays the note reference number of the footnote or endnote.
Append “above” or “below” after number
Certain cross-reference display options enable you to append the word “above” or “below” after the displayed number. With this option enabled you can use the cross-reference in a phrase like “see page 5 above”, where the word “above” or “below” is updated automatically if the target moves.
These words are language sensitive and can be customized in your Language preferences (see the setting “Automatic Text”).
Hyperlink to target when saved as PDF
Checkmark this option so that the cross-reference is hyperlinked in exported PDFs. When you open such a PDF in compliant apps (eg: Apple Preview, Adobe Acrobat, etc) a reader can click the cross-reference to jump to its target
☞ You can modify the way your hyperlinked text appears in the PDF as explained in the section: “Modify the appearance of linked text in PDF files”.
☞ Cross-references in documents that are exported to HTML or EPUB will always be hyperlinked.
It may be troublesome to find the desired target in the cross-reference insertion window when working in a large document. If you have the desired target already in view, it’s much easier to copy a new cross-reference to it right then and there. Here’s how:
1. Select the cross-reference target (eg: bookmark, heading, etc) that you want to use.
2. Use the menu command Insert > Cross-references > Copy New Cross-Reference…
→ The cross-reference copying dialog appears (see Figure 285 below).
3. Choose what information the new cross-reference will display, as explained in the section “Cross-reference display text”.
→ The generated cross-reference will have been placed on the clipboard.
You can now insert the cross-reference wherever you like in your document by pasting it.
☞ If you were recently working in the section of your document where you want the cross-reference to appear, you can likely return to it quickly using “Go Back” commands. See the section “Go Back (restore prior selections)”.
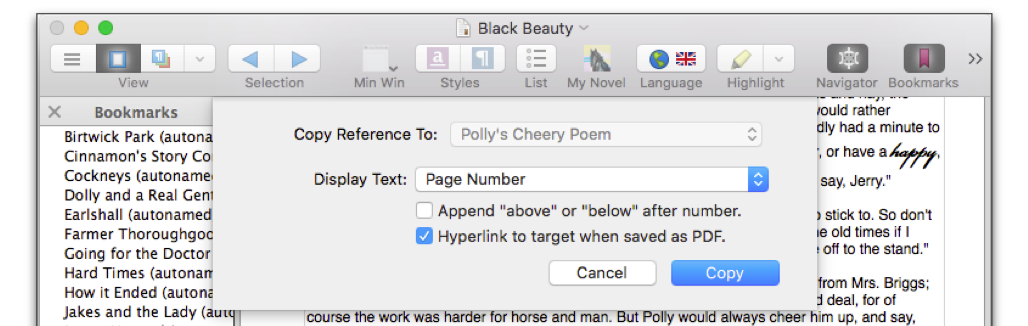
Figure 285 The copy a cross-reference dialog.
Instead of inserting a cross-reference, you may want to link to other content within the same document. This is a called an intra-document link. This kind of link provides the same ability as a cross-reference to jump to a target, but it can be applied to any existing text instead of automatically generated its own text.
You should consider using a link instead of a cross-reference if:
1. Use a link when you want to completely customize the marked text, instead of relying upon cross-reference display text options (eg: show a page number).
2. Use a link when you need to apply non-uniform formatting to the marked text, instead of being limited to uniform formatting by a cross-reference’s atomic nature.
3. Use a link when it isn’t necessary or desirable for the display text to update automatically as the target changes.
How to add an intra-document link:
1. Select the text to which you want to apply the link, ie: the text that will become clickable.
2. Choose the menu command Insert > Hyperlink > Add Link to Content….
→ A dialog appears that is just like the cross-reference insertion dialog (see Figure 284).
3. Select a target in the dialog, just as described in the section “Cross-reference targets”.
4. Click the Insert button to finish.
→ The link is applied to the selected text.
Such links are clickable in Nisus Writer documents, but also when they are exported to various file formats like PDF, HTML, and EPUB. To control how these links look in your document (and in exports) see the section “Link appearance”.
⚠️ Although intra-document links provide more flexibility than cross-references, they do come with one significant drawback. Unlike cross-references, links are not guarded against breakage as described in the section “Broken cross-references”. However broken links will be reported when using the command Find All Broken Cross-references.
⚠️ An intra-document link is defined by the target bookmark’s name (readers familiar with HTML may recognize these link URLs using fragment names like #target). If the target bookmark changes its name or is deleted, the link will break. Nisus Writer Pro will not warn you before you make such breaking changes.
In addition to the intra-document links described in the previous topic, you can also add links to external content. For more details on external links see the following topics:
◦ Link to a location on the Internet
Jump to the Cross-Reference target
Once you you have one or more cross-references in your document, you may want to quickly jump to the referenced text (ie: the target).
How to jump to a cross-reference’s target:
► Double-click the cross-reference.
→ Nisus Writer will select the target and scroll it into view.
To jump to the target of an intra-document link just click the linked text.
If a cross-reference or link is broken (as described below), no jump can occur and a beep will sound.
After jumping to a target, you may want to return to the cross-reference. If you haven’t done much selecting or editing you may simply be able to use the “Go Back” command.
As described in the section “Insert a Cross-Reference”, each cross-reference relies upon a single target bookmark. If the targeted bookmark is deleted from your document, you will end up with a broken cross-reference.
Instead of displaying proper information, a broken cross-reference will show a message like:
[Bookmark "Your Bookmark Name" is missing.]
Nisus Writer Pro will guard against such broken cross-references. If you try to delete text that includes bookmarks being used by one or more cross-references, you will be warned by an alert to confirm the deletion.
To find all broken cross-references before finalizing your document consider using the menu:
Insert > Cross-references > Find All Broken Cross-References
That opens a find results window showing all broken references in your document, so you can replace or fix them. This command will list not only proper cross-references, but also intra-document links that are broken.
| Previous Chapter Tables |
<< index >> |
Next Chapter Create Tables of Contents, Outlines and Indexes |