Create Tables of Contents, Outlines and Indexes
Nisus Writer Pro enables you to create both tables of contents and indexes. Your document can have multiple tables of contents and indexes and each of these can have multiple levels. Nisus Writer Pro also, using the tools of the table of contents, enables you to simulate many of the features of using an outline.
About Tables of Contents and Indexes
Nisus Writer lists items in the table of contents in the same order as they appear in the document. All index entries display in alphabetical order.
Creating a table of contents or an index involves selecting entries and then choosing the appropriate command to mark that text for inclusion in the table of contents or index. Nisus Writer automatically inserts both the table of contents and index at the insertion point when you “create” that item.
Here are some guidelines for creating a table of contents and an index
• Always select text before marking it.
• Marked text displays in the table of contents and index (except for “index as” text) as it does in the document (though not with its font, size or style formatting).
A table of contents is a list of headings related to specific portions of your document with page numbers that indicate where discussion of that subject begins. It is usually placed at the beginning of a document. It is possible to have various tables of contents one for text and another for illustrations, tables, equations, authorities, etc. Items in a table of contents are listed in the order in which they appear in the document.
You can create a table of contents at any time as you edit your text. However, if you add and/or remove text marked for inclusion in a table of contents, you will need to manually update the table of contents as explained in “Update the table of contents” on page 316. Page numbers are always updated automatically when you print your document.
☞ When you do print your document, if it is as a PDF, the entire table of contents heading is clickable for navigation in the document, not just the page number.
Designate text to appear in the table of contents
1. Select the text you want to appear in the table of contents.
2. Choose the appropriate level (Level 1 - Level 9) from the menu Tools > Table of Contents > Include in TOC or from the contextual menu that appears when you right-click.
3. Complete steps 1 and 2 for each entry you want the table of contents to include.
☞ When the Navigator sidebar is open, you can also designate selected text to appear in the table of contents:
► Click the Plus (+) button at the bottom of the Navigator sidebar and choose the appropriate level (Level 1 - Level 9).
See what text has been included in the table of contents
Nisus Writer Pro offers two ways to see what you have included in the table of contents. You can highlight the text in your document, or, you can display the Navigator which lists all entries in the table of contents in a sidebar along the left side of your document window.
Display the table of contents Navigator sidebar
Nisus Writer Pro can display all of your document’s table of contents entries in a sidebar on the left side of your document window. The navigator will update automatically as you edit text to add or remove entries from the TOC.
To show the TOC Navigator use either:
► Use the menu View > Navigator > Show Table of Contents. -or-
► Use the menu Tools > Table of Contents > Show TOC in Navigator.
Nisus Writer Pro will list all the table of contents entries in a hierarchy (if there is one).
For more details on the Navigator pane and its operation, see the sections “Navigator” and “Use the Table of Contents Navigator as an outline”.
Jump to a heading in the table of contents
If you’re working with the Table of Contents Navigator sidebar (as described above), you can simply click any TOC entry in the sidebar to jump to its corresponding text in your document.
Alternatively you can also jump to a particular paragraph that’s been marked for TOC inclusion:
► Use the menu Tools > Table of Contents > Go to Text in TOC…
→ A special version of the Go to Content dialog will appear that allows you to filter all TOC entries. You can quickly jump to the desired text, or open a Find All results list window of all matches.
Once your selection resides in a TOC paragraph, you can also quickly hop to nearby TOC entries by using the menus:
► Tools > Table of Contents > Select Next in TOC
► Tools > Table of Contents > Select Previous in TOC
Nisus Writer Pro selects the next or previous heading.
Highlight text marked for Table of Contents inclusion
Nisus Writer Pro can highlight text marked for the table of contents on screen, so that you can see such text during editing. See the setting “Include in TOC” in the section “Appearance Preferences”.
Find text marked for Table of Contents inclusion
To search all text marked for Table of Contents inclusion and possibly jump to the text:
► Use the menu Tools > Table of Contents > Go to Text in TOC…
A special version of the Go to Content dialog will appear that allows you to filter by TOC topic.
Remove an entry from the table of contents
1. Select the text you want to remove from the table of contents.
2. Choose the menu command: Tools > Table of Contents > Remove from TOC, which is also available from the contextual menu when you right-click.
3. Complete steps 1 and 2 for each entry you want removed from the table of contents.
☞ You can apply this to a range of text and remove all selected entries from the table of contents.
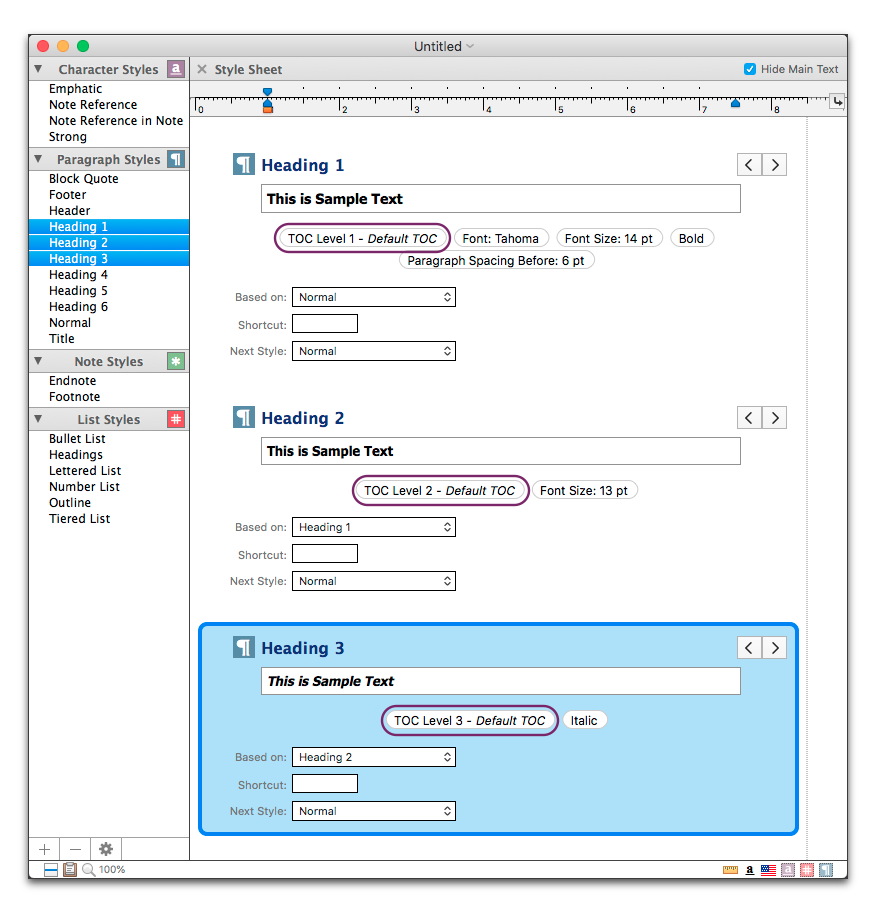
Set the headings to automatically appear in the table of contents
The Nisus New File shipped with Nisus Writer Pro comes with appropriate table of contents styles associated with the various heading styles it contains.
You can alter these, and apply any level of a table of contents to any Paragraph Style in your document. This makes marking text for the table of contents automatic. Nisus Writer Pro applies the Table of Contents style to the various Headings styles in the shipped Nisus New File. You can modify these as you wish.
1. Choose the menu command: View > Style Sheet.
2. Select the level of heading you want to have automatically included in the table of contents.
3. Choose the appropriate level (Level 1 - Level 9) from the menu Tools > Table of Contents > Include in TOC.
4. Complete steps 2 and 3 for each level of heading you want the table of contents to include.
Figure 286
Heading styles indicating that they are automatically included in the table of contents
Insert a table of contents into your document
1. Put your insertion point where you want the table of contents to appear.
2. Choose the menu command: Tools > Table of Contents > Insert TOC.
When you insert a table of contents into your document you can see at a glance the overall structure of your document. The table of contents you have displayed in your document is not “live”. You might, change sections, either modifying the text of your headings or moving portions of your text to a different location in the document. When this happens the information in the displayed table of contents is no longer accurate.
1. Select any of the text of the inserted table of contents.
2. Choose the menu command: Tools > Table of Contents > Rebuild TOC… or from the contextual menu that appears when you right-click in the table of contents area.
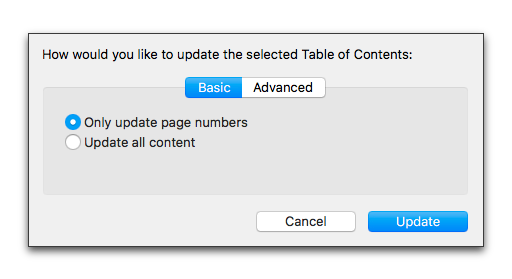
Figure 287
The Basic setting of the Rebuild Table of Contents dialog
3. In the dialog that appears you have a variety of options.
a. Choose Only update the page numbers. Or
For more options, click the Advanced tab.
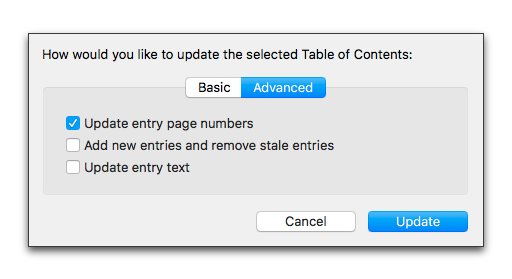
Figure 288
The Advanced setting of the Rebuild Table of Contents dialog
► Choose Update entry page numbers and/or
► Choose Add new entries and remove stale entries and/or
Choosing all of the options in the Advanced portion of the dialog is the same as choosing Update all content in the Basic setting.
4. When you are satisfied with your choices, click Update.
☞ You can also rebuild a table of contents by pressing ⌃ while in the table of contents area and choosing Rebuild TOC… from the contextual menu that appears.
► Select the range of text that makes up the table of contents and choose Cut or Delete from the Edit menu.
Format the text of your table of contents
The format (appearance) of the table of contents is controlled by two tools of Nisus Writer Pro.
• The settings in the Configure TOCs dialog as explained and illustrated in Figure 289 below).
• The Paragraph Styles of your document’s Style Sheet explained in “Edit a style” on page 144.

Figure 289
The Configure TOCs dialog
Determine whether page numbers appear or not
1. Choose the menu command: Tools > Table of Contents > Configure TOC Styles….
2. Choose the table of contents style you want to modify in the Style Name pop-up menu in the Configure TOCs dialog.
3. Check or uncheck Include page numbers.
Determine whether numbers follow a tab or not
1. Choose the menu command: Tools > Table of Contents > Configure TOC Styles….
2. Choose the table of contents style you want to modify in the Style Name pop-up menu in the Configure TOCs dialog.
3. Check or uncheck Use tabs to align page numbers.
Set what appears when line breaks or tab characters appear in marked text
It might occur that line breaks and/or tab characters appear in text marked for the table of contents. generally you would not want these characters in the table of contents itself.
1. Choose the menu command: Tools > Table of Contents > Configure TOC Styles….
2. Choose the table of contents style you want to modify in the Style Name pop-up menu in the Configure TOCs dialog.
3. Check or uncheck Use tabs to align page numbers.
Set the paragraph style associated with each level of the table of contents
When you first generate a table of contents by choosing Insert TOC, Nisus Writer Pro generates nine new Styles that were latent in your document. By default each of these styles is associated with the corresponding level of your table of contents. You can modify the formatting of these styles called TOC 1 though TOC 9. in the Style Sheet view of Nisus Writer Pro.
1. Choose the menu command: Tools > Table of Contents > Configure TOC Styles….
2. Choose the table of contents style you want to modify in the Style Name pop-up menu in the Configure TOCs dialog.
3. Type or paste the character you want to appear in the table of contents in either or both of the text edit boxes to the right of
◦ Replace line breaks in marked text with
◦ Replace tab characters in marked text with
Set the leader that appears between the table of contents text and the page number
1. Choose the menu command: Tools > Table of Contents > Configure TOC Styles….
2. Choose the table of contents style you want to modify in the Style Name pop-up menu in the Configure TOCs dialog.
3. Click any one of the following
◦ Custom Character(s) (and enter the character(s) you want to use)
◦ Underline (and choose the style of line you want from the pop-up menu)
Modify the appearance of the text in the table of contents
1. Choose the menu command: View > Style Sheet
2. Select the TOC Style you want to modify.
3. Modify the Style as explained in “Edit a style” on page 144.
Create a new table of contents
You can create any number of tables of contents for your document.
• Table of Content headings
• Table of Figures
• Table of Tables
• Table of Equations
• Table of Authorities
Each unique table of contents has its own Style.
1. Choose the menu command: Tools > Table of Contents > Configure TOC Styles….
3. Name the style appropriately for your needs.
4. Reconfigure the formatting as you wish as explained in “Format the text of your table of contents” on page 317.
☞ If you want to use a special paragraph style, you need to have created that style before you can choose it in Configure TOCs dialog.
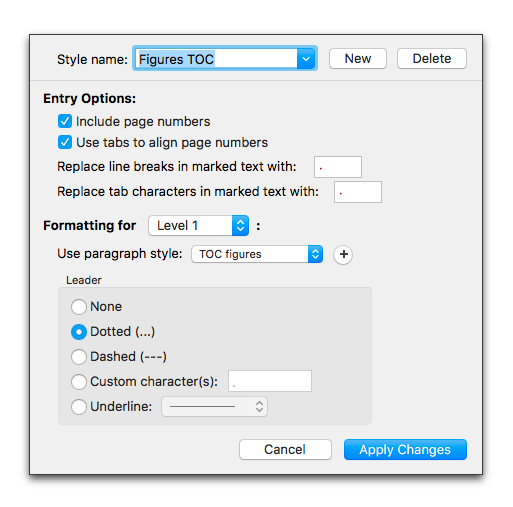
Figure 290
The Configure TOCs dialog reconfigured for a new table of contents
Determine which table of contents is active
The command checked beneath Configure TOC Styles… indicates the name of the current table of contents among those that exist in the document. This is the table of contents that is active, highlighted (in the text), and will be inserted when you choose Insert TOC. The active Table of Contents is the one to which text will be included when you choose one of the various levels of the submenu Include in TOC.
► Choose the name of that table of contents from the bottom of the menu Tools > Table of Contents.
Quickly add text to the table of contents of your choice
You can use the Table of Contents palette to add text to the table of contents without using the menus.
1. Choose the menu command: Window > Palettes > Floating Palettes > Table of Contents.
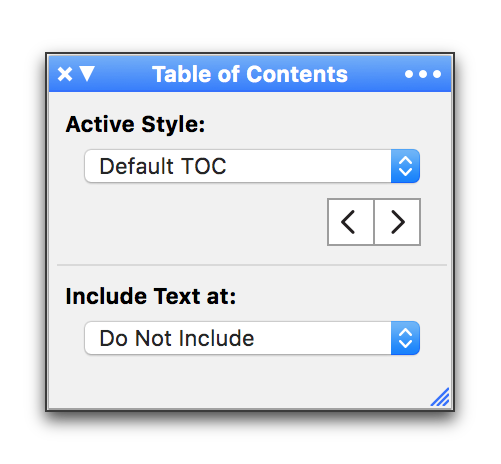
Figure 291
The Table of Contents palette
You can allow the window to float wherever it is most comfortable for you.
2. Select text you want to include in the table of contents.
3. From the Active Style pop-up menu choose the table of contents in which you wish to have this text appear.
4. From the Include Text at pop-up menu choose the level in the table of contents at which the text should appear.
Find text in the table of contents
To search paragraph text marked for TOC inclusion and possibly jump to it:
► Use the menu Tools > Table of Contents > Go to Text in TOC….
A special version of the Go to Content dialog will appear that allows you to filter TOC topics.
Maintain a running table of contents
You can also use markers and cross-references (see pages 300 and 308) to create a running table of contents that constantly updates itself as illustrated at the top of each section in this document.
After you have thoroughly marked your document, place your insertion point near the top of a chapter.
1. Create a Style (as explained in “Create a new style” on page 148) that has the formatting you want for the contents.
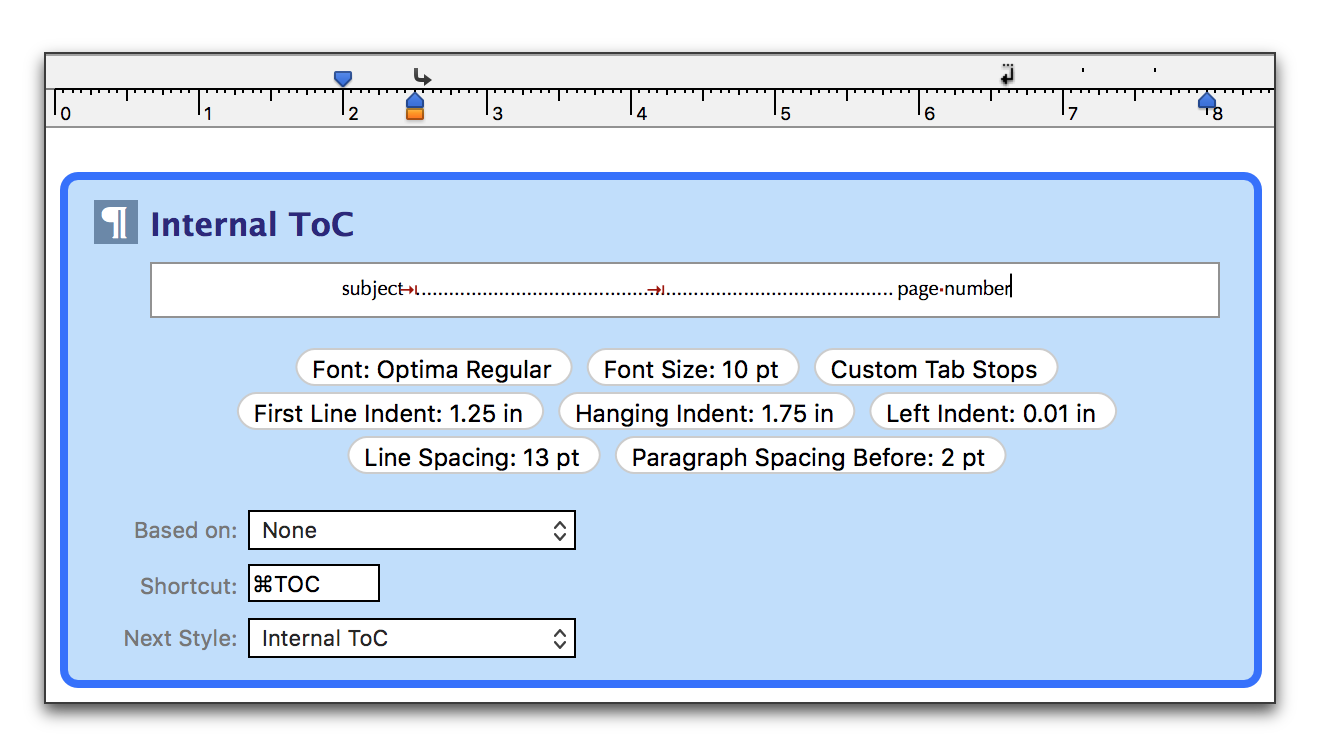
Figure 292
A style for a table of contents
2. Place your insertion point where you want the contents to appear and choose the menu command: Insert > Cross-reference….
3. Choose Bookmark from the Insert Reference to pop-up menu at the top of the dialog.
4. Scroll to the bookmark for the heading of the specified portion of your document.
You can display the list either in alphabetical order, or, in the sequence they appear in your document.
5. Choose Bookmarked Text from the Display Text pop-up menu at the bottom of the dialog and click Insert.
6. Press ⇥ to separate the heading from its page number.
7. Choose the menu command: Insert > Cross-reference….
The marker name you just used is still selected.
8. Choose Page Number from the Display Text pop-up menu at the bottom of the dialog and click Insert.
9. Repeat this process for each of the headings of the section.
Nisus Writer Pro keeps the page numbers in this list current at all times.
Nisus Writer Pro also enables you to simulate many of the features of using an outline.
Wikipedia has an excellent and simple description of an outline:
An outline is a hierarchical way to display related items of text to graphically depict their relationships.
Use the Table of Contents Navigator as an outline
As explained above in the section: “Display the table of contents Navigator sidebar”, Nisus Writer Pro can display a (resizable) sidebar on the left side of your document window that lists all the table of contents entries in the document. If your table of contents is hierarchical, the view in the Navigator reflects that hierarchy as illustrated in Figure 293 where we have taken liberties with Anna Sewell’s novel Black Beauty.
As with “list” view in the Finder, you can collapse or expand the hierarchy.
► Click the reveal triangle to the left of a heading to collapse or expand the hierarchy.
▷ Press ⌥ as you click the triangle to expand or collapse all subordinate items as well.
► If the Navigator sidebar has keyboard focus, you can press the right or left arrow keys to collapse and expand the selected hierarchy.
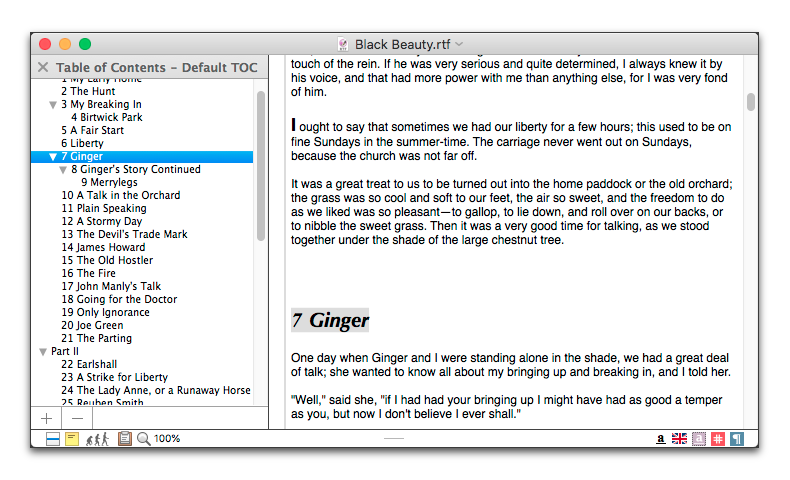
Figure 293
The Table of Contents Navigator displaying a hierarchical outline
Modify the structure of your document using the Table of Contents Navigator
You can modify the structure of your document, moving a portion higher or lower in the text, promoting or demoting various portions using the Table of Contents Navigator.
Move portions of your document
1. Click the heading for the portion of your document you wish to move in the Table of Contents Navigator.
2. Drag and drop the heading where you want the material to appear.
As illustrated in Figure 294, if there are sub headings these are automatically selected and moved as well.

Figure 294
Moving a portion of a document using the Table of Contents Navigator
If you use the automatic numbering systems of Nisus Writer Pro (and have them set to Continue Numbering from Previous) Nisus Writer Pro will automatically renumber appropriately as illustrated in Figure 295.
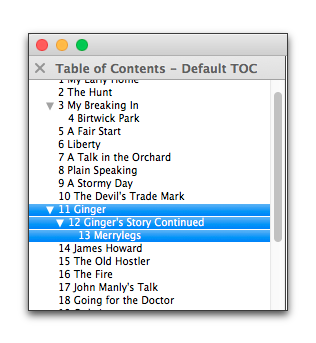
Figure 295
Automatic renumbering in the Table of Contents Navigator
Demote portions of your document
You can easily demote a heading in the hierarchy of your document’s table of contents.
1. Click the heading for the portion of your document you wish to move in the Table of Contents Navigator.
2. Press ⇥ or click the Indent button on the Toolbar or choose the menu command: Format > Increase List Level.
As contrasted with moving portions of your document, explained above, this only demotes the actual heading(s) selected (whether contiguous or multipart).
Promote portions of your document
You can easily promote a heading in the hierarchy of your document’s table of contents.
1. Click the heading for the portion of your document you wish to move in the Table of Contents Navigator.
2. Press ⇧ ⇥ or click the Outdent button on the Toolbar or choose the menu command: Format > Decrease List Level.
As contrasted with moving portions of your document, explained above, this only promotes the actual heading(s) selected (whether contiguous or multipart).
Nisus Writer Pro cannot hide or fold text under a heading in the body of your document.
An index is an “alphabetical” list of terms (words, numerals, symbols, and/or phrases; as well as sorted texts from non-alphabetic (East Asian (idiographic) languages) that may appear in your document. These are related to key topics discussed in your text. The terms are followed by page numbers that indicate where these ideas are discussed. An index is usually placed at the end of a document. It is possible to have various indexes; for example subjects, proper names, foreign words, etc.
Though you can create an index (and certainly mark text for the index) at any time as you edit your text, you should not create your final index until you finish the final formatting of your document and every character is on the page where you want it to print.
Designate text to appear in the index
1. Select the text you want to appear in the index.
2. Choose the menu command: Tools > Index > Index.
3. Complete steps 1 and 2 for each entry you want the index to include.
Nisus Writer Pro distinguishes between Uppercase and lowercase variants of the same words when creating the index and lists each occurrence separately.
You can index items contained in the footnotes. The page number associated with the indexed text is that on which that text appears in the footnotes, not the page on which the footnote first appears.
Index one thing as something else “index as”
The simple method of marking words for an index would index the words fish and fishing individually. Both words will appear as separate entries in the index.
• fish 2-4, 7, 149
• fishing 4-6
Similarly, you may have one term in your document and want to refer to it using a more general term in the index. In this case you index one thing as something else. For example you may have horse, mare or colt all appearing in your document and want to have them all referred to in the index as Horse.
Using Index As… allows you to index the selection as any key word or phrase you specify.
(You can, depending on the emphasis of your document, index “fish” as “fishing” or “fishing” as “fish” so that the example above would have only one entry:
• fish 2-7, 149
or:
• fishing 2-7, 149
You can use Index As… to change the uppercase words in the document so they appear as lowercase in the index. Using this feature, you can also select a paragraph of text and index it as a single word.
1. Select the text you want to index.
2. Choose the menu command: Tools > Index > Index As….
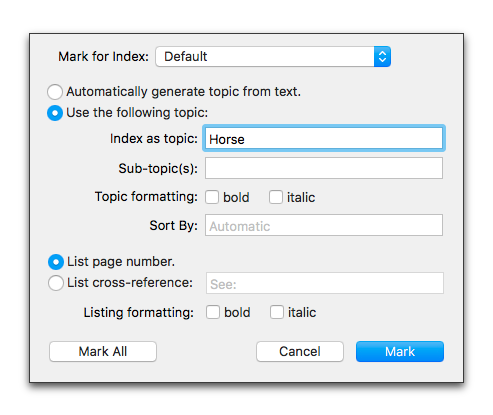
Figure 296
The Index As… dialog
The currently selected text appears in the Index As box.
3. Type the text you want to appear in the index into the Index as topic box.
4. Check the commands you want in the dialog then click Mark.
☞ Of course, if you index a word as the same word, it is equivalent to choosing Index.
Internally, however, Index As… and Index are different. This internal difference is important under the following circumstances:
• When you want to create overlapping index entries (as explained on page 334)
• When you edit the entries.
If you change the text in the document with the attribute Index, what appears in the index changes also.
If you change the Index As… text in the document, the text in the index does not change.
Emphasize the page of a particular occurrence of an item in the index
You might have a document that deals with the same subject in many locations but one of them is more important than the rest. You can make this page (or range of pages) stand out.
So, for example, the word “race” (as in “horse race” appears a number of times in the novel Black Beauty. It appears as “races” on page 5 and then again as “race” on pages 42, 63 and 105. However the word appears twice on page 63 suggesting that this is the primary instance. You can cause page 63 to appear “highlighted” in the index:
race, 42, 63, 105
races, 5
1. Select the word, on the page that is to be highlighted.
2. Choose the menu command: Tools > Index > Index As….
3. Make sure that Automatically generate topic from text and List page number are selected.
4. Check the Listing formatting you want to use (either bold or italic, or both)
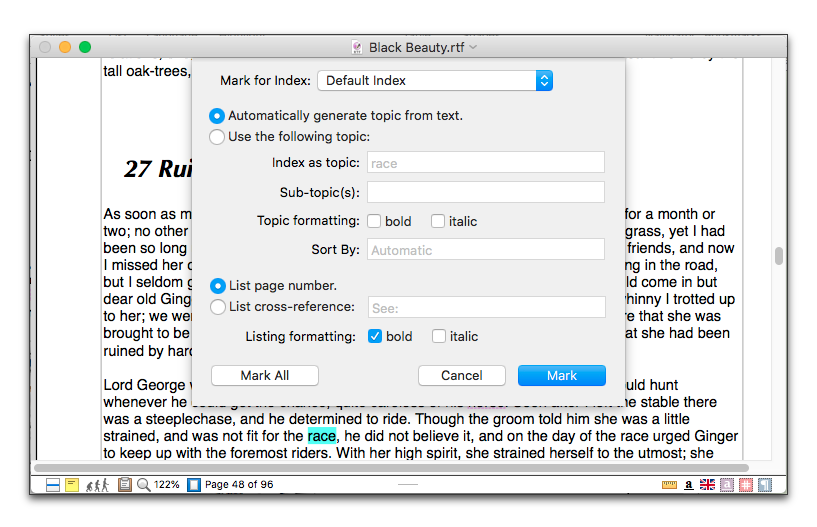
Figure 297
Highlight a page occurrence in the index
Emphasize a particular term in the index
You might have a document that deals with a wide variety of subjects that have similar spellings. You can make any one of those terms stand out.
1. Select the word, or phrase to be emphasized.
2. Choose the menu command: Tools > Index > Index As….
3. Select either Automatically generate topic from text or Use the following topic and make sure the text is as you want it to appear in the index (you can have it appear as a sub-topic and you can add bold and/or italic to the text portion of the listing).
4. Click either List page number or List cross-reference to have the listing refer to a particular page in the document or to another term in the index.
5. Check the Listing formatting you want to use (either bold or italic, or both)
Index multiple terms as one term using the Find/Replace tool
You can use the Find & Replace window to index text. In this way you can use PowerFind (or, if you wish, regular expressions and PowerFind Pro) to find the text you want to index.
PowerFind is explained on page 458. PowerFind Pro is discussed at length beginning on page 477. A discussion of the Or metacharacter appears on page 463.
For example, as described above, you may want to index the subject horses in your document. Horses may be discussed wherever the words horse, horses, mare or colt are used. Use the Find & Replace window to enter the following PowerFind expression illustrated in Figure 298 below.
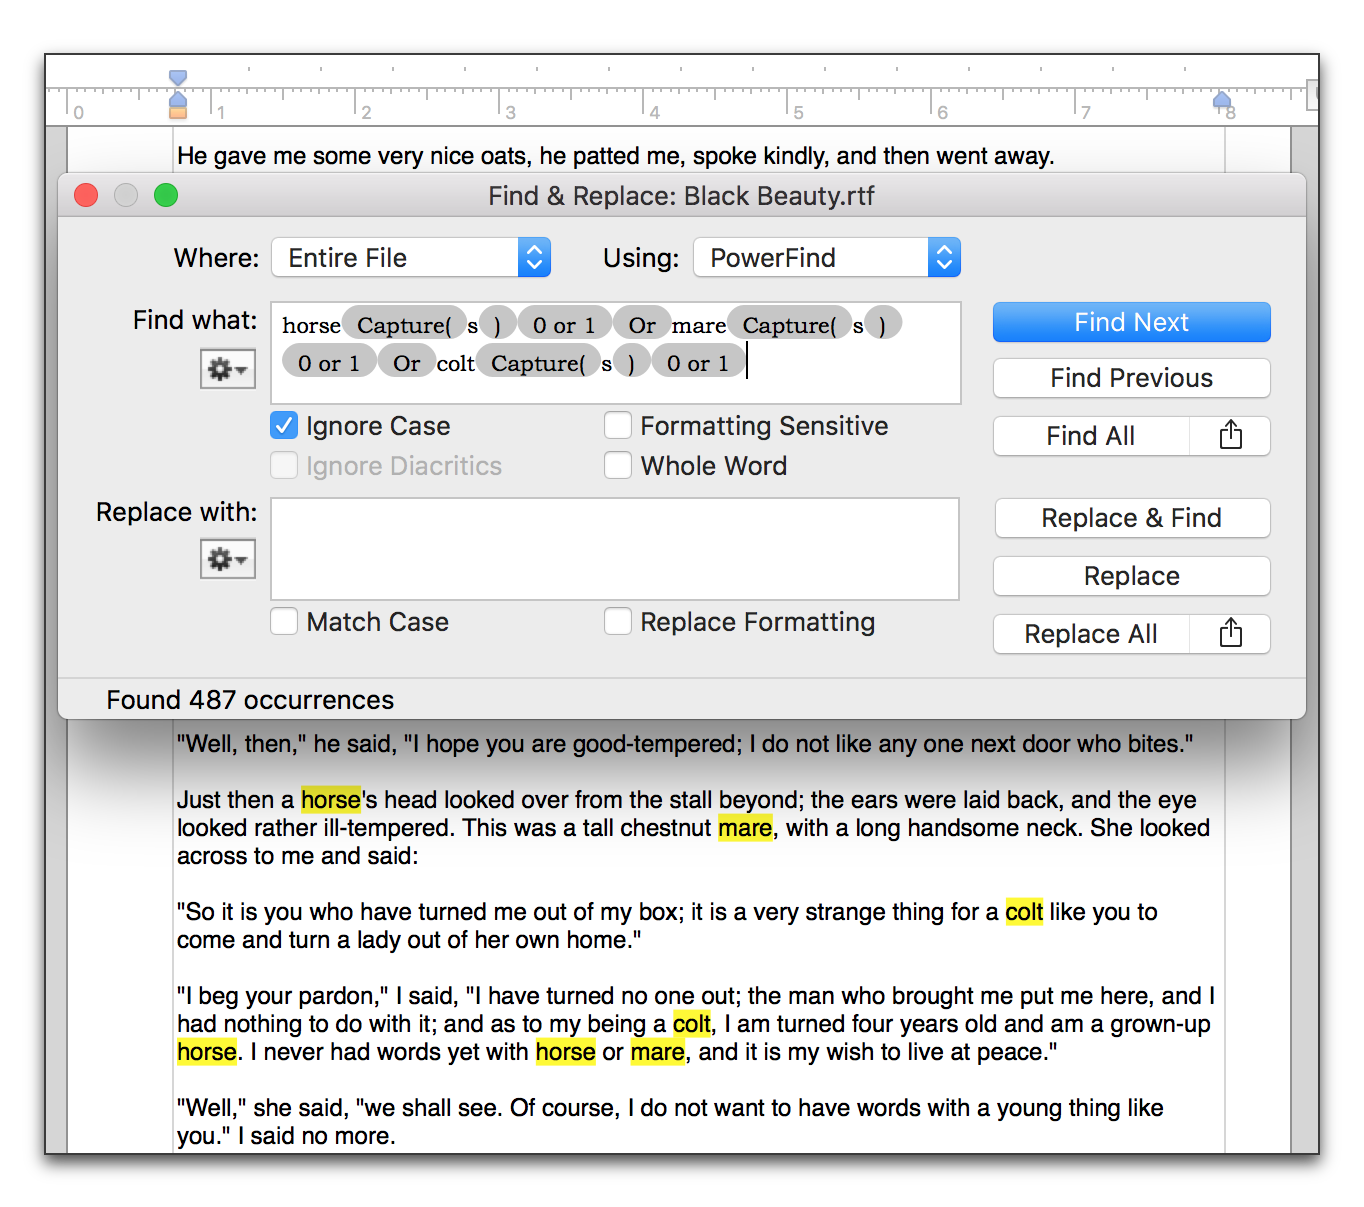
Figure 298
Using “Or” to index multiple terms as one
This will find all occurrences of the words. Note that the Or is not typed but entered by choosing the menu command: Gear > Match > Or of the Find what text edit box of the Find & Replace window.
7. Find (and select) the terms you want to index as one as illustrated in Figure 298 above.
8. Close the Find & Replace window.
9. Choose the menu command: Tools > Index > Index As….
The dialog appears with all the selected text in the Index as topic text box as illustrated in Figure 299.

Figure 299
The Index As sheet with the first selected word appearing in the Index as Topic field
10. Type the word you want to have appear in the index, or leave it as it is.
Use the index to refer to other entries
If you want to index “fish” as “fishing” (have “fishing” appear in the index) and refer to the actual pages in your document (where the word “fish” appears), the instructions in “Index one thing as something else “index as”” on page 326 suffice. However, if you do not want the page numbers to appear but rather have the reader refer to a different subject in the index, Nisus Writer Pro offers a different tool. You may be writing a technical text about various animals and, rather than have the reader find numerous entries for different subsets of those animals you want them to refer to a more technical, or higher level term. This method also permits referencing other index entries. You can refer readers to other entries with the text you type into List cross-reference box.
1. Select the text you want to index.
2. Choose the menu command: Tools > Index > Index As….
The currently selected text appears in the Index as topic box.
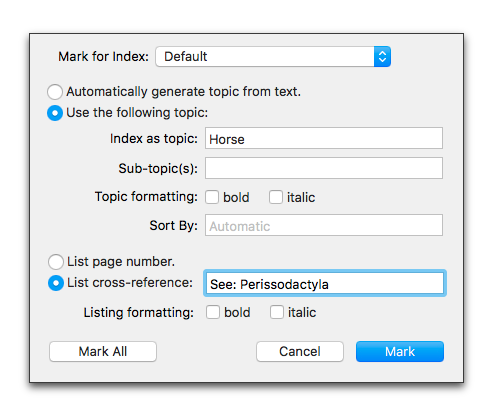
Figure 300
The Index As… dialog set for a cross-reference
3. Type the text you want to appear in the index into Index as topic box if it differs from what is there.
4. Check one or both of the Topic formatting options, if you want.
5. Click List cross-reference.
6. Click in the text box to the right to activate it.
7. Type the secondary index entry in the text edit box.
You can leave the “See: ” text that is already in the List cross-reference text edit box or type over it.
8. Check one or both of the Listing formatting options, if you want.
Determine how indexed items should sort
While it is likely an unusual case, you may want to have certain terms in the document appear in the index as they are in the main text, but sorted differently. Examples might include:
• the number “7” to sort as “seven”
• “#3” as just “3”
• “4th Commonwealth” as “Fourth Commonwealth”
• “hakuna matada” (with quotes) as just hakuna matada (without quotes)
• “☞Pay Attention☜” as “Alert”
Other, more sophisticated examples include foreign language sorting rules. In Japanese Kanji text is sorted using Hiragana conversions. Nisus Writer Pro does this automatically, but you may want to override or tweak the automatic sorting.
Additional considerations exist for other languages. You may want to sort accents first, or last, depending on the local rules. For example, in some areas “ørd” sorts before “ord”, but in other places it should go afterwards. Similar rules may apply for Arabic.
1. Enter the text you want to have the indexed term sorted by in the Sort By field.
Using the five examples explicitly mentioned above
▷ Select the number “7” in your document, choose Index As… and type the word “seven” in the Sort By field.
▷ Select “#3” in your document, choose Index As… and type “3” in the Sort By field.
▷ Select “4th Commonwealth” in your document, choose Index As… and type “Fourth Commonwealth ” in the Sort By field.
▷ Select “hakuna matada” (with quotes) in your document, choose Index As… and type hakuna matada (without quotes) in the Sort By field.
▷ Select “☞Pay Attention☜” in your document, choose Index As… and type “Alert” in the Sort By field.
▷ Select “ørd ” in your document, choose Index As… and type “ord” in the Sort By field.
Index all occurrences of the word in the “Index as topic” box
You may want to index all occurrences of the word in the Index as topic box.
Add an additional “Index As” reference to indexed text
1. Select the “indexed as” text to which you want to add an additional reference in the index.
2. Choose the menu command: Tools > Index > Additional Index As….
The dialog illustrated in Figure 300 above appears as if this was the first time you were adding the selected entry to the index.
3. Complete steps 1 and 2 in the section “Index one thing as something else “index as”“ on page 326 for each entry you want the index to include.
1. Select the text you want indexed.
2. Choose the menu command: Tools > Index > Index As….
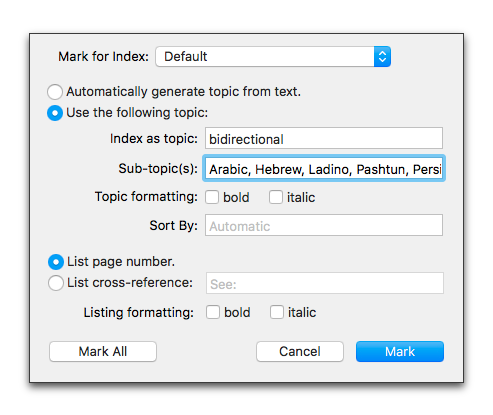
Figure 301
Sub-topics for a hierarchical index
3. In the Index as topic text box enter the text you want to appear in the index.
4. In the Sub-topic(s) text box enter the sub-topic(s) you want to appear in the index.
5. If you want more than one level of sub-topics, separate each level of the hierarchy with a colon ( : ).
Figure 301 above will cause the following to appear in the index
Bidirectional
Arabic, Hebrew, Ladino, Pashtun, Persian, Urdu, Yiddish, ii, 44, 48
Nisus Writer Pro supports nine (9) levels in the hierarchy.
You can create a text string with what you want to use and then paste this into the Index as topic (and/or Sub-topic(s)) text box(es).
Create an index entry which references all text of a given font, size and/or style (or language)
Similar to the instructions on “Set the headings to automatically appear in the table of contents” which appear on page 314, you can apply the index attribute to any Paragraph or Character Style in your document. This makes marking text for the index automatic. Suppose you are writing a specialized document in which all the text in a particular language should appear in the index….
1. Choose the menu command: View > Style Sheet.
2. Select the Style you want to have automatically included in the index.
Creating new styles is explained in “Create a new style” on page 148.
3. Select the sample text.
4. Choose the appropriate index from the bottom of the menu Tools > Index.
Creating a new index is explained in “Create a new index” on page 341.
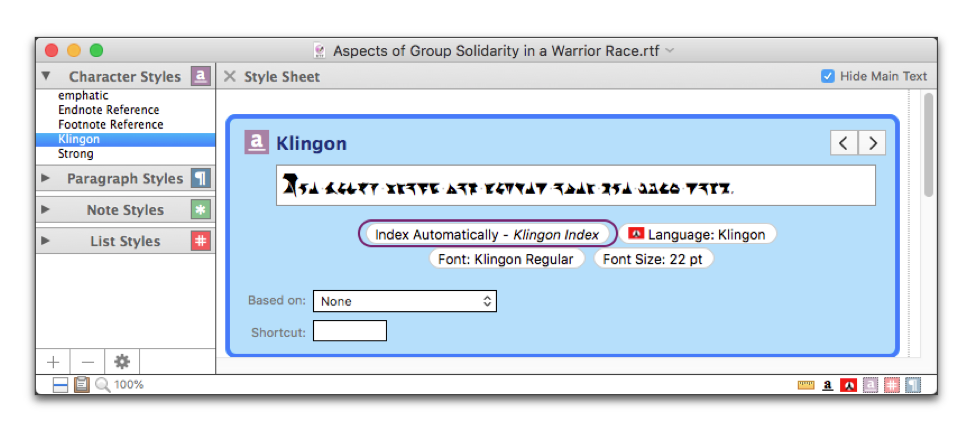
Figure 302
A special “language” Character style set for inclusion in an index
5. Complete steps 2 through 4 for each separate style you want included in its own index.
☞ This document’s “Index of Commands and Screen Messages” is created in this manner.
☞ You can use the Find/Replace capability of Nisus Writer Pro to select text patterns that you want to index.
You must use two different methods—Index and Index As…, and/or Additional Index As…. For example, if you wish to index dogs, cats, birds, and iguanas as Pets in the following sentence “The pet store sells dogs, cats, birds, and iguanas.”
The pet store sells dogs, cats, birds, and iguanas.
1. Select dogs, cats, birds, and iguanas as shown above,
2. Choose the menu command: Tools > Index > Index As….
3. Type Pets in the Index as topic box and click Mark.
4. Select iguanas.
The pet store sells dogs, cats, birds, and iguanas.
5. Choose the menu command: Tools > Index > Index.
By doing this, you have added two overlapping entries to the index Pets and iguanas.
If your text mixes Roman and non-Roman based text (Japanese in particular), you can index your Japanese text and the underlying Hiragana phonemic reading of a Kanji word that is used to correctly place an indexed Japanese Kanji word or phrase under the correct Hiragana index heading. For example, if you index the word 印刷 (insatsu) meaning printing it will appear under the い (I) heading in an index.
By default, Nisus Writer Pro indexes do not include index heading labels. You can easily add Hiragana index headings as explained in the section: “Format your index” beginning on page 338.
If a majority of words in a document are indexed as Japanese, then Japanese index headers labels (あ, い,う…, etc.) will appear before the Roman index labels ((A, B, C…, etc.). Alternatively, if English is the primary language, then the reverse will be true: English index labels will appear before the corresponding Japanese index header labels.
If Kanji are indexed, they are automatically converted to Hiragana for collating in the generated index.
If Japanese text is most commonly indexed, it is sorted topmost in the generated index.
Automatically index your document using a word list
You may want to automatically search through your document to find all occurrences of a particular set of terms that should be indexed. To do this Nisus Writer Pro requires a word list file. Such a file consists of a list of terms, each associated with a particular indexing topic. This word list file should contain a single “table” the word in your document to index on the left followed by a tab then the text that should represent that word in the index on the right as illustrated in Table 28. The text does not need to be in an actual table, but must be two columns separated by a tab character, as illustrated in Figure 303.
|
dogs |
Pets |
|
cats |
Pets |
|
birds |
Pets |
|
iguanas |
Pets |
|
horse |
Horse |
|
mare |
Horse |
|
Colt |
Horse |
Table 28
An example of a index word list in an actual table
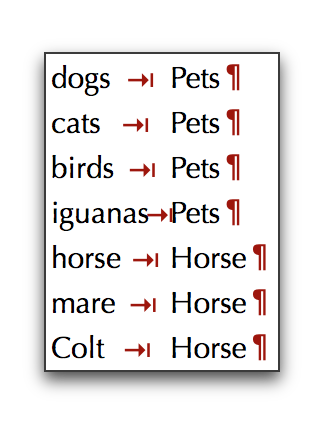
Figure 303
An example of a index word list in “tab delimited” form
1. Select the portion of your document you want to index using the word list file you have created using the Create Word List (v4) macro, as explained in “Create a word list as a tool for preparing an index” on page 336.
2. Choose the menu command: Tools > Index > Index Using Word List….
A variant of the Open dialog appears.
3. Locate your word list file, select it and click Auto Index.
The command Index Using Word List… selects each “paragraph” (that is each line in the word list document consisting of anything from a character to a lengthy phrase ending in a Return) then searches the document for that text and marks it for the index.
Nisus Writer Pro indexes every occurrence of every character/word/phrase in the word list and distinguishes between Uppercase and lowercase characters in the list and indexes each occurrence separately.
While for most texts indexing every instance of a particular word would be superfluous, this tool would make sense for certain technical texts.
Create a word list as a tool for preparing an index
The Create Word List (v4) macro supplied with Nisus Writer Pro works on a selection of your document and creates a new document with an alphabetical list of all the “words” in that selection. Another useful tool is the Create Word Frequency List (v2) macro. This command works on a selection of your document and creates a new document containing a word list sorted with the most frequently used word at the top (with the number of its occurrences) and the least frequently used word at the bottom.
1. Select that portion of your document from which you want to create a word list.
2. Choose Create Word List (v4) or Create Word Frequency List (v2) from the Macro menu.
If you do not have a selection Create Word List (v4) presents a prompt illustrated in Figure 304 that asks you to decide whether the macro should scan the entire document or if you want to stop the macro and make a selection.

Figure 304
The “create word list on entire file?” Macro Prompt
Nisus Writer Pro creates a new “Untitled” file with an alphabetical list (one word per paragraph) of all the words in the selection. While you can create a word list of your document for any purpose, these should be saved in a location and with a name associated with the document you wish to index.
3. Eliminate the terms you do not want to index.
When Nisus Writer Pro indexes a document using a word list file it requires that the word list consist of a “table”. The word (or phrase) in the left column is the word to find in the document. The word (or phrase) in the right column is what should appear in the index. The two columns must be separated by a tab. You can use colons to separate sub-topics, as explained in Create a hierarchical index on page 332:
Bidirectional
Arabic, Hebrew, Ladino, Pashtun, Persian, Urdu, Yiddish, ii, 44, 48
4. If you are working from the file created by Create Word List (v4),
► place your insertion point after the word (or phrase) you want to index, press ⇥ then add the word (or phrase) you want to appear in the index.
If you are working from the file created by Create Word Frequency List (v2), this macro places the frequency to the left of the word. You can reverse this sequence by selecting the text in the document and choosing the menu command: Macro > Swap Columns.
► Select the number that represents the occurrences in the file and replace that with the word (or phrase) you want to appear in the index.
5. Save the file. You can always change it at another time.
See what text has been included in the index
Nisus Writer Pro can show on-screen highlighting for indexed text, using distinct colors for automatically and explicitly indexed text. To control this highlighting see the settings for “Include in index” and “Include in index (auto)” in the Appearance Preferences.
Remove an entry from the index
1. Select the text from which you want to remove the indexed attribute.
2. Choose the menu command: Tools > Index > Remove Indexing.
3. Complete steps 1 and 2 for each entry you want removed from the index.
The command Remove Indexing removes all kinds of indexing (“auto”, “Index As” and “Additional Index As…”).
Insert an index into your document
1. Put your insertion point (at the end of your document) where you want the index to appear.
2. Choose the menu command: Tools > Index > Insert Index….
☞ Once you have inserted your index you can double-click a page number there to jump to that page and select the indexed text. This is an excellent way to double-check the quality of your index. This “click-ability” is preserved in the document created when you “save” or print your file as a PDF.
When you insert an index into your document you can see at a glance the important subjects discussed in your document. The index you have displayed in your document is not “live”. You might, change sections, either modifying the terms in your text or moving portions of your text to a different location in the document. When this happens the information in the displayed index may no longer be accurate.
1. Select any of the text of the inserted index, or simply place your insertion point there.
2. Choose the menu command: Tools > Index > Rebuild Index.
☞ You can also rebuild an index by pressing ⌃ while in the index area and choosing Rebuild Index from the contextual menu that appears.
► Select the range of text that makes up the index and choose Cut or Delete from the Edit menu.
The format (appearance) of your index is controlled by two primary tools of Nisus Writer Pro.
• The settings in the Configure Indexes dialog as explained below.
• The Paragraph Styles of your document’s Style Sheet explained in “Edit a style” on page 144.
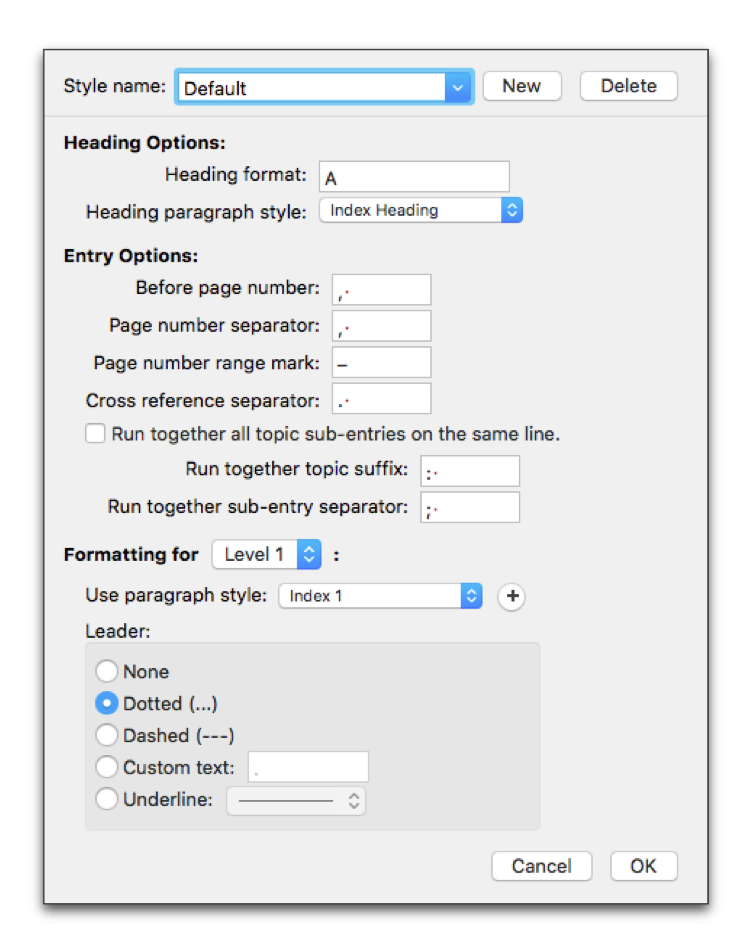
Figure 305
The Configure Indexes dialog
Determine the appearance of what separates the various sections of your index
You can put any character you want in the Heading format text edit box. However none of these will increment except for an "Uppercase A".
1. Click your insertion point in the Heading format text edit box and type the character(s) you want to have appear between each “alphabetical” section of the index.
You can use dingbats (any character you can find in the Special Characters palette) to set off the alphabetic headings so that they can appear as (for example)
☞A☜
You can use any Paragraph style that appears in your document to determine the format of the header. Nisus Writer Pro creates a new style called Index Heading and chooses that as the default style for these headings. You can modify that style in the Style Sheet view of Nisus Writer Pro, or, you can…
2. Choose the Paragraph style you want from the Heading paragraph style pop-up menu.
Determine what separates the index entry from its reference
1. Choose the menu command: Tools > Index > Configure Index Styles….
2. Choose the index style you want to modify in the Style Name pop-up menu in the Configure Indexes dialog.
The default character is a tab.
3. Enter the character(s) you want to have appear in the Before page number text edit box.
Determine what “leader” separates the index entry from its reference
If you use a tab to separate the index entry from its reference you can display any one of a variety of items in the space that appears.
1. Choose the menu command: Tools > Index > Configure Index Styles….
2. Choose the index style you want to modify in the Style Name pop-up menu in the Configure Indexes dialog.
3. From the Leader portion at the bottom of the dialog click any one of the following
◦ Custom Character(s) (and enter the character(s) you want to use)
◦ Underline (and choose the style of line you want from the pop-up menu)
Determine the characters that separate page numbers in the index
If a subject is discussed in your document on more than one page and you refer to those pages in the index Nisus Writer Pro offers a number of ways of setting these off from each other. You can customize each one of them by entering the character you want in the text edit box associated with each option.
Use when a subject appears on more than one page and they are not contiguous.
Use when a subject appears on more than one page and they are contiguous.
Use when one subject has a related subject in the index to which you wish to refer.
Have all sub-levels of the index appear on the same line (space permitting)
You can have all sub-levels of the index appear on the same line (space permitting), or, you can have each sub-level indented on a separate line.
► Click (check) Run together all topic sub-entries on the same line.
If you decide to have your sub-levels run together, you can determine the characters that set them apart. The default characters are a colon between the primary indexed term and the sub-level and a semicolon between each sub-entry.
▷ If you want to use a character other than the defaults already present, enter those character(s) in the text edit boxes:
▪︎ Run together sub-entry separator
Set the paragraph style associated with each level of the index
When you first generate an index by choosing Insert Index…, Nisus Writer Pro generates new Styles (one for each level of indexing you have assigned) that were latent in your document. By default each of theses styles is associated with the corresponding level of your index. You can modify the formatting of these styles called Index 1 through Index 9. in the Style Sheet view of Nisus Writer Pro.
1. Choose the menu command: Tools > Index > Configure Index Styles….
2. Choose the Index style you want to modify in the Style Name pop-up menu in the Configure Index Styles dialog.
3. Choose the level and the corresponding Paragraph style from the Formatting for and Use paragraph style pop-up menus.
You can create a new style while in this dialog by clicking the “+” (plus) button beside the Use paragraph style pop-up menu.
If you use a tab to separate the index entry from its reference you can display any one of a variety of items in the space that appears.
Modify the appearance of the text in the index
1. Choose the menu command: View > Style Sheet
2. Select the Index Style you want to modify.
3. Modify the Style as explained in “Edit a style” on page 144.
You can create any number of indexes for your document.
• Subject Index
• Index of Specialized Terms
• Index of “Foreign Language” Terms as described in “Create an index entry which references all text of a given font, size and/or style (or language)” on page 333.
• Index of References
• Table of Authorities (which, while it has the name “table” is actually an index)
Each unique index has its own Style.
1. Choose the menu command: Tools > Index > Configure Index Styles….
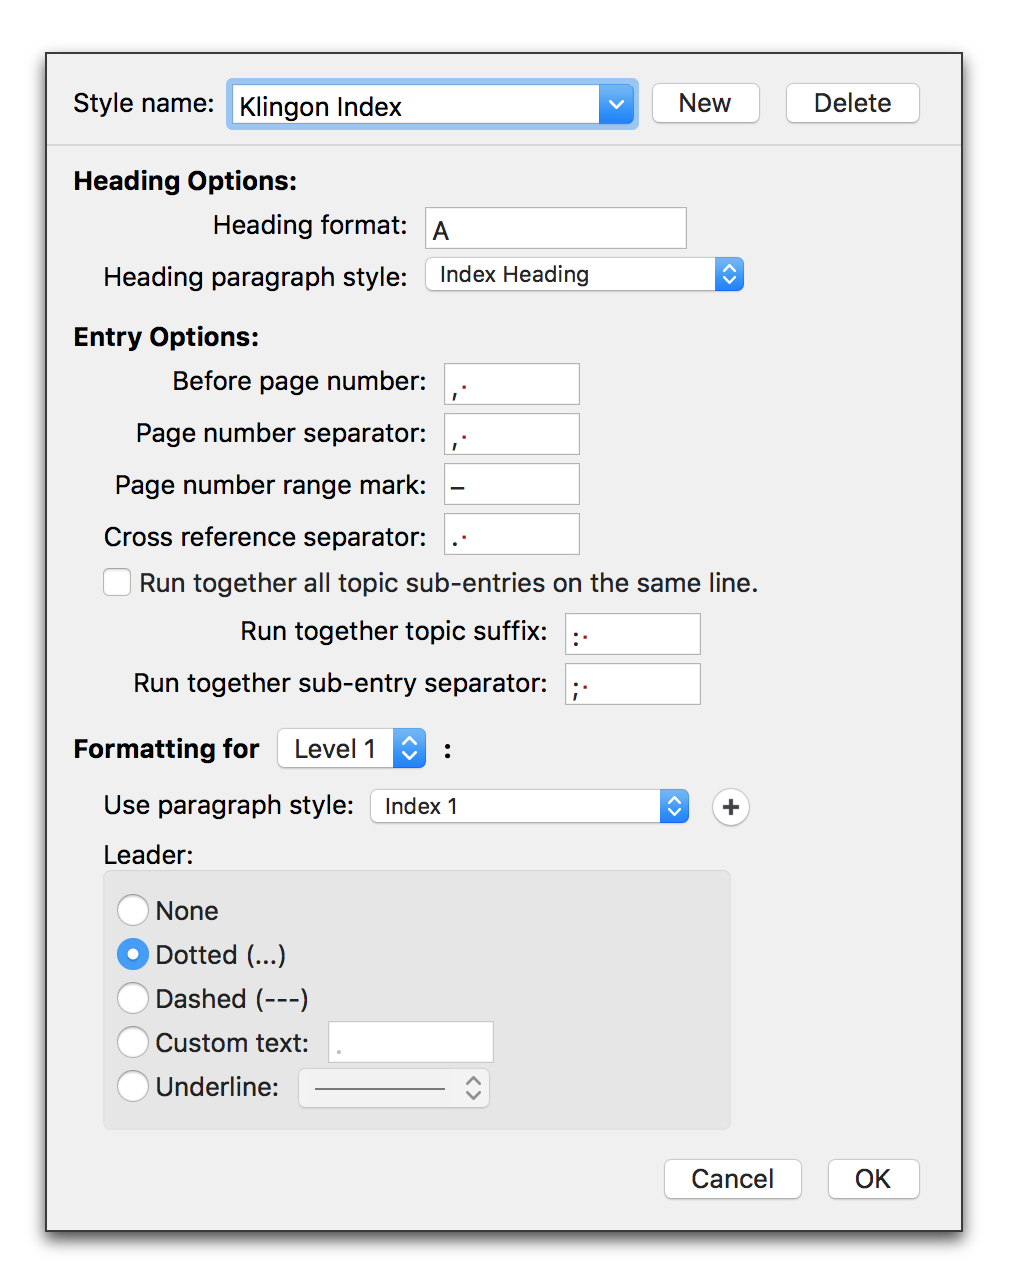
Figure 306
The Configure Indexes dialog with a new index style
3. Name the style appropriately for your needs.
4. Reconfigure the format as you wish as explained in “Format your index” on page 338.
Determine which index is active
The command checked beneath Configure Index Styles… indicates the name of the current index among those that exist in the document. This is the index that is active, highlighted (in the text), and will be inserted when you choose Insert Index…. The active index is the one affected when you choose any of the various commands of the menu Tools > Index.
► Choose the name of that index from the bottom of the menu Tools > Index.
Use the Indexing palette to review what text is indexed, and as what
1. Click the Reference Tools group button on the Palette Dock to display the Indexing palette.
2. Click the right or left-pointing “arrow” to move forward in your document to select the next or previous index entry of the active index style.
The palette displays the topic used in the index, what it is sorted by (if it differs from the topic) and any other special modifications to the indexed entry (if they exist).
Quickly add text to the index of your choice
You can use the Indexing palette to add text to the index without using the menus.
1. Click the Reference Tools group button on the Palette Dock to display the Indexing palette.
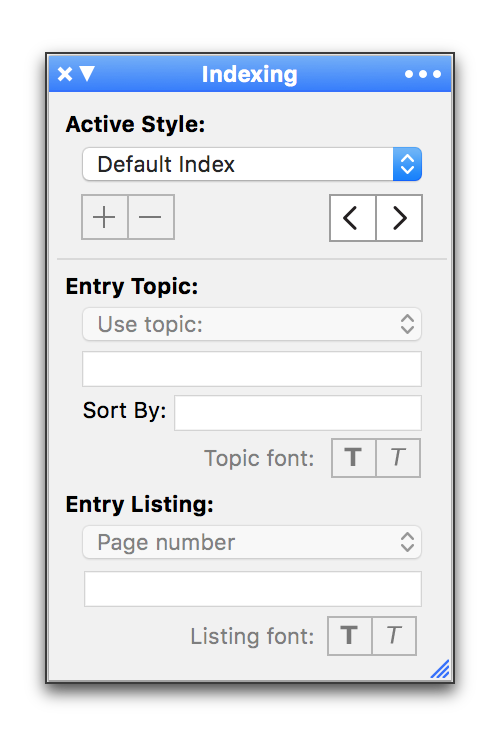
Figure 307
The Indexing palette
2. If you have more than one, choose the index to which you want to add an entry from the Active Style pop-up menu.
3. Select text you want to include in the index.
4. Click the Plus (+) button beneath the Active Style pop-up menu.
5. The selected word appears in the palette in the Entry Topic portion with Use topic selected in the pop-up menu.
▷ Either type a word you want to use if you want to index this as something else (this is the same as choosing the menu command Tools > Index > Index As…, even if you do not change the text there) or
▷ Choose Automatic from the Entry Topic pop-up menu to have the word indexed as it appears in the document.
6. Make any other choices you want as if this were the Index As dialog.
7. Continue adding other words by repeating steps 3 through 6.
Quickly remove text from the index of your choice
You can use the Indexing palette to remove text from the index without using the menus.
► Follow steps 1 through 4 in the section “Quickly add text to the index of your choice” except where it indicates to click the Plus (+) button click the Minus (-) button instead.
Sometimes it’s hard to remember exactly what terms you’ve used during indexing. You could consult a previously inserted index, but that’s potentially cumbersome and may not be up-to-date (if the index hasn’t recently been rebuilt).
To search indexing topics and possibly jump to the indexed text:
► Use the menu Tools > Index > Go to Indexed Text….
A special version of the Go to Content dialog will appear that allows you to filter by indexing topic.
How consecutive page numbers are handled in an index
Nisus Writer Pro checks to see whether you have indexed the same term on consecutive pages. If so, the application automatically concatenates all the numbers of these pages and displays them in the index as a unit with the page number of the first instance followed by a hyphen then the page number of the last instance.
| Previous Chapter Bookmarks and Cross-references |
<< index >> |
Next Chapter Bibliographic Reference Tools |