Views, Tabs, Sidebars, Splits & Focus
You can view the main text area either as it might appear on a page of paper, as a continuous scroll, or in such a way as to block out all other potential visual distractions. Yet another view displays and enables editing of all the styles that control the formatting of your document. In addition to these views, Nisus Writer Pro enables you to display the bookmarks and table of contents you add to your document in sidebars that appear beside the text. If you add comments or track changes to your document these can also be displayed in sidebars on either side of or below the main text. You can also split your document window so that you can see areas of your text that are not contiguous. Nisus Writer Pro can also help you focus on the immediate text by dimming all but the line or paragraph of the current selection.
The controls for Page View, Draft View and Style Sheet view are available at the left edge of the default set of icons on the Nisus Writer Pro Toolbar. If you want quick access to the commands, you can assign keyboard shortcuts using the Menu Keys preferences of Nisus Writer Pro (if you wish to toggle back and forth). The commands are available at the top of the View menu and from the View button on the left edge of the Toolbar.
The View button offers one-click access to the various views of your document that are described below. The button has four parts: three icons on the left representing Draft View, Page View and Style Sheet view, and a reveal triangle on the right that displays additional available views in a pop-up menu.
Each of these and other ways of viewing your document are described below.
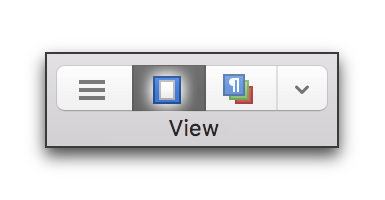
Figure 316
The Page View button on the Toolbar selected
As explained in the section on Pagination beginning on page 422, Nisus Writer Pro comes preset for your new files to display ready to print your file on paper.
To display your document as it would appear on paper:
► Choose the menu command: View > Page View.
► Click the Page View button on the far left of the Nisus Writer Pro Toolbar.
When in Page View you can see:
• The Header and Footer areas;
• Footnotes (if they exist in the document);
• Columns (if you have set multiple columns in your document);
• Line numbers (if you have turned on their display);
• Page Borders (if you have turned them on using the Page Borders palette);
• The Page Guides;
► You can turn the display of the guides on or off by choosing the menu command: View > Page Guides > Show Page Guides.
► You can lock the page guides by choosing the menu command: View > Page Guides > Lock Page Guides (this command toggles: check to lock, uncheck to release).
► When the page guides are visible you can change the margins by dragging the guides. When Show Page Guides is turned off, Lock Page Guides is automatically turned on and disabled to prevent you from accidentally altering the margins.
☞ You can learn more in “Page guide” on page 591.
• The frame around the page;
• The page backdrop;
► You can change the appearance of the line numbers in the Line Numbers palette and the colors of the Page Guides, Page Frame and Page Backdrop in the Appearance preferences.
Nisus Writer Pro is more responsive in Draft View because it does not need to calculate pagination, footnotes, and other complicated aspects of final layout. If your current need is to quickly get your ideas from your mind through your fingers and the keyboard so you can see them on the screen in front of you, you may prefer to write in Draft View.
In Draft View, Nisus Writer Pro displays your document as though it were a continuous scroll rather than individual pages.
To display your document as a continuous scroll:
► Choose the menu command: View > Draft View.
► Click the Draft View button on the far left of the Nisus Writer Pro Toolbar.
When in Draft View very few of the items mentioned in Page View on page 355 are visible. Of those listed above, you can only see:
• Paragraph numbers (which are turned on in the Line Numbers palette… though line numbers themselves are not visible).
You can see images of Nisus Writer Pro documents displaying various aspects of Draft View:
• Figure 366 on page 424 The Draft View
• Figure 367 on page 425 The Draft View with an inserted page break
• Figure 368 on page 427 The Draft View with an inserted page break found
If you want to work on your document while minimizing distractions from other applications that might be running you can use Full Screen view. While you cannot see the Desktop nor the windows of any other application you will still receive notifications from those applications from which you have turned notifications on. You can view your document in either Page View, Draft View or Style Sheet view while in Full Screen view.
When you enter Full Screen view all aspects of your main document window remain visible as they were.
• If your Palette Dock is embedded in the window, entering and exiting full screen does not change the Palette Dock’s visibility. Each document window keeps whatever palette visibility it already had.
• If your Palette Dock is floating when you enter Full Screen, the Palette Dock will be visible and embedded if both the following criteria are met:
◦ the floating Palette Dock is currently visible.
and
◦ the Palette Dock was visible the last time Full Screen was in use for any document, (that is you did not explicitly hide the Palette Dock in Full Screen mode).
• Any floating palettes that have been removed from the Palette Dock or opened from the menu: Palettes > Show Palettes will continue to float wherever they were.

Figure 317
The Menu Bar and options available while in Full Screen view
Moving your pointer to the top of the screen reveals the Menu Bar and a number of Full Screen view options. While you can set a number of these in the Appearance preferences and elsewhere, what you choose here will override those choices. These possibilities include:
• Coloring
A pop-up menu offers:
◦ White Background
shows your text on a white background while also showing any color attributes you have added to your text such as Highlight, Text Color and/or Background Color.
◦ Dark Background
shows your text as white on a black background while also showing any color attributes you have added to your text such as Highlight, Text Color and/or Background Color.
◦ Green Phosphor
shows your text as green on a black background while also showing any color attributes you have added to your text such as Highlight, Text Color and/or Background Color.
◦ Show Preferences
Opens the Appearance preferences of Nisus Writer Pro where, in the Colors portion, at the bottom of the window you can set your preferences for the Document Views controlling Full screen background, Full screen caret, Full screen gutter, and Full screen text.
◦ A slider where you can change the Zoom percentage of the text in the main text of your document window.
◦ A slider where you can change the size of the gutter relative to the main text of your document window.
• Status Bar
A pop-up menu offers:
◦ None
hides the entire Status Bar.
◦ Statistics
Displays only the statistics you have chosen to display in the Status Bar
◦ Full Bar
Displays the full Status Bar
• Focus Mode
A pop-up menu allows you to quickly switch the focus mode, so inactive text appears dimmed. For more details see the section on focus mode.
When you exit Full Screen the Palette Dock will be visible if both the following criteria are met:
◦ the floating Palette Dock was visible before you entered Full Screen
and
◦ the Palette Dock was still visible in Full Screen when you chose to exit it.
If you close the Palette Dock while in Full Screen, the additional width is given to the main document view (not the Navigator nor the Comments, nor Tracked Changes sidebars). If you have your Zoom set a fixed percentage (as displayed on the menu) or to Show Entire Page, only the Full Screen gutter will expand. If, however you have your zoom set to Show Text Width or Show Page Width, the zoom percentage (including Comments and/or Tracked Changes sidebars, though not the Navigator) will expand to fill the available space.
There are numerous colors you can customize for Full Screen view, as described in the section “Document Views” in the Appearance Preferences.
The Style Sheet view of Nisus Writer Pro is described in extensive detail beginning on page 136 and continuing through 165.
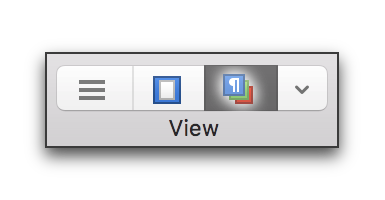
Figure 318
The Style Sheet button on the Toolbar selected
☞ These tabs are not to be confused with the tabs that appear on the horizontal ruler and control the spacing of characters on a line when pressing the →. Those tabs are explained in the section “Set tabs” beginning on page 129.
You can display all your documents in tabs of one window that are familiar from Web browsers).
Nisus Writer Pro displays a Tab Bar between the Toolbar and the Horizontal Ruler (if they are visible). At the far right of the Tab Bar a Plus + sign enables you to open a new untitled document as a new tab. If multiple tabs are open, a close button appears at the left edge of each tab when your pointer hovers over that spot. The document’s name appears in the center of the tab. Whichever tab is active determines the name of the file in the title bar of the window.
Display your documents as tabs in existing windows
You can start displaying your documents as tabs in one window in a variety of ways.
Tabbed window behaviors are partially determined by macOS. This makes their behavior hard to predict precisely in Nisus Writer Pro. That said, the menu command: Window > Document Tabs > Automatic only adds documents as a new tab if a tabbed window already exists, while the menu command: Window > Document Tabs > Always will (naturally) always add a document as a tab, and the menu command: Window > Document Tabs > Never, well…, I’ll never say never, never again.
Use tabs to display your documents in one window
► In a new untitled, or existing open document, choose the menu command: View > Document Tabs > Show Tab Bar. If it is a new document it will appear as illustrated in Figure 319. If it is an existing document, or, when you save the document its name appears in the title bar of the window and in the tab as illustrated in Figure 320.
Every time you choose the menu command: File > New (or click the Plus + sign or choose the menu command: View > Document Tabs > New Tab) the Untitled document (based on the Nisus New File) will appear with its Tab Bar displayed and be added to the window of any existing document as illustrated in Figure 321.
► Choose the menu command: View > Document Tabs > New Tab.
If you do not have the Tab Bar turned on and you do not use tabbed windows on a normal basis the menu command: New Tab will add a tab to the active window. This does not affect the command File > New, which will continue to open new Untitled documents in new windows.
► Choose the menu command: View > Document Tabs > Use Tabs > Always.
This automatically turns on the menu command: View > Document Tabs > Show Tab Bar. Every time you choose the menu command: File > New (or click the Plus + sign or choose the menu command: View > Document Tabs > New Tab) the Untitled document will appear with its Tab Bar displayed and be added to the window of any existing document.
Open a group of documents into one window with many tabs
If you want to open a group of documents into one window…
► Choose the menu command: View > Document Tabs > Use Tabs > Always.
▷ You can open them all at once. Select them in the Finder and choose the Finder menu command: File > Open.
▷ If they were recently open, you can open them one after the other by choosing them from the Nisus Writer Pro menu command: File > Open Recent.
☞ The new tab always appears to the right of the latest tab opened, not to the right of whatever tab may be active.
☞ The setting in the Use Tabs submenu is saved with the application. Therefore, if you quit Nisus Writer Pro with Always turned on when you restart Nisus Writer Pro and choose to open a new file, these new files will appear the Tab Bar turned on, or (if another window is already open) as tabs in another window.
☞ If you set your menu command View > Document Tabs > Use Tabs > Automatic, they will open in separate windows.

Figure 319
An untitled Nisus Writer Pro window with the Tab Bar turned on
.png)
Figure 320
An untitled Nisus Writer Pro window with the Tab Bar turned on and the document saved with a name
.png)
Figure 321
A Nisus Writer Pro window with the Tab Bar turned on and a new tab added (and saved with a name)
The active tab determines the name that appears in the title bar of the window as illustrated in Figure 321.
► You can rearrange the sequence of the tabs in the window by dragging them to the right or left.
► You can control which tab is active by:
▷ clicking its title with the mouse,
▷ choose the menu command: View > Document Tabs > Show Next Tab or Show Previous Tab,
▷ choose that tab’s document name from the Window menu,
or
▷ choose the next or previous tab by assigning a keyboard shortcut to the Show Next Tab or Show Previous Tab using the Menu Keys preferences of Nisus Writer Pro,
☞ Using the keyboard shortcut enables you to shift between your documents (tabs) without taking your hands off the keyboard.
If more than one tab exists in a window, you can close each tab individually or all at once.
► Click the small “x” that appears when you hover over the left edge of the tab beneath the title bar (or Toolbar if it is turned on).
► Choose the menu command: File > Close to close the active tab.
► Click the red close button in the upper left corner of the document window to close all tabs at once.
You can only remove one tab from a window at a time. If a window has more than its own tab, the command View > Document Tabs > Show Tab Bar is disabled.
► You can drag any tab out from its cluster of tabs in a window and make its window float independently of the others. Alternatively you can use the menu command: View > Document Tabs > Move Tab to New Window. Its Tab Bar remains visible and you can add additional tabs to that window by clicking the Plus + sign or choosing the menu command: View > Document Tabs > New Tab), or (if your choice in the Use Tabs submenu is Automatic or Always) choose File > New.
You cannot combine specific open windows so that they appear as tabs in one window. However, you can combine all open windows into multiple tabs in one window.
► Choose the menu command: View > Document Tabs > Merge All Windows.
☞ If there are any open documents you do not want to merge into one window, be sure to close those before choosing the command.
Beside the main text of your document Nisus Writer Pro can display a number of sidebars. These sidebars hold tools for viewing the structure and moving around in your document as well as auxiliary information.
The resizable Navigator sidebar can list content from your document. It can show either bookmarks or table of contents (TOC) entries.
The top of the Navigator sidebar displays a label showing the name of its current mode. You can click that label to switch the mode, eg: from bookmarks to TOC.
This mode shows all bookmarks in your document. The list can sort the bookmarks by their location in the document or alphabetically by name. To learn more about working with bookmarks in the Navigator see in the section “Navigate bookmarks”.
If you add table of contents entries to your document these automatically display in the Navigator. Different levels of the table of contents appear in a hierarchical list that you can collapse or expand. If you have more than one table of contents you can display each of them, though only one at a time. To learn more about working with tables of contents in the Navigator see the sections:
• Display the table of contents Navigator sidebar.
• Use the Table of Contents Navigator as an outline.
Move around within the Navigator
If the Navigator sidebar has keyboard focus (eg: after you clicked on the sidebar), here are a few tips on how to move around within it:
► Type the first few characters of a listed entry to auto-select it.
► Press the up and down arrow keys on your keyboard to move up or down in the list.
► Press Return or Enter to shift the focus back to the text area of your document.
☞ You can select a range of entries in the Navigator and copy their text.
You can close the navigator sidebar using any of the following:
► Click the ✖️ button on the left side of the navigator’s titlebar.
► Uncheck the menu View > Navigator > Show Navigator to toggle it off.
► Click the navigator titlebar’s Ellipsis icon to show the contextual menu and choose Hide Navigator.
Navigator Settings and Appearance
The Appearance Preferences allow you to customize the Navigator sidebar font, Navigator background color, and Navigator text color.
By default the Navigator appears on the left side of your document. To display Navigator sidebar on the right side of your document:
► Choose (uncheck) the menu command: View > Navigator > Attach on Left Side.
You (and any co-editors you might have) can add comments to your document. Comments initially appear in a sidebar on the left side of your main text. If the Navigator is open, the Comments sidebar appears between the Navigator and the main text. Comments can be shown whenever you are in Draft View, Page View and Full Screen but not in Style Sheet view. You can also display the comments as part of a split view of your document as explained below in the section: “Main Text with Comments” on page 369. A full discussion of Comments is in the section “Use Comments” on page 497.
You (and any co-editors you might have) can track, review and accept or delete changes made to the main text of your document. Nisus Writer Pro can monitor these alterations. These revisions can include nearly every change you make except changes to floating shapes, or modifications to inline images (other than to note that they have been added to your document). If the Navigator is open, the Tracked Changes sidebar appears to the right of the main text. Tracked Changes can be shown whenever you are in Draft View, Page View and Full Screen but not in Style Sheet view. You can also display the tracked changes as part of a split view of your document as explained below in the section: “Main Text with Tracked Changes” on page 370. A full discussion of tracking changes is in the section “Track Changes” on page 521.
You can simultaneously scroll through two (or more) document windows (or splits of a window). When you scroll through one document, the other(s) scrolls at the same speed. When you scroll through various splits (either notes, comments or tracked changes) the ancillary content associated with the content displayed in the main text of your document scrolls into view.
Synchronize scrolling of documents
1. Open the two documents you want to scroll.
2. Choose the menu command: View > Synchronize Scrolling….
Nisus Writer Pro displays an overlay banner directing you to Click another open document area to synchronize scrolling…. When your pointer hovers over another open document window another overlay banner indicating that the window is selected for Synchronize Scrolling appears. These overlay bars are illustrated in Figure 322.
3. Click anywhere in the window you want to scroll synchronously.
A brief animation linking the two files “scrolls” through them indicating that they will scroll together.


Figure 322
The Overlay Banners for synchronized scrolling
The documents scroll from the location of their insertion points. If the insertion point of one document is at the top and another is somewhere near the middle, they will scroll together from that point. If the insertion points of both documents are at the top they will scroll together to the bottom of the shorter document.
Add more documents to scroll synchronously
You can have as many documents scroll together as you like.
1. Open the additional document.
2. Proceed with steps 2 and 3 in the section “Synchronize scrolling of documents” on page 361.
Continue with this process to add more documents to scroll together.
Stop documents from scrolling synchronously
Nisus Writer Pro does not save whether a file is set to scroll synchronously when you close it. If you do not want to close one of the linked windows…
1. Make the document you want to remove from scrolling the active window.
2. Choose the menu command: View > Synchronize Scrolling….
Synchronize scrolling the main text with ancillary content of your document
You can display the main text of your document. This is explained in detail in the section: “Splits” beginning on page 363. When you display a split with your ancillary content Nisus Writer Pro automatically scrolls the content of both the main text and the ancillary content synchronously.
☞ Your insertion point does not need to move in order to cause the two splits to scroll.
In this context, to scroll synchronously means:
• When viewing the main text with notes, the split with the footnotes does not scroll unless and until a note appears in the main text; and the reverse if you scroll the notes, the main text does not scroll unless and until a corresponding note reference appears in the main text. You can learn more about working with notes in the section: “Main Text with Notes” on page 368.
• When viewing the main text with comments, the split with the comments does not scroll unless and until a comment appears in the main text; and the reverse if you scroll the comments, the main text does not scroll unless and until a corresponding selection with an associated comment appears in the main text. You can learn more about working with splits and comments in the section: “Main Text with Comments” on page 369.
• When viewing the main text with tracked changes, the split with the changes does not scroll unless and until a tracked change appears in the main text; and the reverse if you scroll the tracked changes, the main text does not scroll unless and until a corresponding selection with an associated tracked change appears in the main text. You can learn more about working with splits and tracked changes in the section: “Main Text with Tracked Changes” on page 370.
• When viewing the main text with the Style Sheet the behavior is different. In this context, your insertion point must move in the main document to cause the Style Sheet to display the style associated with that particular bit of text. In order to accomplish the reverse: scroll backward or forward in the main text based on the selected Character, Paragraph or other style, click the Find Previous or Find Next buttons in the upper right corner of the style definition box. You can learn more about working with splits and style sheets in the section: “Main Text with Style Sheet” on page 371.
You can split your document either vertically or horizontally so that various non-contiguous parts of the main text are visible at once. For example, you can view your introduction and conclusion, two distant portions of a comma or tab delimited row of data as illustrated in Figure 325, or even two succeeding pages side by side as illustrated in Figure 326. You can divide the view of your document so that the main text appears in one split and the footnotes/endnotes, Comments, Tracked Changes and/or the Style Sheet view appear in others.
When you add splits, that state of the document is saved when you close the file. The splits that existed when you closed the file reappear when you reopen it.
Depending on how much screen real estate you have, you can add as many splits as you like as illustrated in Figure 323. Perhaps a more useful collection of splits would be to examine the first and last mentions of a particular term, as illustrated in Figure 324 where the first and last uses of the name “Black Beauty” occur in Anna Sewell’s novel of that name appear.
Nisus Writer Pro can dim or fade inactive splits. The degree of dimming is controlled by the option “Fade inactive document split views by” in the Appearance Preferences.
.png)
Figure 323
Split Views gone wild
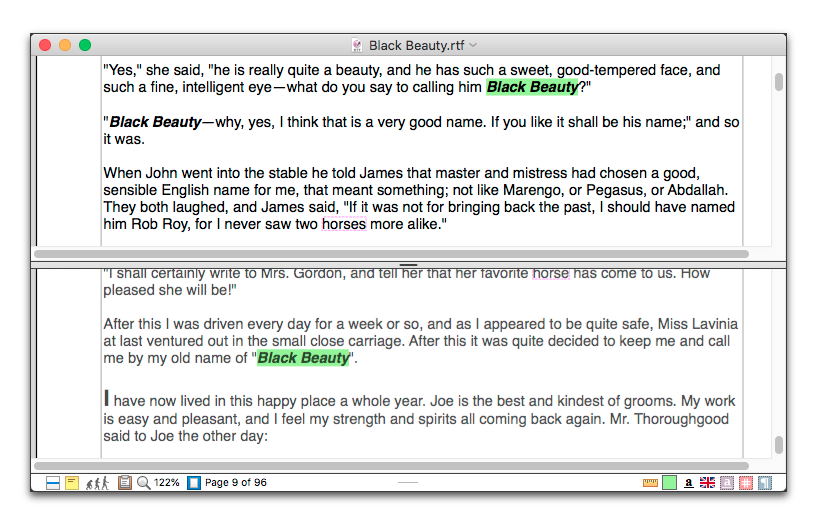
Figure 324
First and last mentions of Black Beauty in the novel by Anna Sewell
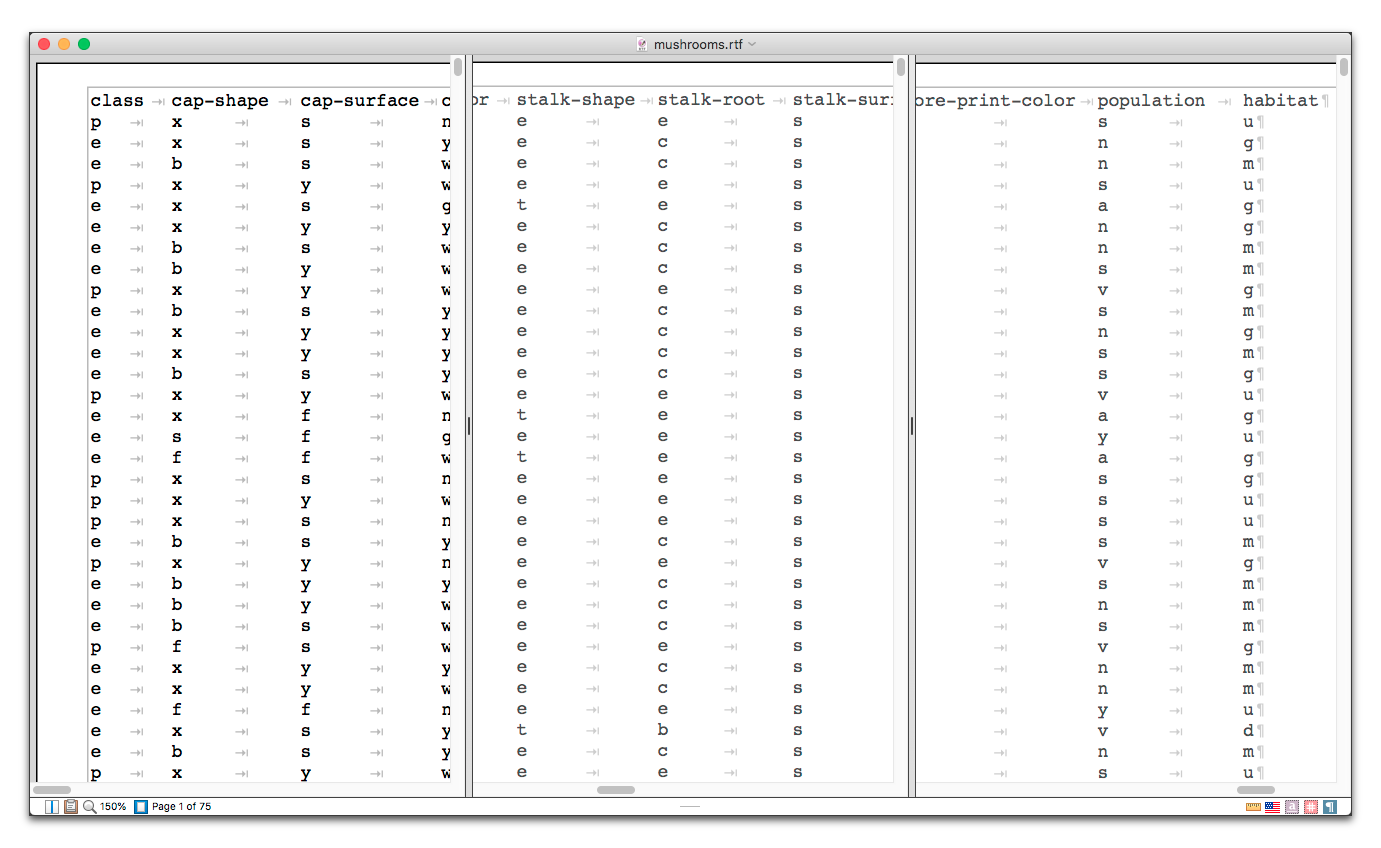
Figure 325
Beginning middle and last columns of a multi-column database on mushroom classification
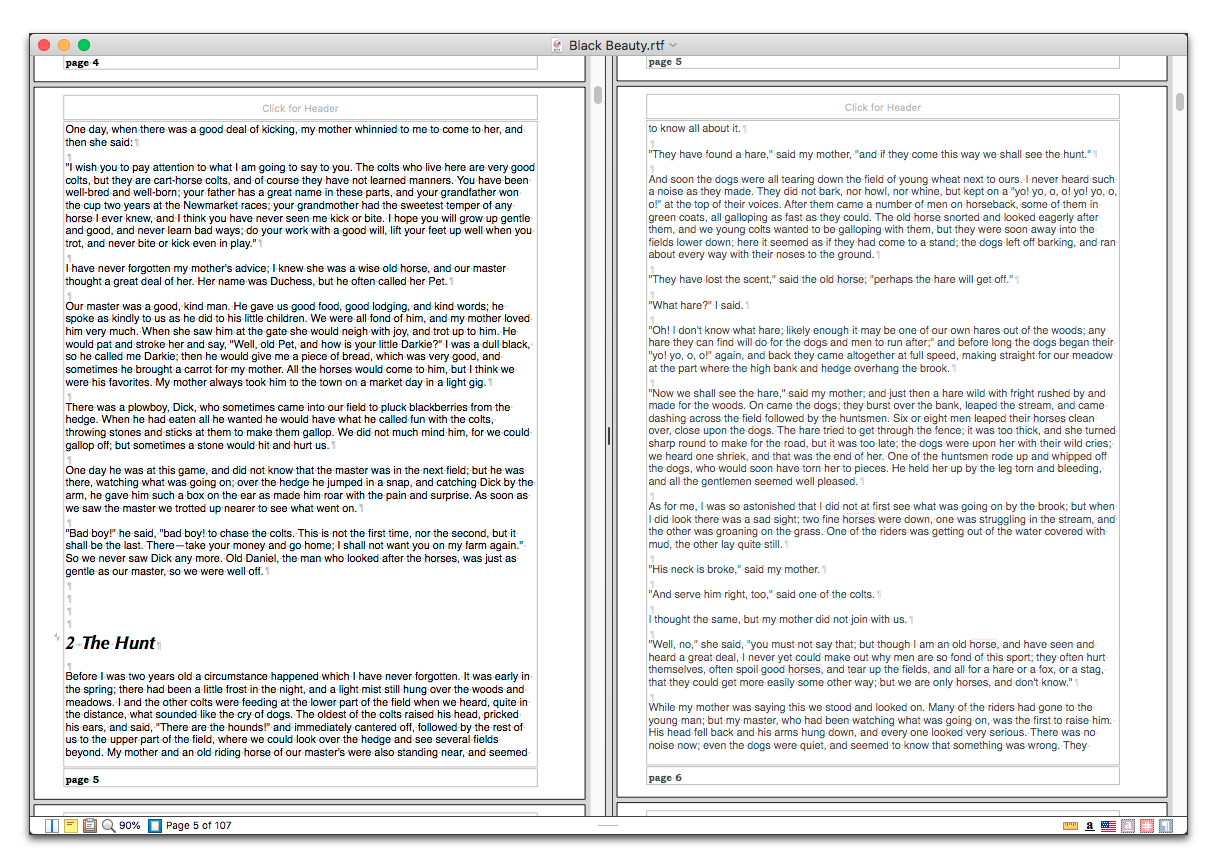
Figure 326
Pages 5 and 6 of Black Beauty displayed side by side
When you split your window a Split View Divider appears between each split.
The Split View Divider. illustrated in Figure 327, has two tools.
• In the center of the Divider a small grabber enables you to resize the splits by dragging it, or anywhere on the Divider, either up/down or right/left (depending on the orientation of the split).
• On the left/bottom of the Divider (depending on the orientation of the split) is a small Split View Options menu button. Clicking the button presents menu commands to (once again depending on the orientation of the split):
• Close Split Above or Close Split Left
• Close Split Below or Close Split Right
as well as alter the Split Orientation

Figure 327
The Split View Divider
If you add a split view showing any of the ancillary content of your main text (Notes, Comments and/or Tracked Changes) the Split View Options Bar, illustrated in Figure 328, appears above the splits.
☞ The Split View Divider always appears between the two splits. The Split View Options Bar always appears above the ancillary content.
When the pointer hovers over the area of the split with the Options Bar (whether or not that split is active), the Bar displays (from left to right) a “Close Button” designated as an “x” the kind ancillary content displayed and an “…” (Ellipsis, or Options menu). On the far right a checkbox enables you to hide or display the main text.


Figure 328
Two states of the Split View Options Bar (showing Footnotes) beneath the Split View Divider
The Ellipsis, or Options menu contains a number of commands. You can choose to:
• View using the submenu to switch the ancillary split to:
…and depending on what kind of ancillary content your document has:
• Hide Main Text which corresponds to the checkbox on the far right of the Split View Options Bar. This toggles on and off the display of the main text so that you can focus exclusively on the ancillary content.
☞ Depending on which ancillary content is displayed in the split, different commands are enabled/displayed. These will be described in the sections below, pertaining to the different ways you can display your splits.
On the far right of the Split View Options Bar a Hide Main Text checkbox enables you to hide or display the main text. This corresponds to the command Hide Main Text available from the Ellipsis, or Options menu on the left side of the Bar.
You can display your main text along with its corresponding notes.
► Choose the menu command: View > Split View > Add Split Showing Notes.
Nisus Writer Pro automatically turns on (checks) the menu command: View > Synchronize Scrolling…. This enables you to scroll through your document and see the main text along with the relevant notes (whether footnotes or endnotes).
If your document contains only footnotes or only endnotes the Split View Options Bar will indicate either one or the other. If your document contains both, the Split View Options Bar will be labeled Footnotes & Endnotes.
The Ellipsis, or Options menu on the Split View Options Bar introduced on page 368 contains a number of commands. In addition to those described above, those that appear in the Split View Options Bar when notes are viewed include:
• Convert to Endnote (or Convert to Footnote depending on which form of note you selected).
• Set Custom Note Reference… which is explained in the section “Use an asterisk or other custom symbol for note references” on page 261.
• Edit Style: Footnote which opens the Style Sheet view (in place of the main text) with the Footnote style selected. To return to the main text choose the desired command from the View menu: Draft View, Page View or Full Screen View.
• Edit Style: Endnote which opens the Style Sheet view (in place of the main text) with the Endnote style selected. To return to the main text choose the desired command from the View menu: Draft View, Page View or Full Screen View.
Display two views of the same ancillary content
If you have many notes and you want to compare those from one portion of the document with those from another, you can add additional splits showing the notes.
1. Open document.
2. Choose the menu command: View > Split View > Horizontal Orientation.
3. Choose the menu command: View > Split View > Add Split Showing Notes.
4. Because Nisus Writer Pro automatically turns on Synchronize Scrolling when you show a split with the notes, choose the menu command: View > Synchronize Scrolling… to turn it off.
5. Click your insertion point in the notes split and choose the menu command View > Split View > Add Split.
Your document now shows the main text in the top split and two independent views of the notes in the two splits below.
6. Make sure your insertion point is in the middle split (from top to bottom, the first notes split), and choose the menu command: View > Split View > Add Split once again.
There are now four splits, three displaying notes.
7. With insertion point in the middle notes split use the “…” (Ellipsis, or Options menu) of that Split View Options Bar and choose the menu command: View > Draft View (or Page View, depending on what the other main text view is at the top of the document window).
8. Click your insertion point in top split (the main text) and choose the menu command: View > Synchronize Scrolling…, then click the split with notes immediately beneath it.
9. Finally, click your insertion point in the third split (the second display of the main text) and choose the menu command: View > Synchronize Scrolling…, then click the split with notes immediately beneath it.
Now you have two independent views of the main text with the associated notes each scrolling synchronously. This enables you to examine (for example) note 1 (which may appear on page 3) and note 36 (which may appear on page 75).
You can display your main text along with its corresponding comments. You can find a full explanation of working with Comments in Nisus Writer Pro in the section: “Use Comments” beginning on page 497.
► Choose the menu command: View > Split View > Add Split Showing Comments.
Nisus Writer Pro automatically turns on (checks) the menu command: View > Synchronize Scrolling…. This enables you to scroll through your document and see the main text along with the relevant comments.
The “…” (Ellipsis, or Options menu) introduced on page 368 contains a number of commands. In addition to those described above, those that appear in the Split View Options Bar when comments are viewed include:
• Hide Inactive Comments which hides all comments other than those closest to the paragraph with the insertion point.
• Show Comments which, being checked “✓” because the Comments are open, closes the Comments split.
• Show Comment Icons in Margin turns on/off the display of a small comment note icon in the margin wherever a comment has been added to your document. Double-clicking the note icon opens the Comments if they are closed. If any comments appear in the document an icon appears beside each paragraph when the pointer hovers in the margin at the paragraph’s start.
• Show Comment Highlighting in Text turns on/off a highlight for the selected text to which a comment has been added.
◦ None hides your document’s comments whether they appear in a sidebar or a split view.
◦ Sidebar displays your document’s comments in a sidebar on either the right or left side of the main text (depending on your setting in the Comment Display Options window).
◦ Split View displays your document’s comments in a split view beneath the main text.
• Show Authors displays a submenu with the names of any users who have added comments to your document. Beneath All Authors appear the names of all users who have added comments to your document. Choose any one author or as many authors as you want to display only their comments.
• All Authors displays the comments of every editor who has made comments in the document.
• Comment Display Options… opens a window that enables you to set a wide variety of display options for your comments. The options can be set apply differently for each document.
• Export All Comments… creates a new Nisus Writer Pro document with the name “‘Filename’ - Comments” containing all the comments added to your document, including the author of the comment and the date it was added.
Main Text with Tracked Changes
You can display your main text along with its corresponding tracked changes. You can find a full explanation of working with Tracked Changes in Nisus Writer Pro in the section: “Track Changes” beginning on page 521.
► Choose the menu command: View > Split View > Add Split Showing Tracked Changes.
Nisus Writer Pro automatically turns on (checks) the menu command: View > Synchronize Scrolling…. This enables you to scroll through your document and see the main text along with the relevant changes.
The Ellipsis, or Options menu introduced on page 368 contains a number of commands. In addition to those described above, those that appear in the Split View Options Bar when tracked changes are viewed include:
• Hide Inactive Tracked Changes which hides all changes other than those closest to the paragraph with the insertion point.
• Track Changes turns on/off the monitoring of changes to your document.
• Track Change Options… opens a floating windoid that enables you to set a variety of display and other options for your tracked changes
• Review Changes… opens a window and scans the document for changes, enabling you to appraise the changes made to the document and accept or reject them without opening the Tracked Changes sidebar.
• Accept All Changes… accepts all changes in the document, removing the change highlights and corresponding notes in the Tracked Changes sidebar.
• Reject All Changes… rejects all changes in the document, restoring the original text and/or formatting and removing the change highlights and corresponding notes in the Tracked Changes sidebar.
• Show Changes which, being checked “✓” because the Tracked Changes are open, closes the Tracked Changes split.
• Show Change Icons in Margin turns on/off the display of a small change icon in the margin wherever a tracked change has been made in your document.
• Show Change Highlighting in Text turns on/off a highlight for the selected text to which a tracked change has been made.
◦ None hides your document’s tracked changes whether they appear in a side sidebar or a split view.
◦ Sidebar displays your document’s tracked changes in a sidebar on either the right or left side of the main text (depending on your setting in the Track Change Options window).
◦ Split View displays your document’s tracked changes in a split view beneath the main text.
• Show Authors displays a submenu with the names of any users who have made tracked changes to your document. Beneath All Authors appear the names of any users who have made tracked changes to your document. Choose any one or as many as you want to display only those changes.
• All Authors displays the tracked changes of every reader who has made tracked changes in the document.
• Export All Tracked Changes… creates a new Nisus Writer Pro document with the name “‘Filename’ - Tracked Changes” containing all the tracked changes made in your document, including the author of the change and the date it was made.
You can display your main text along with its corresponding styles. You can find a full explanation of working with styles in Nisus Writer Pro in the section: “Style Sheets” beginning on page 136.
► Choose the menu command: View > Split View > Add Split Showing Style Sheet.
Nisus Writer Pro automatically turns on (checks) the menu command: View > Synchronize Scrolling…. This enables you to scroll through your document and see the main text along with the relevant changes.
The “…” (Ellipsis, or Options menu) introduced on page 368 contains only those basic commands.
The split opens and displays the style definition box(s) for the style(s) currently selected in the document as illustrated in Figure 329. Click the Find Previous or Find Next buttons (circled in red in the illustration) in the upper right corner of each style’s definition box to select the previous or next instance of text in that style.
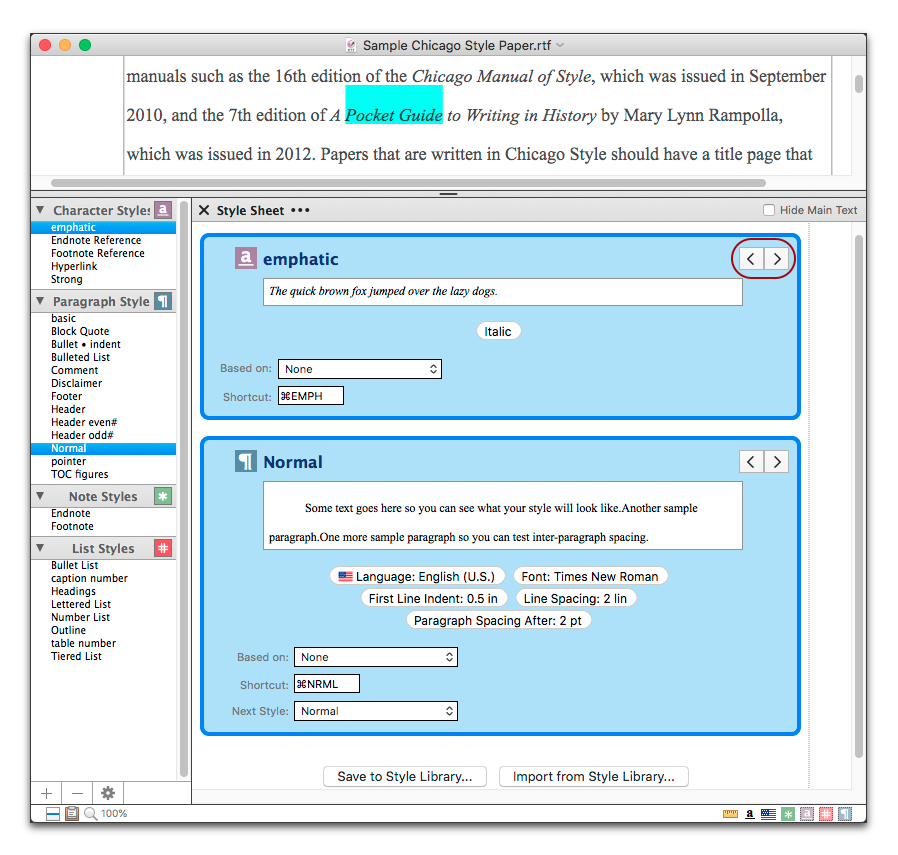
Figure 329
A split showing the Style Sheet
In addition to the sample text in the Style Sheet view, when you make changes to the styles in the Style Sheet split you can see your entire document update the changes in formatting in real time.
If you open more than one split you can edit the Main Text of your document while keeping the footnotes and endnotes visible and also have available thoughts about what you want to write or review comments from your editors, all at the same time. If you need to examine tracked changes in the notes, you can switch to that view by using the Split View Options Bar’s Ellipsis, or Options menu and choosing the menu command: View > Track Changes View and then switch to any other kind of ancillary content.
You can change the ancillary content viewed in a split.
► Depending on whichever split view happens to be open choose an alternate view from the Ellipsis, or Options menu, the View submenu:
or:
There are a number of methods for closing splits in your document window.
► Depending on which split you wish to close (and the vertical or horizontal orientation of your splits), click the options button on the left (or bottom) edge of the Split View Divider and choose the menu command:
▷ Close Split Above or Close Split Left.
▷ Close Split Below or Close Split Right.
► Click the “Close Button” designated as an “x” on the left edge of the Split View Options Bar.
► Choose the menu command: View > Split View > Remove Split.
This closes the active split. An overlay banner indicates which split will close.
► Choose the menu command: View > Split View > Remove All Other Splits.
This closes all but the active split displaying the main text of your document. Overlay banners indicate which splits will close.
► Drag the Split View Divider quickly to the top of the window. As you release the mouse button the split disappears.

Figure 330
The Split View Divider dragged to the very top
☞ If you close a split with Notes, Comments, or Tracked Changes, you can click the close button at the left edge of the Split View Options Bar to reveal the main text once again.
Nisus Writer Pro offers a variety of tools for zooming in and out of your document, enabling you to take a close look at odd characters or get the sense of a few pages of your document. Zooming in to see what your document looks like (even on the Clipboard so you don’t have to change the view of your entire document as illustrated in Figure 331). Alternatively, you can zoom out to get a sense of multiple pages of your document as illustrated in Figure 218 on page 232 and Figure 255 on page 279.
You can zoom using the commands of the
• View menu (to which you can assign keyboard shortcuts)
• Page Zoom tag on the Status Bar
• Page Zoom palette.
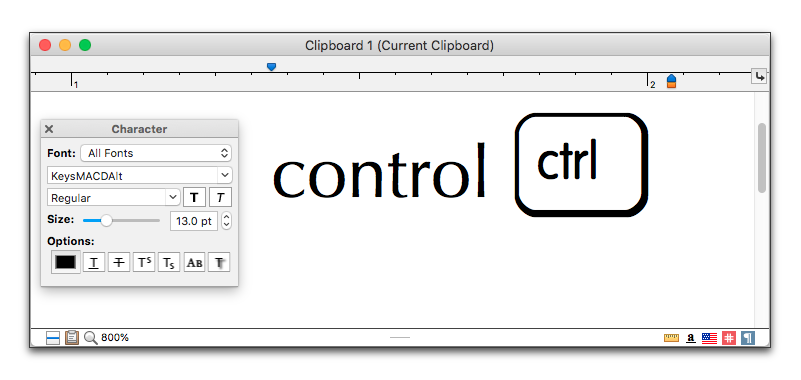
Figure 331
The Clipboard zoomed to 800% to examine an unusual 13 pt character
While it does not appear in any of the default sets, the Page Zoom palette is very useful. As with the Status Bar at the bottom of each Nisus Writer Pro document window, its title bar indicates (when in Page View) the page number of the currently displayed page (not the location of the insertion point), and the total number of pages in your document. A “magnifying glass” and slider indicate the percentage to which you have zoomed your window and enables quick zooming. It also offers additional tools relating to the magnification of your document’s display.
► Choose the menu command: Window > Palettes > Floating Palettes > Page Zoom or View > Palettes > Floating Palettes > Page Zoom.
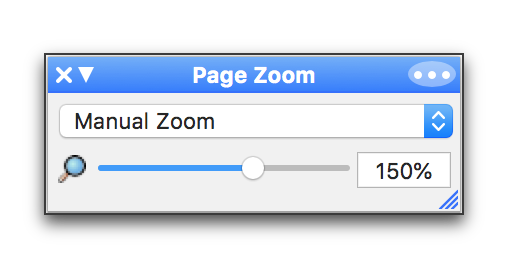
Figure 332
The Page Zoom palette
► Click and drag the slider in the Page Zoom palette.
► Double-click in the percent zoom text box and type the percent you want to increase or decrease the display.
You can have a different zoom percentage for Page View or Draft View. The percent set in Draft View is maintained in Full Screen view.
When in Page View Nisus Writer Pro can zoom your page in a variety of manners.
Show the maximum width within the Page View window
► In the Page View palette choose Show Text Width from the pop-up menu at the top.
This zooms your document in such a way so that the entire text width of your page is always visible while hiding the margins. As you resize the window, the page zooms.
Show the maximum width including the margins in Page View
► In the Page View palette choose Show Page Width from the pop-up menu at the top.
This zooms your document in such a way so that the entire page of your document is always visible including to the edge of the page (on which it might be printed). As you resize the window, the page zooms.
Show the entire width and height in Page View
► In the Page View palette choose Show Entire Page from the pop-up menu at the top.
This displays your document in a format similar to Page (or Print) Preview; it is, however, fully editable. In this view you can scroll through your document one full page at a time by clicking your pointer on the scrollbar. As you resize the window, the page zooms so that an entire page is always visible.
Show the text zoomed at a designated percentage in Page View
► In the Page View palette choose Manual Zoom from the pop-up menu at the top.
This displays your document at whatever zoomed percentage you set. As you resize the window, the page zoom remains the same and portions of your document’s text may be hidden.
In addition to the tools of the Statusbar’s Page Zoom tag the Page Zoom palette contains the tools of the Page Number tag.
If you have multiple sections in your document or you have begun your page number counting at something other than 1, you can choose commands from the “…” (Ellipsis, or Options menu) to Show Physical Page Numbers (that is, counting every page that would print on paper) or Show Logical Page Numbers (that is the numbers of pages you have assigned in Nisus Writer Pro).
You can also choose the menu command: Go to Page…. You can learn more about quickly moving between distant pages of your document in the section: “Jump to a particular page” on page 379.
With the deluge of digital data flooding into our workspace it is good to have tools that can help us focus. In addition to Full Screen view described beginning on page 355, which minimizes distractions from other applications that might be running, Nisus Writer Pro can help you dim inactive text.
When focus mode is enabled only the text containing your selection or insertion point appears brightly. All inactive text fades out and appears dim on screen. To control focus mode use the commands on the menu View > Focus Mode:
• None: Disable focus mode and display all text normally.
• Line: Focus the line containing your selection or insertion point.
• Paragraph: Focus the entire paragraph containing your selection or insertion point.
You can set the degree to which Nisus Writer Pro dims inactive text by the option “Focus mode fades inactive text by” in the Appearance Preferences.
☞ Focus mode is purely an on-screen display feature. It never affects printouts or PDFs.
Focus can be particularly useful when you are examining your document and using Find/Replace to search for a particular instance of a find expression. If you set your focus mode to Line, not only will the selection highlight (as set in the Appearance preferences of Nisus Writer Pro, explained in the section: “Find & replace” on page 576) and make the found item stand out, with all other text, above and below the selection dimmed your eyes are sure to focus on what you seek.
With Typewriter Scrolling you can determine how much of the visible area should appear above the selection or insertion point as you type.
• 25% would keep the selection near the top of the visible area.
• 50% would center the selection.
• 75% would keep the selection near the bottom of the visible area.
The setting is determined in the General preferences of Nisus Writer Pro as explained in the section “Text Editing” beginning on page 569.
☞ You need to test what is best for you in a document that is sufficiently long. If there is not enough content ( at least more than a screen), or you are typing at the very top or very bottom of the file, Nisus Writer Pro can't keep the text centered because there's nowhere to scroll to.
| Previous Chapter View and Work in Documents |
<< index >> |
Next Chapter Move Around in Your Documents |