%20and%20not%20(Paragraph%20Styles).png)
Nisus Writer Pro has multiple ways of handling the various possible combinations of fonts, sizes, colors and paragraph formats, languages and other character formats. While the vast majority of word processors allow you to define styles that apply to entire paragraphs, in Nisus Writer Pro you can also apply a collection of formats to a single character. This offers you much greater control over the final look of your document as well as the manner in which you can modify it. A Style Sheet is a collection of formats associated with your document. Each style can consist of a variety of characteristics and be as precise as you want, so as to define the font, size, underline characteristic, color, spacing, line wrap, tab locations, and language. Or, a style can consist of as little as one characteristic.
☞ Please note we use the word “style” to refer to the user defined styles (whether shipped with Nisus Writer Pro or created by you, the individual user) which appear in the Style Sheet view of Nisus Writer Pro, in the Character Style and Paragraph Style submenus of the Format menu, the Styles buttons on the Toolbar, and in the Styles palettes. This document uses the word “format” to refer to those other means of altering the appearance of your characters which you choose directly from the Format menu and apply individually.
Style Sheets can provide a variety of functionalities:
• Styles can help you to automatically format document content including text and rulers, with a single click or keystroke using sets of predefined formats you, the user define.
• Styles can help you to automatically re-format your document as you the user change any style definitions.
• Styles enable you to store that formatting in a way that can be reused in other documents.
Nisus Writer Pro comes with a Nisus New File that includes a number of predefined styles. These appear in the Styles palettes, the Styles buttons on the Toolbar, as well as in the Character Style and Paragraph Style submenus of the Format menu, and in the Style Sheet view of your untitled document.
☞ You can modify these styles, or add more styles which meet your writing needs. Any formats you can apply to text using the Format menu and its submenus you can use to create a paragraph style, while those that do not affect entire paragraphs you can use to create a character style. In addition a number of the tools in various palettes are also available.
In order to have these styles available to you at any time, each time you open a “New” (Untitled) file you need to add them to your Nisus New File. Instructions on how to modify your Nisus New File are explained in “Create a Nisus New File” on page 597.
In addition, you can create any number of unique named template files with different Style Sheets in them, each one for a different purpose. You can learn more about the Nisus New File and other template documents in the section “Understanding Template (Stationery) Documents” beginning on page 586
As an alternative, you can manage your styles using the Style Library of the Document Manager. The Document Manager is explained in detail in the section “Manage… Save and Open Files” beginning on page 73. The Style Library is explained in detail in the section “Maintain a Style Library” beginning on page 154.
Working with styles makes it easy for you to experiment with the appearance of your document. Changing a style only affects the formats that are specifically linked to that style. Once you change a style, all text of that style in the document changes to match the modifications.
The various tools for using styles
Nisus Writer Pro supplies a number of devices for applying styles and their attributes to your text. These include tools for applying styles, creating and editing styles, and diagnosing the formatting of your documents’ styles. Some of these tools are described in more details here and in other portions of this Guide.
• Applying styles
As mentioned above, Nisus Writer Pro comes with a Nisus New File that contains a variety of styles you can apply to your text. These are described beginning on page 137.
• Creating and editing styles
The Style Sheet view enables you to create new styles and edit the attributes of existing styles. It is described beginning on page 142.
• Diagnosing the styles and their attributes as they are applied to your document, as described in the section “Use the Formatting Examiner” beginning on page 485.
Applying styles to your text is easy. Rather than choosing a font, then a size, then bold and/or italic and possibly a color, when you choose a style, all the formatting associated with it are applied at once.
1. Select the text to which you wish to apply the style.
2. Apply the style
► Click that style’s name once in the Styles palettes.
► Choose the style’s name from the Character Style or Paragraph Style button on the Toolbar.
► Choose the style’s name from the Character Style and/or Paragraph Style submenus of the Format menu.
► Choose the style’s name from the Character Style or Paragraph Style tag pop-up menu on the Status Bar.
When you apply a paragraph style Nisus Writer Pro removes certain characteristics that may already be associated with the text and substitutes the formatting of the style you are applying.
• Existing paragraph formats are always removed (for example); only one paragraph style can be associated with any string of text at one time
◦ line spacing (leading)
◦ paragraph spacing
• Character formats are removed only if the applied paragraph style defines a setting for those characteristics (for example)
◦ color
◦ italics
◦ List formats are removed only if the applied paragraph style defines a setting for that property.
When you apply a character style (for example Emphatic) Nisus Writer Pro removes all character formats that may already be associated with the text (except language)
◦ color
◦ italics
☞ Nisus Writer Pro only removes a language attribute if the applied style has a different language associated with it.
The styles present in the shipped Nisus New File consist of four types: character, paragraph, list, and notes. The Character Styles palette and the Paragraph Styles palette list all the styles in your document and enable you to apply a collection of attributes to selected text with one click of the mouse or trackpad. While the two palettes display character and paragraph styles by default, you can cause them to display list styles and note styles as well, as explained in “List and Note styles in the palettes” on page 139.
The styles names are listed in their palettes sorted alphabetically. Many of these supplied styles use standard names and formatting common in HTML documents. An icon identifying the type style appears along the left edge of this name in the list. If there is a keyboard shortcut associated with that style, that appears to the right of the style’s name.
The name of the style of the current selection is highlighted in gray. If a selection consists of text using more than one style (a “mixed selection”) the names of all applied styles are highlighted using special coloring, as described in the section Mixed selections.
Figure 122 The Character Styles palette showing a mixed selection (left); the Paragraph Styles palette showing a normal selection.
The difference between various kinds of styles
Nisus Writer Pro supports four kinds of styles
• Paragraph Styles
Apply the associated formats to the entire paragraph.
• Character Styles
Apply the associated formats to selected text only (and it can overlay the formatting of a Paragraph Style). These include those that determine the appearance of the footnote or endnote reference character in the document. Character Styles toggle on or off the same way that choosing individual characteristics (such as Bold, Italic, Outline or Shadow).
• List Styles
Apply to the lists you insert in your document.
• Notes Styles.
Apply to the notes areas of your document.
The Nisus New File that comes shipped with Nisus Writer Pro contains a number of styles.
Styles of the Paragraph Styles palette
• Block Quote Use for indented blocks of quoted text;
• Footer Use for text in the footer. This style is already present when you click in the footer;
• Header Use for text in the header. This style is already present when you click in the header;
• Heading 1 Use for top level headings;
• Heading 2 Use for second level headings;
• Heading 3 Use for third level headings;
• Heading 4 Use for fourth level headings;
• Heading 5 Use for fifth level headings;
• Heading 6 Use for sixth level headings;
• Normal Use for your basic flowing paragraphs of text;
• Title Use for your document’s title;
Styles of the Character Styles palette
• Emphatic Use to emphasize smaller amounts of your text with italics;
• Note Reference
Used for your note markers in your text;
• Strong Use to emphasize smaller amounts of your text with bold;
• Note Reference in Note
Use to determine the display of the note reference marker in your endnotes and/or footnotes.
The Lists palette is dedicated to showing and controlling list styles. However, you can optionally show list styles in any styles palette: open the palette’s contextual menu and enable the option Show List Styles.
For a list of built-in list styles see “Add list numbers to paragraphs”.
Styles of the Note Styles palette
Similar to the List Styles palette, there is no independent Notes Styles palette. However, you can choose to display Notes styles in either the Character Styles or the Paragraph Styles palette.
• Endnote The style applied to the endnotes in your document.
• Footnote The style applied to the footnotes in your document.
In addition to the close x and the reveal triangle on the left edge of the palettes’ title bar, the Styles palettes contain three menus to help you work with the styles of your document. The commands in each set differ slightly depending on which set of styles are displayed. Clockwise from the upper right corner they are:
The “…” (ellipsis, or options) menu
The commands of the “…” (Ellipsis, or Options) menu control the appearance of the palette itself.
Collapses the palette so that it displays only one style with all others available in a pop-up menu.
Enlarges the palette to show a scrollable list of up to six of the available styles in the document.
☞ You can also use the drag bar or enlarge corner illustrated in Figure 27 on page 25 to condense and expand the palettes.
Either of the two palettes can display any and all of the four sets of styles. The following four commands toggle on/off.
When checked displays all the character styles in your document. A style icon button menu, similar to the corresponding tag on the Statusbar, appears in the lower right corner of the palette to indicate which styles are available in the palette.
When checked displays all the paragraph styles in your document. A style icon button menu, similar to the corresponding tag on the Statusbar, appears in the lower right corner of the palette to indicate which styles are available in the palette.
When checked displays all the list styles in your document. A style icon button menu, similar to the corresponding tag on the Statusbar, appears in the lower right corner of the palette to indicate which styles are available in the palette.
When checked displays all the note styles in your document. A style icon button menu, similar to the corresponding tag on the Statusbar, appears in the lower right corner of the palette to indicate which styles are available in the palette.
☞ It is possible to turn off the display each of the sets of styles and the palette will appear empty. Simply choose one of the commands above and the styles will reappear in the palette. Alternatively, if you remove the display of all the styles, when you drag the palette outside the Dock or return it to the Dock, that palette’s default set will be displayed.
You can modify the display of the styles in the Styles palettes to make them WYSIWYG or not.
Nisus Writer Pro generally displays your Styles palettes with the characteristics of that style so that each style’s name appears with all its character formatting. You can change this. The options are illustrated in Figure 123.
Removes all formatting.
Displays all formatting including possible extreme height characteristics.
Displays the formatting, but maintains a similar height for all styles.
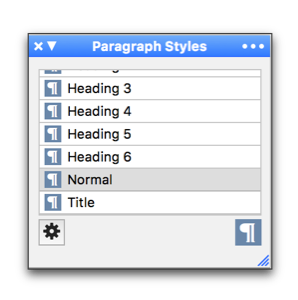
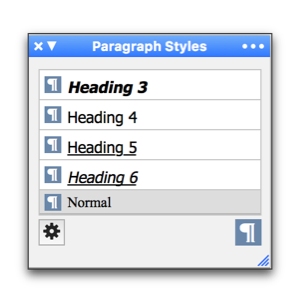
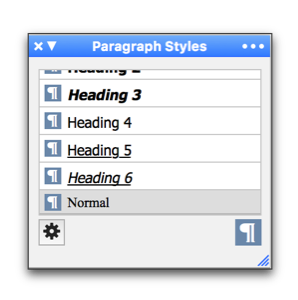
Figure 123
The Styles palette showing Plain Text, Formatted Text, and Formatted Text - Small Size views
The last two commands in the menu change depending on whether the palette is in the Dock or floating.
• Attach Palette to Dock / Detach as Floating Palette
If the palette is floating, choose Attach Palette to Dock to cause the palette to return to the Dock (whether or not the Dock, and the appropriate palette group is visible).
If the palette is in the Dock, choose Detach as Floating Palette to cause the palette float independent of the Dock.
Visible only when the palette is in the Dock, choosing it will present a warning dialog, illustrated in Figure 124. While you cannot undo this action you can restore a removed palette to the Dock as explained in the section: “Customize the Dock and its Palettes” on page 622.
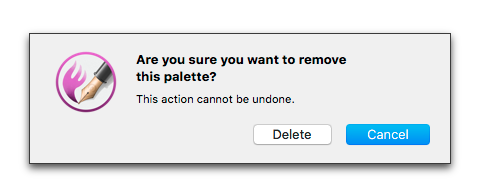
Figure 124
The remove palette warning dialog
The lower right corner of the palette displays a button similar to those that appear on the right edge of the Statusbar as illustrated and described in the section: “Formatting tags” on page 19.
The style icon button menu of the Character and Paragraph Styles palettes
The commands of these menus are identical except for where one refers to “Character” the other refers to “Paragraph”. They offer additional access to the commands of the main menu: Format > Character Style and Format > Paragraph Style.
• New Character Style Based on Selection
• Redefine Style from Selection
The style icon button menu of the List Styles palette
The commands of the List style icon button menu mirror those of the top portion of the commands of the main menu: Format > Lists.
• Restart Numbering / Continue Numbering from Previous
These two commands toggle. The first restarts the numbering sequence for every paragraph that is selected. The second resumes the numbering sequence from the last number or letter before any break was introduced.
Removes any of the numbers that have been automatically created.
The style icon button menu of the Note Styles palette
The commands of the Note style icon button menu mirror those of the top portion of the commands of the main menu: Format > Note Style.
• Redefine Style from Selection
• Remove Custom Note Reference
The lower right corner of the palette displays a Gear. The menu that appear when you click it is the same for all four versions of the Styles palette.
• Remove Attributes Except Styles
You can modify the display of the styles in the Styles palettes to make them WYSIWYG or not.
Nisus Writer Pro generally displays your Styles palettes with the characteristics of that style so that each style’s name appears with all its character formatting. You can change this. The options are illustrated in Figure 123.
► From the “…” (Ellipsis, or Options menu) on the title bar of any of the Styles palettes choose the menu command:
• Style Preview Mode > Plain Text to remove all formatting,
• Style Preview Mode > Formatted Text to display all formatting including possible extreme height characteristics, or
• Style Preview Mode > Formatted Text - Small Size to display the formatting, but maintain a similar height for all styles.
The Style Sheet view’s interface
The Style Sheet view, illustrated in Figure 126 on page 143 lists all the styles of the document in a sidebar along the left side of the window (that you can hide or reveal, minimize or enlarge (to make sure you see the styles’ full name) by dragging the vertical line that separates it from the Style Definition area). The Styles are listed in alphabetical order grouped by Character Styles followed by Paragraph Styles and then Note Styles and, finally, List Styles. You can display all styles or a sub-set of them by clicking the reveal triangle to the left of that section’s title bar, or the title bar itself. You can view two or more styles that are not contiguous by pressing ⌘ as you click each style name. You can select a range of styles by pressing ⇧ as you drag across the list.
Each style has its own portion of the Style Definition area. When you select a style, its controls activate in a blue rounded rectangle as illustrated in Figure 127 on page 144. The upper left area displays the style’s name and beneath that a sample of text as it would appear in the document. (You can modify either, or both, of these.)
In the upper right corner of the blue rectangle are search forward and search backward buttons. Clicking either one of those buttons splits the screen to display your main text above and the Style Sheet view below and selects the next or previous set of characters in the designated style (depending on which button you click). If the selected style exists in the document but has not been applied to any text, Nisus Writer Pro flashes an overlay banner with the text: “Found no occurrences”.
Above the style’s rectangle the horizontal ruler appears (though you can turn this off/on). If you edit a Character Style the ruler is disabled, as the ruler can only affect Paragraph level styles.
Above the ruler is the Split Options Bar. You can learn more about splitting your document window in the section: “Splits” beginning on page 363. The x on the far left closes the Style Sheet view and returns you to the main document view (Draft View or Page View, whichever had been active before the Style Sheet view). The “…” (Ellipsis, or Options menu) on the Split Options Bar enables you to switch to any other available view of your document (depending on whether or not you have notes, comments and/or tracked changes, or hide or display the main text). On the far right a checkbox also enables you to hide or display the main text of our document.
At the bottom of the window, below the style definition area, two buttons enable you to save the active styles to a library of styles, or import an existing style from a library of styles. You can learn more about Style libraries in the section: “Maintain a Style Library” on page 154.
See the Style Sheet associated with a document
You can see (and edit) all the details of all the styles in your document, using any of the following methods.
☞ This changes the view of your document. It momentarily (while in that view) hides the text of your document.
► Choose the menu command: View > Style Sheet.
► Click the Style Sheet portion of the View button on the Toolbar.
.png)
Figure 125
The Styles Sheet portion (selected) of the View button
► Choose the menu command: Gear > Edit Styles… at the bottom of any of the Styles palettes.
► Choose Edit Style… from the style tag menus on right edge of the Status Bar at the bottom of the document window to display the style in which your insertion point appears.
► Double-click the active style’s name in the Styles palette to display and edit the style you double-clicked.
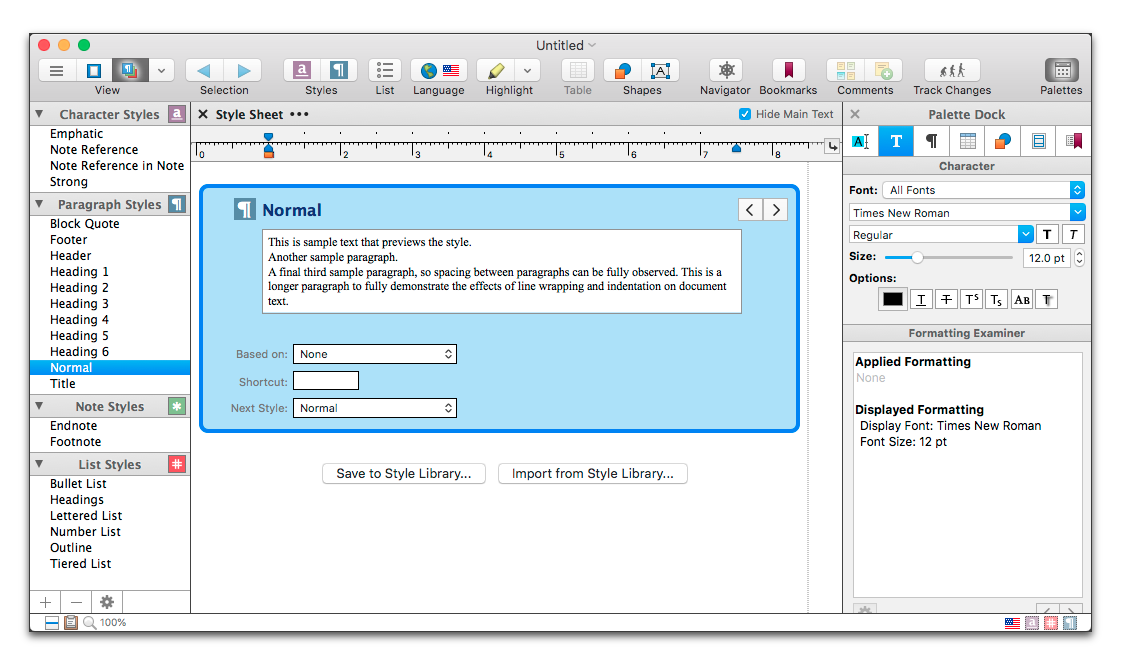
Figure 126
The Style Sheet view
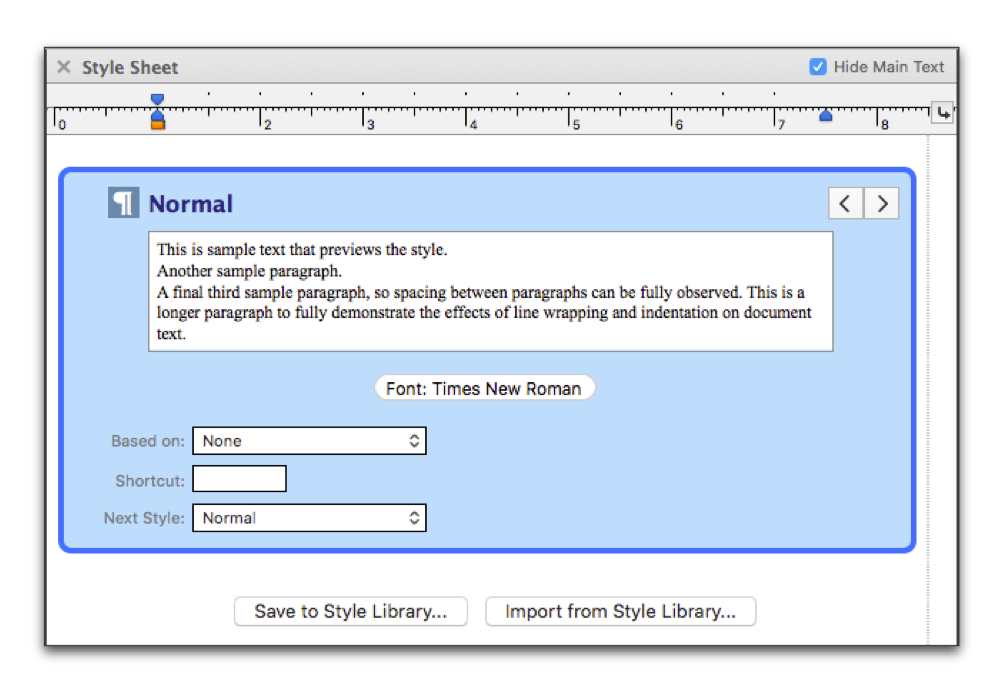
Figure 127
The default Normal style in Style Sheet view
Beneath the sample text within the blue rounded rectangle, in clearly readable “bubbles”, are all the characteristics that make up the selected styles. You can click to select and delete any of the formats you do not want as part of the style. You can use the tools of the Character and Paragraph palettes (among others) to make the changes you want to alter the formatting of the selected style.
Below the sample text and the “bubbles” and to the left are controls you can use to
• determine on what other style in the document this should style be based, as explained in the section: “Have one style inherit the formats of another” on page 145;
• assign a keyboard shortcut to the style, as illustrated in Figure 129 on page 147;
• determine the style automatically assigned to the next paragraph (when you press ⏎), as explained in the section: “Determine the style of the next paragraph of your text automatically” on page 147.
You can edit all the details of all the styles in your document.
1. Display Style Sheet view of your document as explained in “See the Style Sheet associated with a document” on page 143.
2. Select the style (or styles) you want to modify.
Or
► Double-click a style’s name in the Styles palette to display the style you double-clicked.
► Choose Edit Styles… from the Gear menu in the lower left corner of the appropriate Styles palette.
► Press ⌘ as you click each style’s name.
► Press ⇧ as you drag across a number of styles.
☞ When you have more than one style selected you can only change those characteristics that they currently share. Changing any of the non-shared formats will automatically deselect those styles that do not share the property.
Once you’ve selected a style in the Style Sheet view you can use all the usual tools to edit textual formatting. For example: the Format menu, the Character and Paragraph palettes, the toolbar, etc. Any formatting the style defines will appear underneath the style preview as “bubbles” like so:

Figure 128
A style preview area indicating the style enforces formatting for font size, bold, and underline.
The style preview area will showcase the final formatting of text using the style, including any formatting that is inherited from the parent (based on) style. However, bubbles will not be displayed for formatting inherited from the parent style; only formatting defined by this style will be shown as bubbles.
To remove enforced formatting, click any formatting bubble to select it, and press the Delete key to remove it.
Styles can also enforce the removal of formatting, e.g.: unbold. To enforce such removals:
1. Select the style in the Style Sheet view.
2. Apply the formatting as usual, e.g.: use the Bold menu to enable bold.
3. Toggle the formatting off to enforce its removal, e.g.: activate the Bold command a second time.
You should see a formatting bubble appear that displays the negated formatting like so:

Once the Style Sheet is open and you have selected a style…
1. Click in the name area of the selected style.
2. Select or delete the text there and type the name you want as illustrated in Figure 132 on page 149.
Have one style inherit the formats of another
Once the Style Sheet is open and you have selected a style…
► Choose that style’s name from the Based on pop-up menu.
☞ Depending on the style you choose, both Paragraph and Character (as well as the various Note and List) Styles are available here. However, the only style names that appear in the pop-up menu are those that are available. If Heading 3 is based on Heading 2 and Heading 2 is based on Heading 1 which is based on Title, which is based on Normal, the Normal style cannot (logically) be based on Title, Headings 1, 2, nor 3.
For example…
Normal style has the paragraph formats (listed in alphabetical order)
• First Line Indent 0
• Font Times
• Line Spacing 1 lin
• Paragraph Spacing After 6
• Paragraph Spacing Before 0
• Text Alignment Left
Heading 1 style is based on Normal. To distinguish it from Normal you only need to designate
◦ Bold
◦ Font Size 14 pt
◦ Font Lucida Grande
◦ Paragraph Spacing After 0
◦ Paragraph Spacing Before 6
◦ All other formats will remain the same as those for Normal.
Heading 2 style is based on Heading 1. To distinguish it from Heading 1 we only want to make it a bit smaller
◦ Font Size 13 pt
◦ All other formats will remain the same as those for Heading 1.
You can “base” Paragraph Styles on other Paragraph Styles and have different Character Styles underlying them. You cannot base a Character Style on a Paragraph Style.
Determine the style of the next paragraph of your text automatically
Generally, when you type descriptive text, each new paragraph shares the same formatting as the one that preceded it. Headings are exceptions to this. Usually a heading is immediately followed by normal text. The styles of Nisus Writer Pro take this into account. You can determine the style of the following paragraph.
1. Choose the menu command: View > Style Sheet.
2. Select the style you want to modify from the sidebar on the left.
3. Choose the style for the next paragraph from the Next Style pop-up menu.
☞ Normal style is already set to follow the various Heading styles and the Title style.
4. Return to Draft View or Page View.
Assign a keyboard shortcut to your style as you edit it
Nisus Writer Pro allows you to assign keyboard shortcuts to any command of the program. You can set your keyboard shortcuts in the Preferences as explained in “Menu Keys for Menu Commands” on page 578. However, while you are busy working on your styles, Nisus Writer Pro allows you to assign the shortcuts right in the Style Sheet view.
1. Click your insertion point in the Shortcut box.
2. Type the key you want for your shortcut.
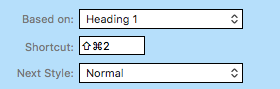
Figure 129
Assigning a Menu Key shortcut in the Style Sheet view
Remove a keyboard shortcut from your style
1. Click your insertion point in the Shortcut field.
2. Press ⌫.
Change the sample text that illustrates your style
The right side of the Style Sheet view has a window with a string of text. While one line of text is usually sufficient for illustrating your Title and Heading styles, for your Normal style you would probably want at least three paragraphs of text to be able to see not only the leading (line spacing) but the space allocated before and after paragraphs.
1. Click the style name to select the style you want to modify.
2. Click your insertion point in the sample text field and select all the text there (Choose the menu command: Edit > Select > Select All or press ⌘a).
3. Paste any text you have on the Clipboard or type in the text you want as illustrative.
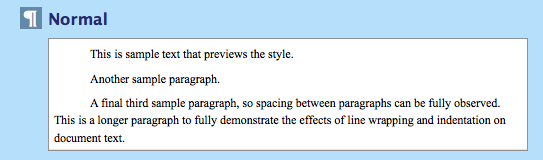
Figure 130
Changing the text and paragraph formatting in Style Sheet view
Quickly remove formats that define your style
Beneath the string of text on the right side of the Style Sheet view indicators appear in little “bubbles”. Each bubble represents a different format associated with that style.
1. Click the style name to select the style you want to modify.
2. Click to select the format you wish to remove.
3. Press ⌫ to remove that format.
☞ When you delete any of these formats, the style assumes the reigning format of the style upon which it is based. If it is not based on any particular style, it assumes the format set in the Format portion of your New File preferences (the Nisus New File) as illustrated in Figure 509 on page 593.
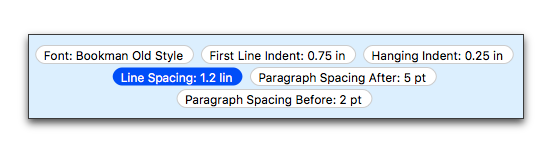
Figure 131
The format “bubbles” of the Style Sheet view illustrated in Figure 130 above with “Line Spacing” selected
Add or modify formats associated with your style
1. Click the name of the Style you want to modify in the sidebar on the left of the window.
2. Make the changes you want using the appropriate menus or palettes.
Your writing needs may differ from those of others. You may need various kinds of numbered lists or “block-quoted” text, or sections of computer code. You can create a new style to control these or any other block of text you want to format.
1. Choose
►  the menu command: Insert > New Style > Character Style Based on Selection to create a style that inherits the character formatting of the text in which your insertion point appears.
►  the menu command: Insert > New Style > Paragraph Style Based on Selection to create a style that inherits the character and paragraph formatting of the text in which your insertion point appears.
►  the menu command: Insert > New Style > Character Style to create an entirely new style that has no relationship to the text in which your insertion point appears.
►  the menu command: Insert > New Style > Paragraph Style to create an entirely new style that has no relationship to the text in which your insertion point appears.
►  the menu command: Insert > New Style > List Style to create an entirely new style that has no relationship to the text in which your insertion point appears.
☞ Variants of these same commands appear if you click the Plus (+) button pop-up menu in the Styles palette.
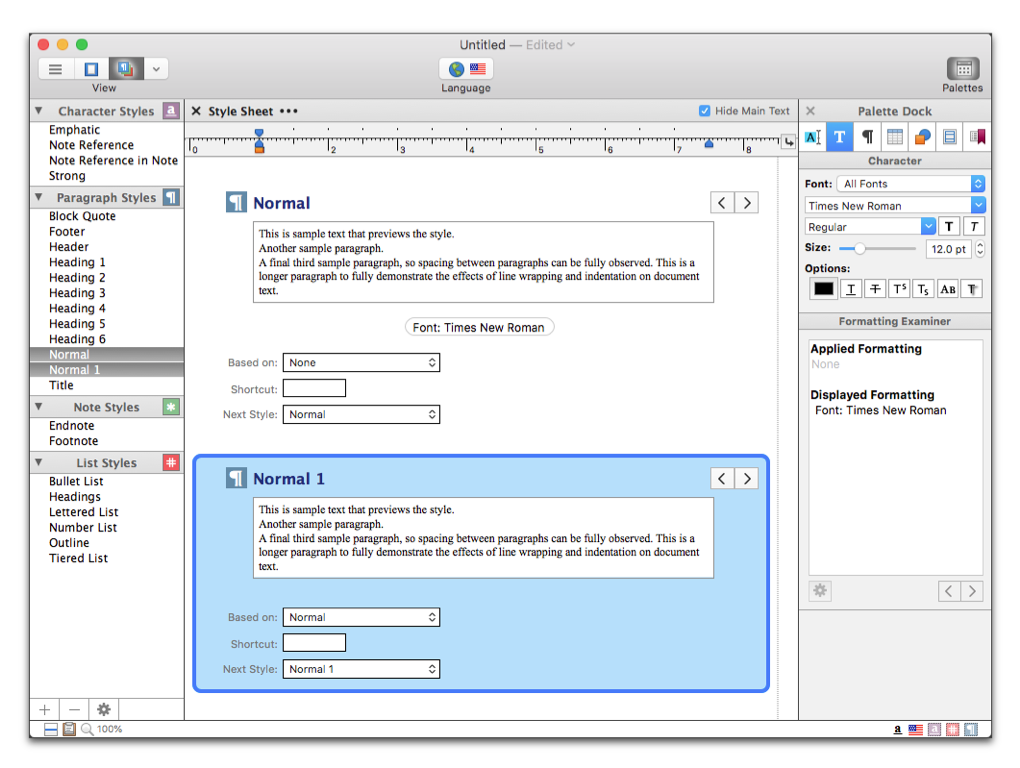
Figure 132
The new paragraph style based on the selection
2. Give the style a unique name.
3. Modify the style’s formats as explained in “Edit a style” on page 144.
Nisus Writer Pro offers fully-flexible Formatting Sensitive search features, which can find text using particular styles.
palette also provides extensive formatting search features. However, in simple circumstances it’s easier to use the following built-in style search commands.
To find all text in your document using a single style:
1. Place the insertion point in any text that is using that particular style.
2. Choose the command Select All in Style from any of the following places:
• The menu Format > Character Style.
• The menu Format > Paragraph Style.
• The menu Format > Note Style.
• The style tags on the Status Bar.
• The style icons in the The Styles palettes.
The above process will expand the selection to include all text in your document that is using the style. This is likely to be a multi-part selection that you can’t see on screen all at once, but you can now manipulate all of the text. For example, you could remove the style from all text.
In order to get a better overview of all text using a style, or go through and review each case one-by-one, you can display a list of matches in a Find All results list window. After you follow the above instructions to select all text using a style, use the menu Edit > Select > Show Selection in Results Window.
Alternatively see the section “Search for matches in text using a style” below.
Jump to the next text using a style
You can quickly jump to the next bit of text that’s using a particular style. This will be the same style that’s applied to the currently selected text.
Instead of following the full instructions in the section above “Find all text using a style”, use the menu command Select Next in Style, which is available from the same locations.
Search for matches in text using a style
You may want to see only text in a particular style that includes certain words or characters. In other words: you want to search for text matches, but only within text using a particular style.
► Use the menu Format > Character Style > Go to Text in Style….
► Use the menu Format > Paragraph Style > Go to Text in Style….
A special version of the Go to Content dialog will appear that allows you to filter all text using a particular style. This allows you to quickly jump to the desired text, or open a Find All results list window of all matches.
Remove a style’s formats from selected text
You may have a document with styles associated with text that you no longer want. You can easily remove that Style from the text.
1. Click your insertion point inside any area of text of the Paragraph Level Style which you wish to remove.
2. Choose
► the menu command: Format > Paragraph Style > Remove Paragraph Styles,
or
► Remove Style from the Paragraph Level  style tag on the Statusbar of the document window, or
► Remove Paragraph Styles from the  pop-up menu in the Paragraph Styles palette.
► from the Paragraph Level  Styles button on the Toolbar.
3. If it is a Character Level style, select the range of text from which you wish to remove the style and choose
► the menu command: Format > Character Style > Remove Character Styles, or
► Remove Style from the Character Level  style tag on the Status Bar or
► Remove Character Styles from the  pop-up menu in the Character Styles palette.
► from the Character Level  Styles button on the Toolbar.
Remove a character format from your text
Removing formats from your text is easy.
1. Click your insertion point in the area of text which has the format you wish to remove.
2. Choose Select Range or Select All from the Character Formatting tag on the Status Bar.
3. Choose Remove Font from the Character Formatting tag on the Status Bar.
When you remove these character formats, any underlying paragraph style characteristics appear. If no paragraph style is assigned to the text, whatever you have set in the Format portion of the New File preferences, as illustrated in Figure 509 on page 593 will appear.
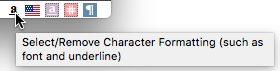
Figure 133
The Select/Remove Character Formatting tag on the Status Bar
Remove a style from your document
You may have received a document with styles that do not match the way in which you do your work. You can remove all vestiges of that style from your document (both the style’s name and the fact that it is applied to text in your document).
1. Choose the menu command: View > Style Sheet.
2. Click the name of the style you wish to remove.
☞ Be sure not to click inside the style’s name or the sample text area or on any of the characteristics that make up the style.
3. Either:
► Press ⌫, or
► Click the Minus (-) button at the bottom of the list of styles in the lower left area of the document window.
If your style is not applied to any text you will see the following dialog:
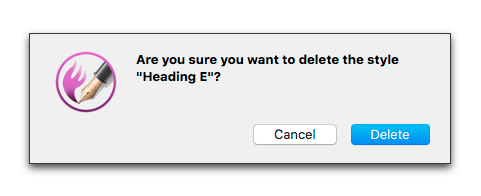
Figure 134
The “style is not currently used” dialog
If, however, your style is applied to text you will see the following dialog, which states that “This style is currently used in the document. Deleting it may change the formatting of your document.”:
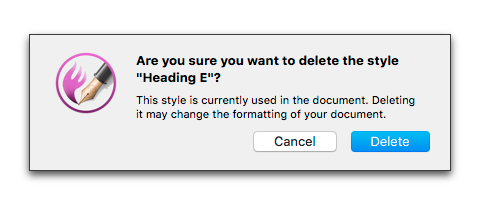
Figure 135
The “style is currently used” dialog
You should consider carefully how you want to proceed.
Resolve conflicts between styles
You can copy and paste text with its associated styles from one document to another.
Depending on what you have set in your General preferences of Nisus Writer Pro (as explained in “Set “Defaults” for the Application” on page 566) you have a variety of choices. The default is set to Always ask me what to do.
If a Style with the same name already exists in a new document, but it has different formatting, Nisus Writer Pro presents a sheet that offers a series of choices.
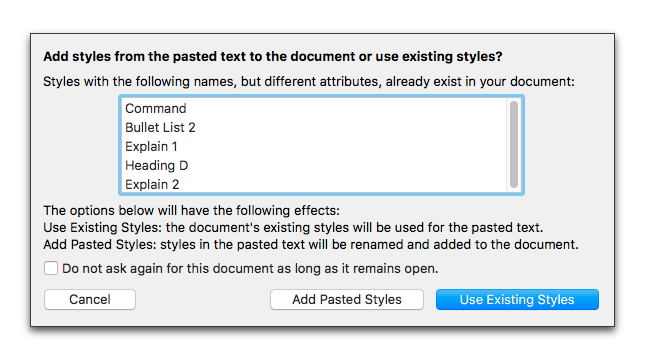
Figure 136
The Style conflict sheet
As explained in the dialog sheet that appears, the options have these effects
The document’s existing styles will be used for the pasted text.
The styles in the pasted text will be renamed (by appending a numeral in sequence) and added to the styles of the document.
If you are secure in your decisions you can check:
◦ Do not ask again for this document as long as it remains open.
If you are not sure what you want to do:
As explained in the beginning of this section on pages 136 and 137, Nisus Writer Pro displays all of the styles that exist in a particular document in the Style Sheet view and in the Styles palettes as well as on the Character Style, Paragraph Style and Note Style submenus of the Format menu. The Nisus New File comes with a variety of styles built in, as explained on 137. You can add as many styles as you want to the Nisus New File so that all your favorite styles are always available in each new document you open, but that might make it hard to find just the few styles you regularly use.
The solution is to create a number of files, each containing styles specific to one particular kind of project and save them in the Style Library folder of the Document Manager. You can then import any styles you want on an as-needed basis into your current document.
The Document Manager is described in depth on pages 80 - 100.
Creating a style library is simple. There are a variety of methods.
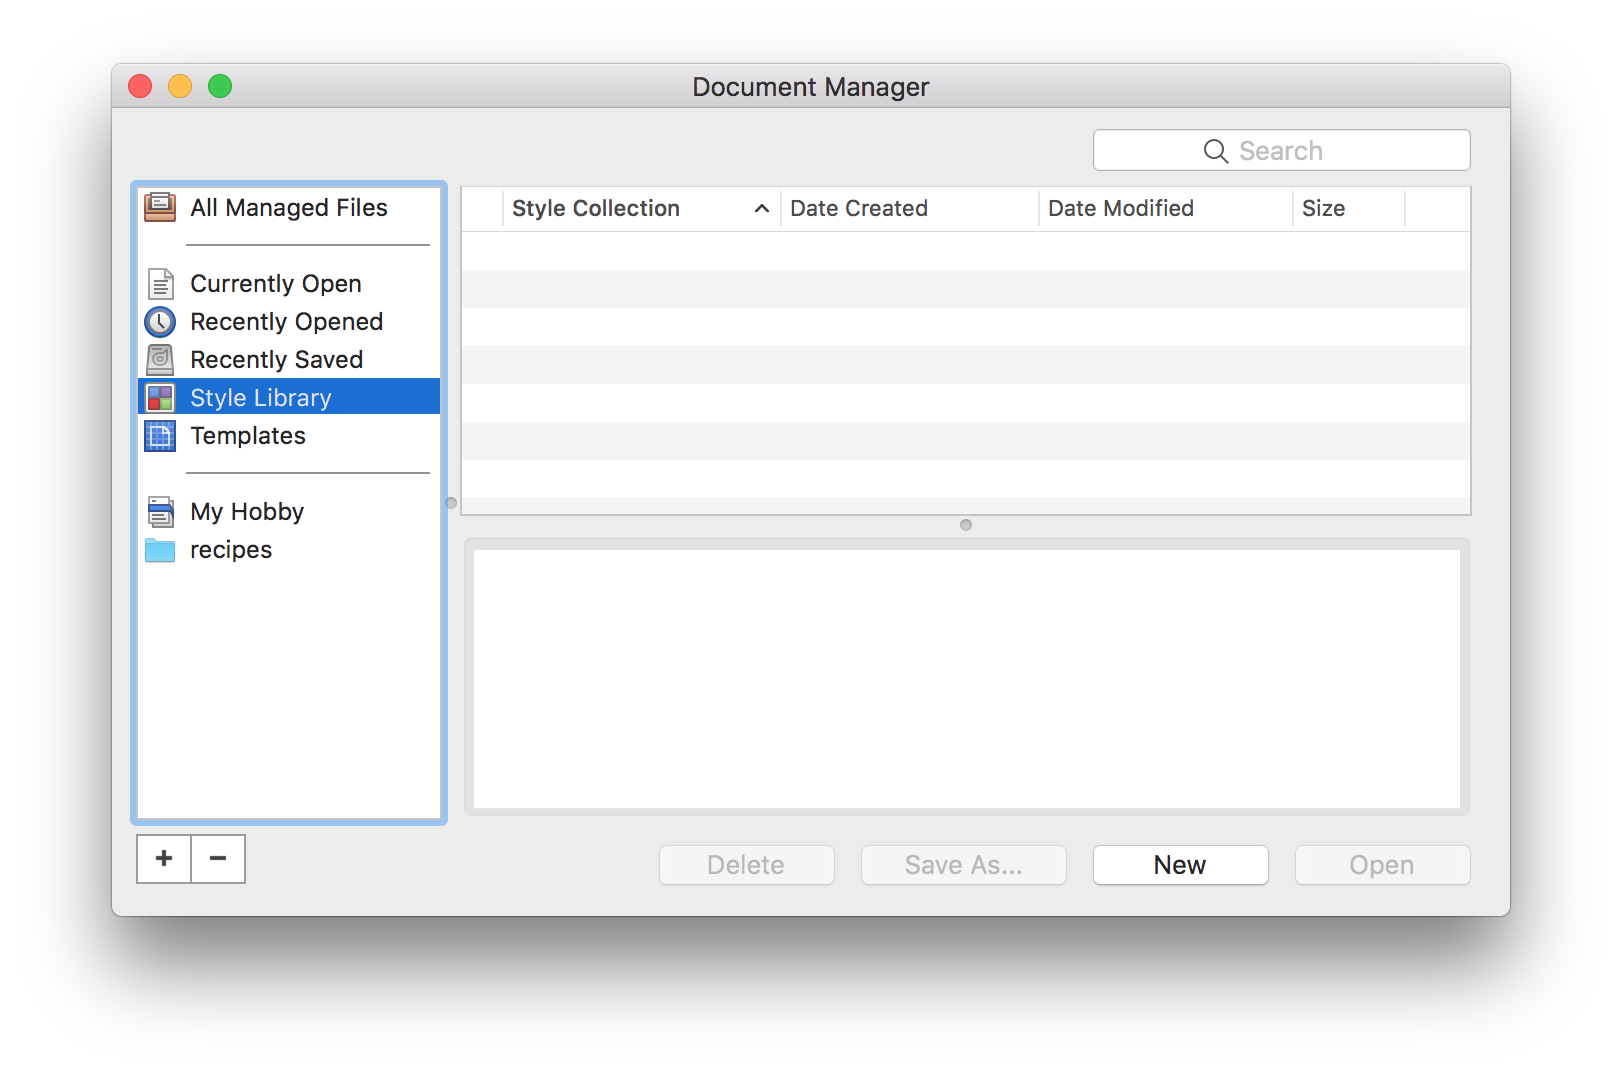
Figure 137
The Document Manager showing the Style Library window with nothing in it
Import styles from an existing file
1. Open a document that has styles you want to add to a Style library.
2. Choose the menu command: View > Style Sheet.
3. Select the style(s) you want to add to the Style Library from the list in the Styles sidebar on the left side of the document window.
4. Either
► choose the menu command: Gear > Save to Style Library… at the bottom of the styles list in Style Sheet view, or,
► click Save to Style Library… in the style previews area of the Style Sheet view.
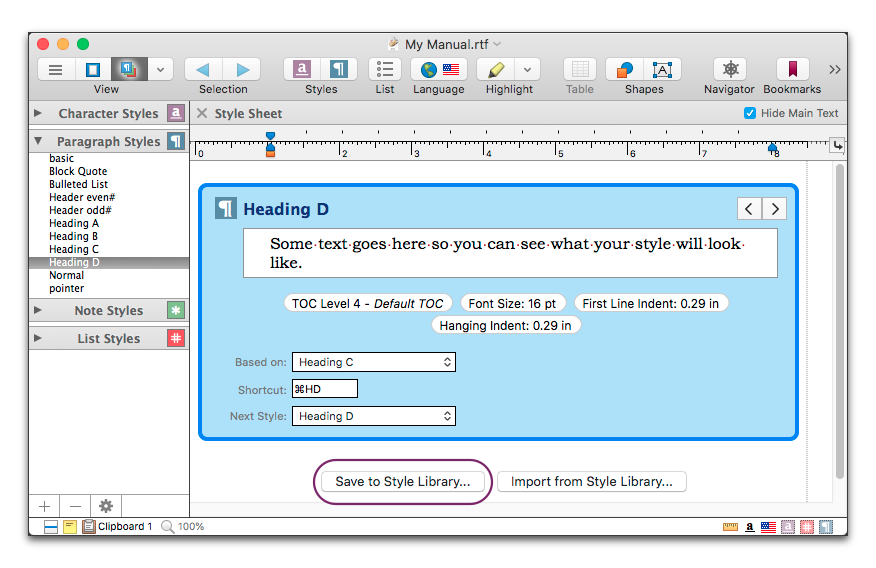
Figure 138
The Save to Style Library… button in the define styles area of the Style Sheet view
5. A sheet appears. Type the name you want to use in the Add styles to a new style collection field.
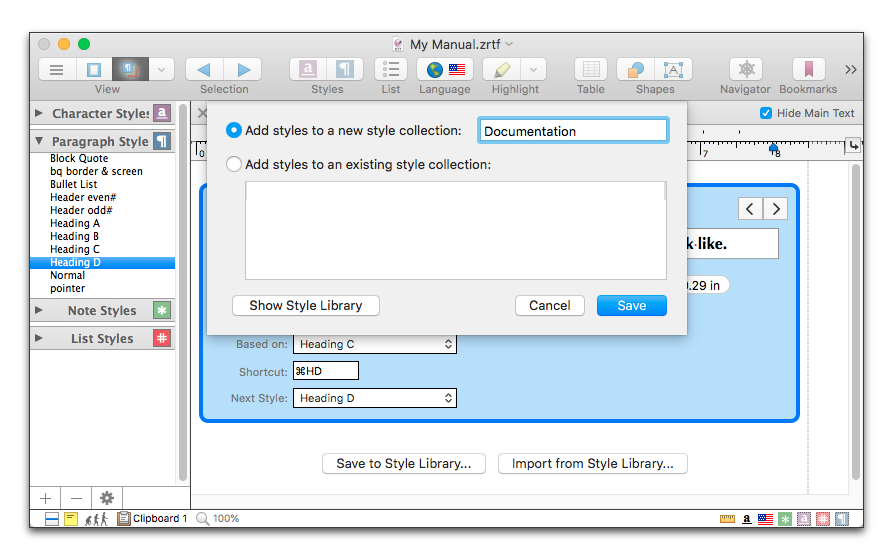
Figure 139
The Add styles to a new style collection sheet
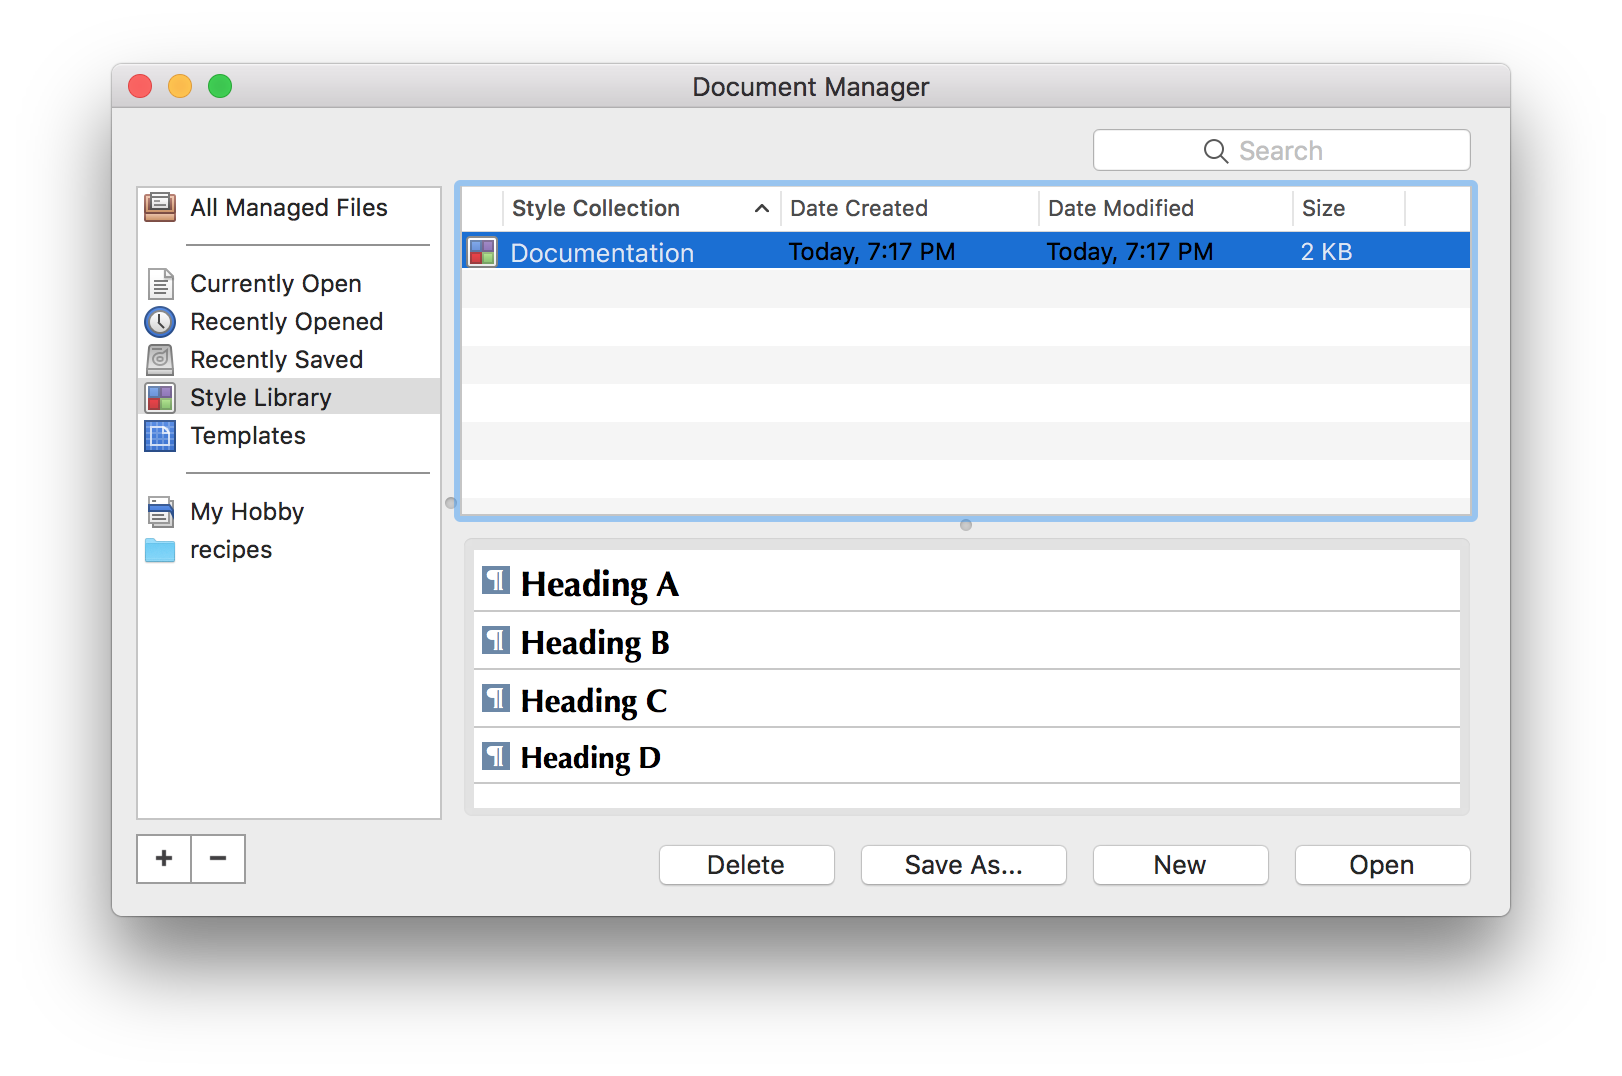
Figure 140
The Document Manager with a Style Collection and its associated styles
☞ Note that even though only Heading D was selected in the Styles List and saved to the Style Library, because it is “based on” Heading C which is based on Heading B, etc. all the based on styles are also added to the library.
Save a file with styles you want to the Style Library folder of the Document Manager
You may already have created a document that has a collection of styles you want to add to your Style Library.
1. Open a document that has styles you want to add to a style library.
► the menu command: File > Save in Document Manager to save the file in the Style Library;
► the menu command: File > Save As in Document Manager… to save a copy of the file (with, perhaps a new name) in the Style Library;
► the menu command: File > Move to Document Manager to actually move the file from its current location into the Style Library;
► the menu command: File > Add to Document Manager to place an alias that points to the file into the Style Library;
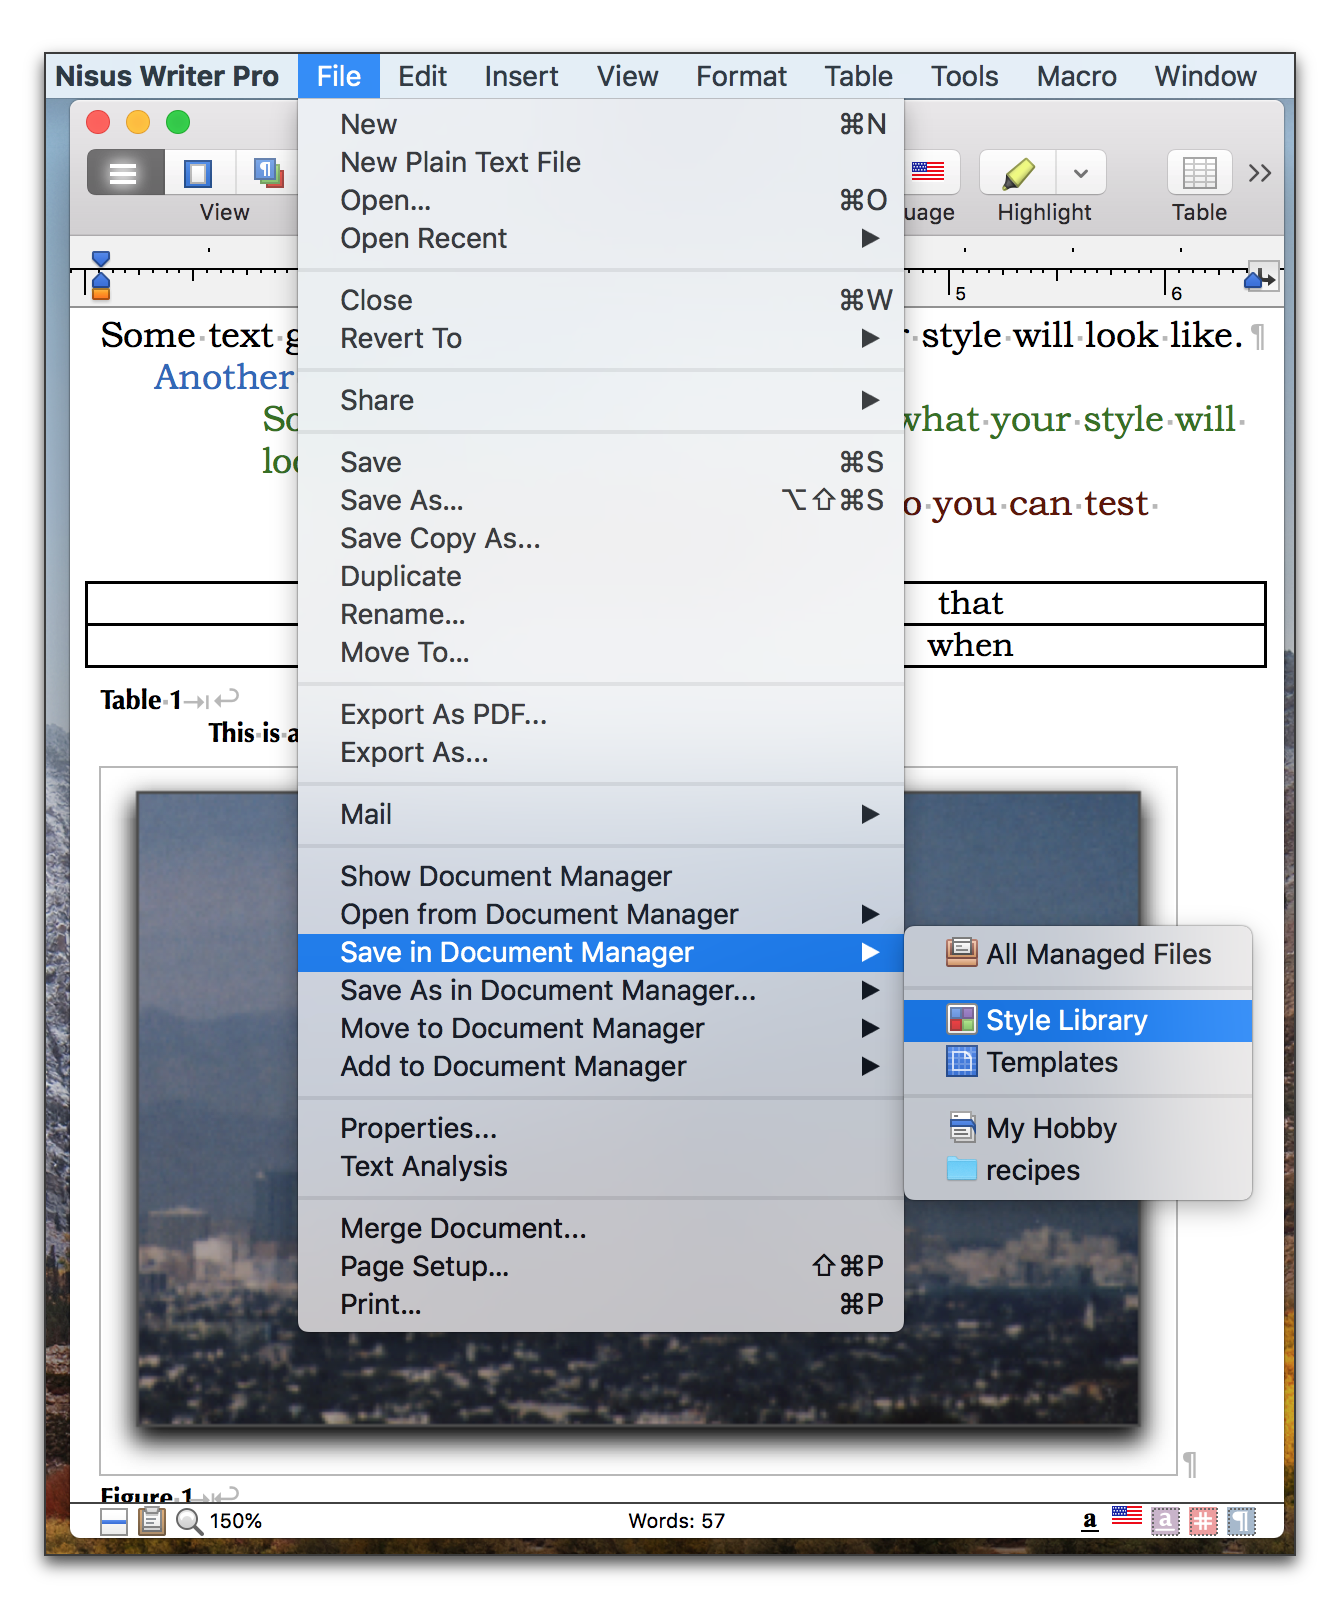
Figure 141
Saving a file to the Style Library of the Document Manager
The file and its styles appear in the Style Library portion of the Document Manager.

Figure 142
A document with styles saved to the Style Library of the Document Manager
Add styles to an existing Style Library file
Once you have created a Style Collection in your Style Library, you can add styles to it.
1. Open a document that has styles you want to add to a style library.
2. Choose the menu command: View > Style Sheet.
3. Select the style(s) you want to add to the Style Library from the list in the Styles sidebar on the left side of the document window.
4. Either
► choose the menu command: Gear > Save to Style Library… at the bottom of the styles list in Style Sheet view, or,
► click Save to Style Library… in the style previews area of the Style Sheet view.
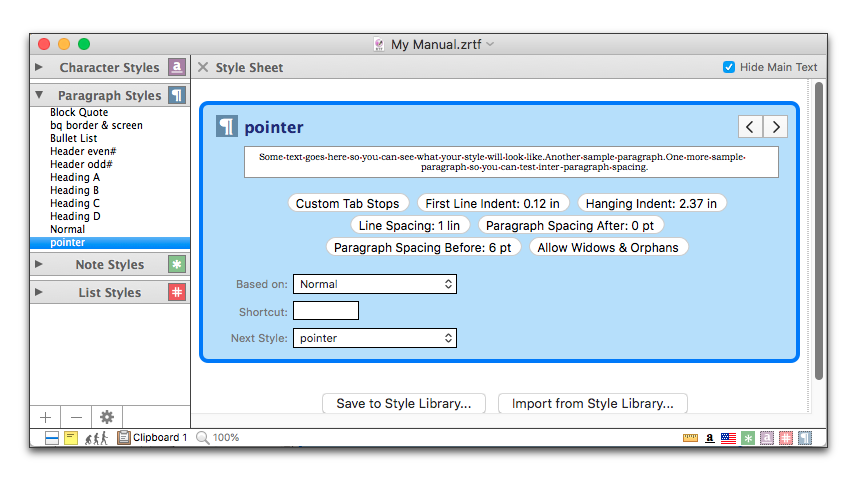
Figure 143
Selecting a style to add to a Style Collection
5. A sheet appears. Click Add styles to an existing style collection.
6. If you have more than one collection be sure to select the appropriate collection.
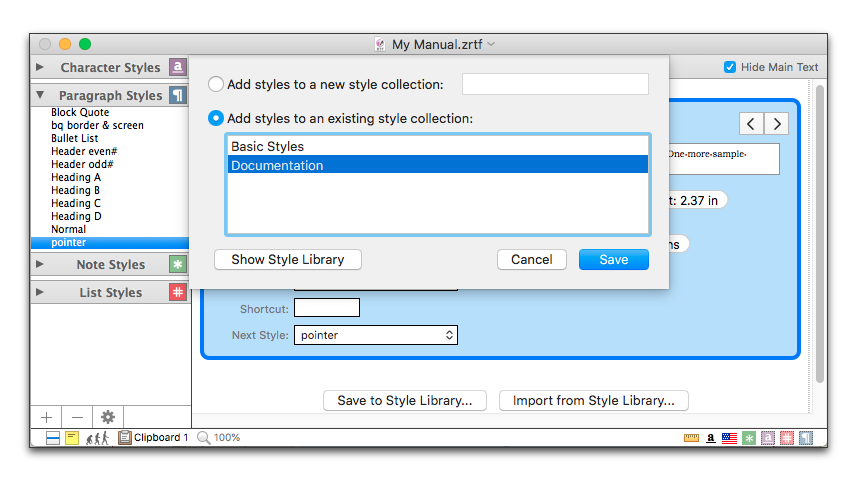
Figure 144
Selecting a Style Collection to which to add styles
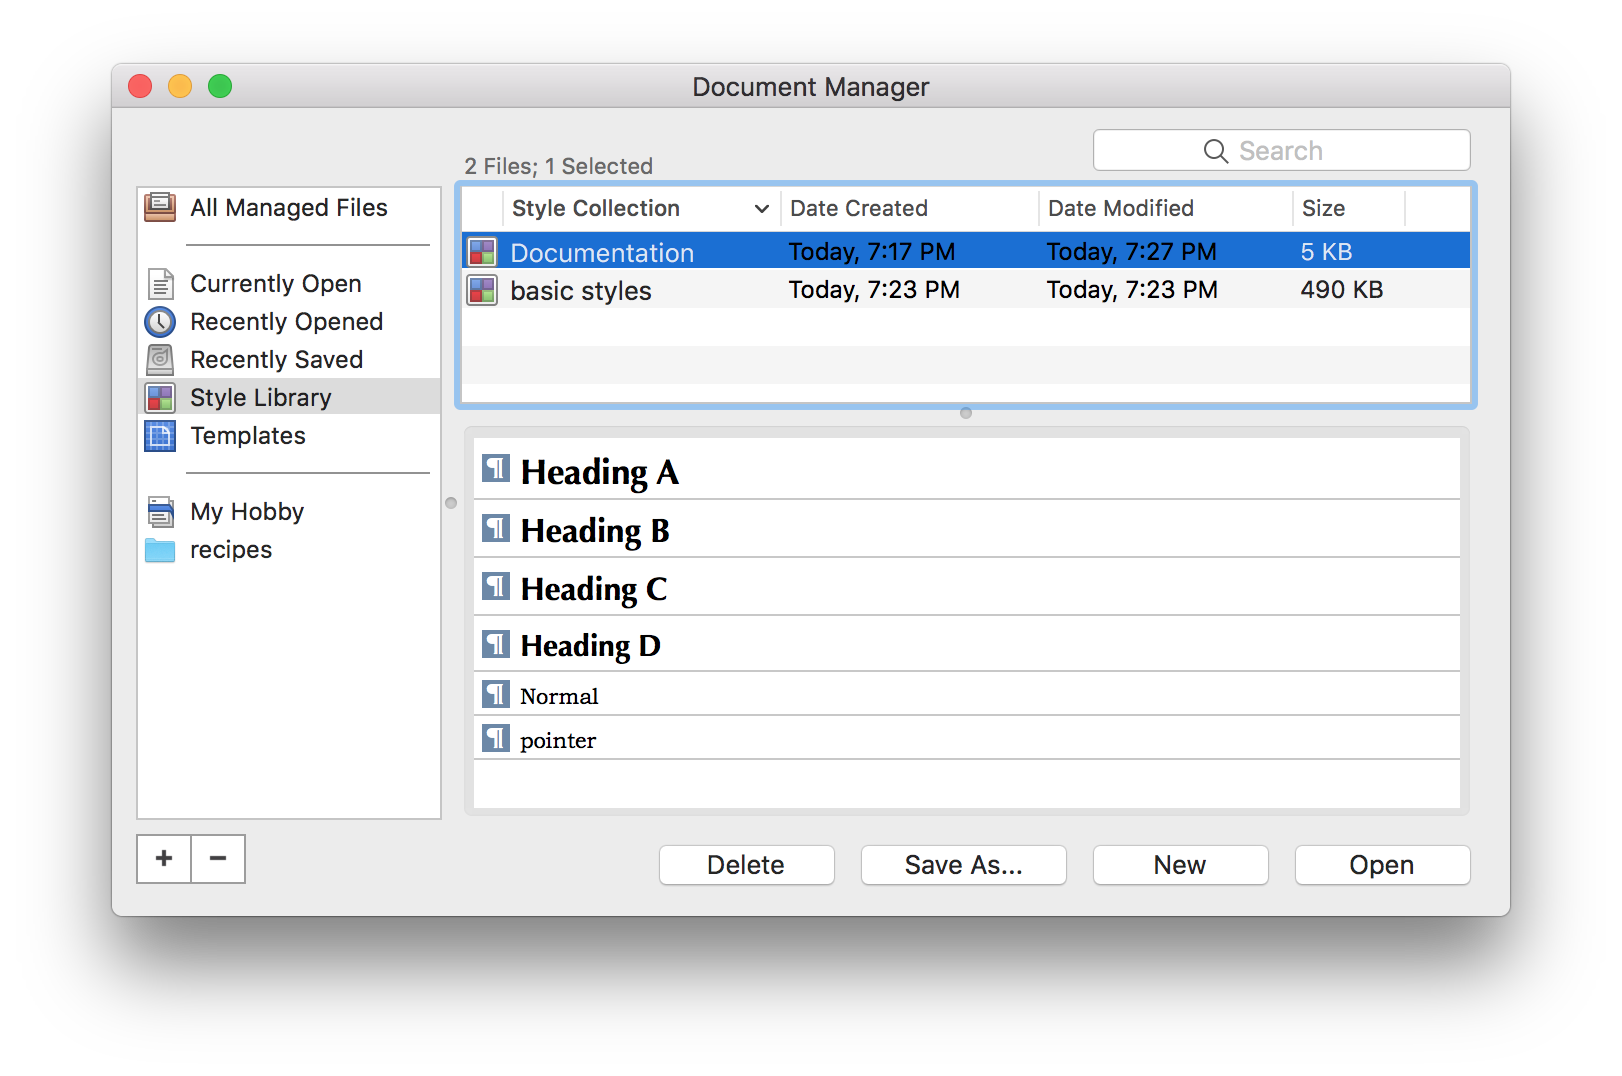
Figure 145
A Style Collection with added styles
Your new styles appear in the selected Style Collection.
Save specific styles from an existing file to a Style Collection
You may already have created a document that has a collection of styles you want to add to your Style Library.
1. Open a document that has styles you want to add to a style library.
2. Either choose Save to Style Library…
► from the Gear menu at the bottom of the Styles palette, or,
► from the menu command: Insert > New Style.
A sheet appears from which you can choose the styles to save to the style library.
3. Select the styles you want to add and click Save.

Figure 146
Choosing styles to add to a Style Collection with the Styles palette open
A variant of the sheet illustrated in Figure 132 on 149 appears.
4. Select the style collection to which you want to add the styles and click Save.
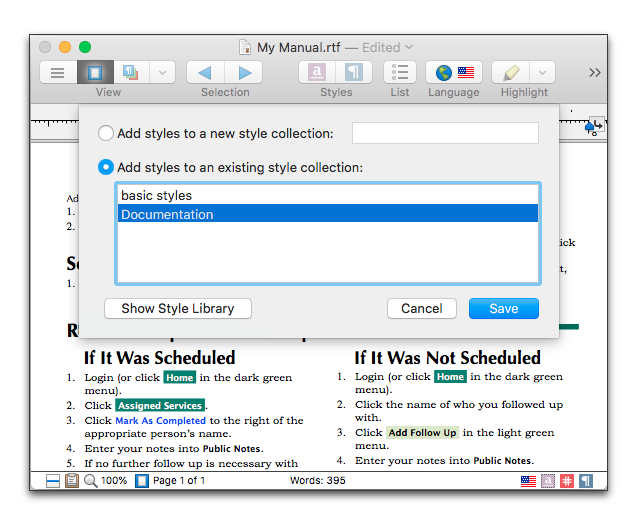
Figure 147
Selecting a particular Style Collection to which to add styles
Your styles are added to the collection and ready for you to use in additional documents as illustrated in Figure 148.
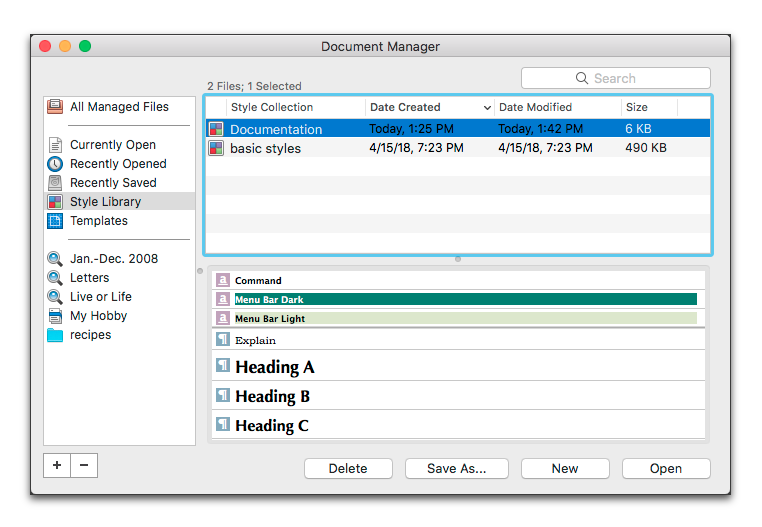
Figure 148
Multiple style collections with many styles
Use styles saved in a Style Library
Once you have your Style Library set up you can easily take styles from it to use in different documents.
Suppose that you are busy working on a new document that has a minimum number of styles in it. You come to a point where you realize that you need a style that you have saved to your style library.
Import a style the formats of which you know
1. Choose the menu command: Insert > New Style > Import from Style Library….
A sheet appears that lists all the styles available in the various Style Collections in your Style Library.
2. Scroll through the list and check the styles you want to import.
The style now appears in the Styles palette of the active document. You can select text and apply the style.
Import a style the formats of which you do not know
As an alternate method, especially if you do not remember the various formats of the different styles, you can:
1. Either…
▷ Choose the menu command: Window > Document Manager (and select Style Library in the sidebar on the left) or
▷ Choose the menu command: Gear > Show Style Library of the Character or Paragraph Styles palettes, or
▷ Choose the menu command: Insert > New Style > Show Style Library.
This opens the Document Manager with the Style Library selected in the sidebar.
2. Select any of the Style Collections you have in your Style Library from the top pane on the right. The associated styles appear (in their formats) in the bottom pane.
3. Drag the style(s) you want from the list at the bottom into any open window.
The style now appears in the appropriate (Paragraph or Character) Styles palette (depending on what kind of style it is) of the active document. You can select text and apply the style.
Open a Style Collection to copy text with style for pasting in another document
If the style’s name displayed in its own formats does not give you enough of an idea of how the style appears, you can also open a particular Style Collection directly and copy styled text from it.
1. Choose the style collection you want from the menu File > Open from Document Manager > Style Library.
This opens the actual Nisus Writer Pro document with the style in it. If you have text displaying that style in the document you can see how it appears as illustrated in Figure 141 on page 158.
2. Copy some text in the style(s) you want to have in the new document.
3. Paste the text into your new document.
The style now appears in the Styles palette of the active document. You can select text and apply the style.
☞ Once styles are copied from the Style Library and used in another document they lose all connection to the original Style Library file. If you make changes to the style in the Style Library file, these changes do not appear in any of the files to which the style has been imported or copied.
| Previous Chapter Format Paragraphs |
<< index >> |
Next Chapter Set Up a Document’s Page |