This section describes the different ways you can define the appearance of paragraphs. When in page view, all paragraphs appear within the margins you set (outlined as the gray line around the area of the page). When in Draft View and Full Screen view, Nisus Writer Pro allows your text to run as far to the right of the document window as you wish. (For right-to-left languages text flows as far to the left as you wish.) The four blue paragraph definition “droplets” appear on the ruler at the top of the window (though not when in Full Screen view).
Select the paragraph(s) you want to modify before making any changes to the ruler.
☞ The markers (droplets) you see on the rulers are called indents. They are measured from the edge of the margin.
The actual indent used for right to left text switches based on the direction of the paragraph.
Set the indent or outdent (“hanging indent”) position of the first line of a paragraph
All the numbered and “bulleted” instructions in this document use a “hanging indent”.
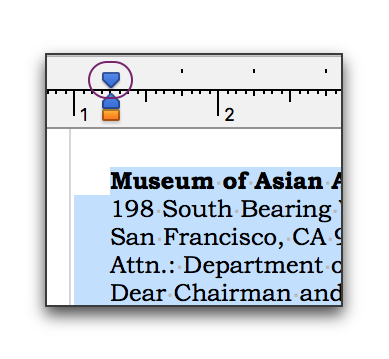
Examine the highlighted area at the bottom of Figure 95 below.
► Drag the First Line In/Outdent maker across the ruler and release the mouse button or trackpad at the position where you want the first character of your paragraph to appear.
Examine the highlighted area at the bottom of Figure 96 below.
► Drag the Left Indent marker across the ruler and release the mouse button or trackpad at the position where you want the text to wrap.
► For right to left text, do the reverse: drag the Right Indent marker.
Figure 94
The First Line In/Outdent marker relative to the Tail Line Wrap Indicator (flush)

Figure 95
The First Line In/Outdent marker relative to the Tail Line Wrap Indicator (indented)
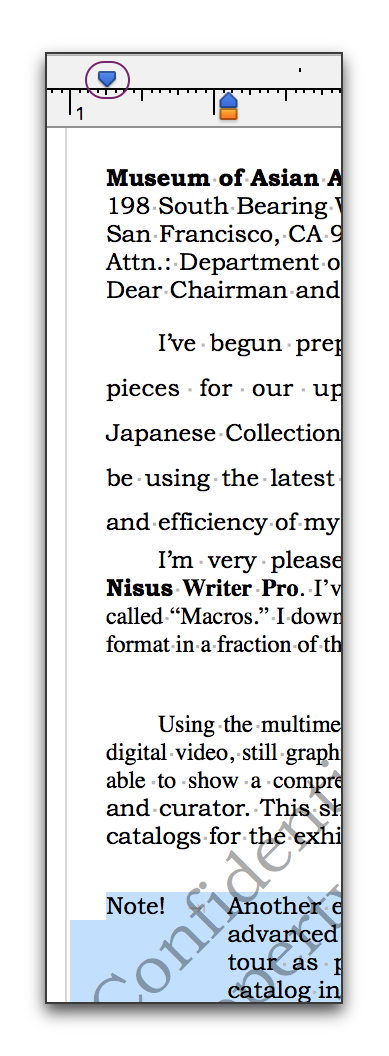
Figure 96
The First Line In/Outdent marker relative to the Tail Line Wrap Indicator (outdent or hanging indent)
Quickly indent or outdent a selected range of paragraphs
Nisus Writer Pro has tools that enable you to quickly indent or “outdent” your text. The commands are available on the Format menu, or you can customize your Toolbar to add the buttons illustrated in Figure 41, as explained in the section “Make the Toolbar Your Own” on page 611.
► Select the range of paragraphs you wish to modify and click the Indent or Outdent button on the Toolbar or choose the menu command: Format > Paragraph Indents > Increase Both Left Indents or Decrease Both Left Indents.
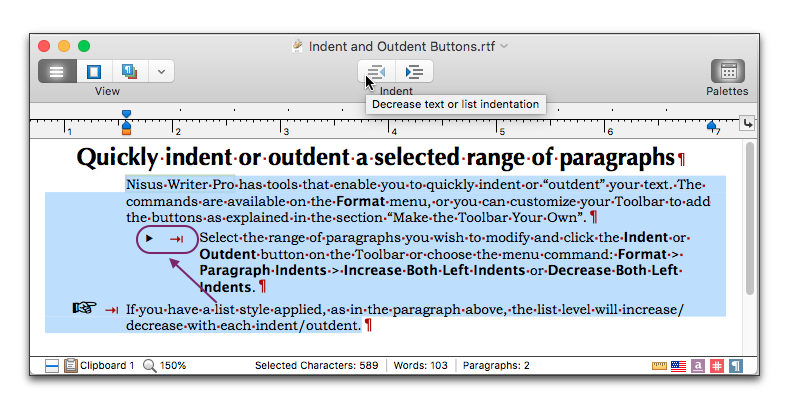
Figure 97
A range of paragraphs with the indents set at the left edge of their designated styles
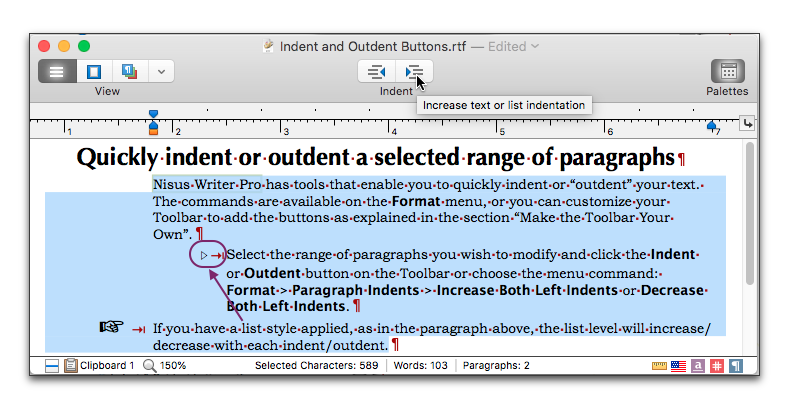
Figure 98
A range of paragraphs after clicking the Indent button
☞ The Indent and Outdent buttons are available if you customize your Toolbar, as explained in the section “Make the Toolbar Your Own” on page 611.
☞ If you have a list style applied, the list level will increase/decrease with each indent/outdent.
☞ Note that the Outdent button in Figure 97 is dimmed (disabled) as the left-most character is already as far left as it can be for its applied style.
► Drag the First Line Indent and/or the Right Indent marker across the ruler and release the mouse button or trackpad where you want the lines of your paragraph to wrap.
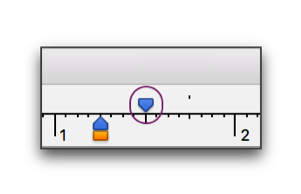
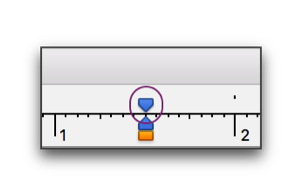
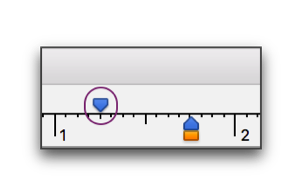
Figure 99
The First Line Indent in various positions relative to the Left Indent marker
You can drag the First Line Indent marker independently of the Left Indent marker. If you drag the larger (upper) “Independent Drag” droplet, when you release the mouse button or trackpad, the smaller, lower “Conjoined Drag” droplet bounces into position. The First Line In/Outdent does not move.
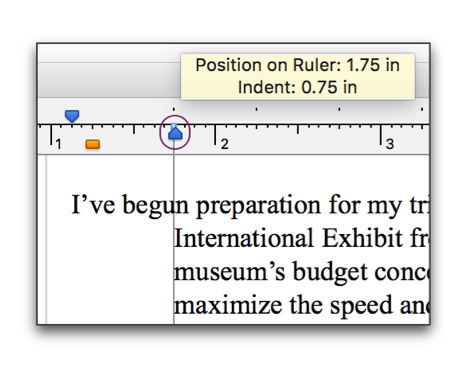
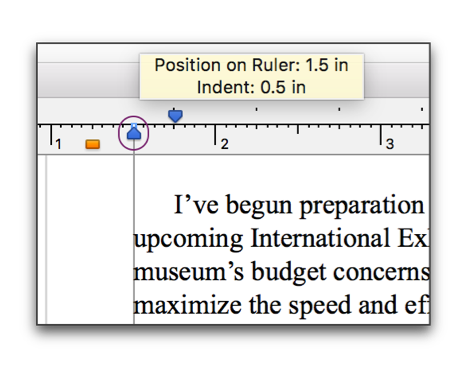
Figure 100
The Independent Drag First Line Indent marker
If you drag the smaller, lower “Conjoined Drag” droplet, when you release the mouse button or trackpad, the larger (upper) the “Independent Drag” droplet bounces into position and the First Line In/Outdent moves the same distance as you moved the Conjoined Drag droplet as illustrated in Figure 101.
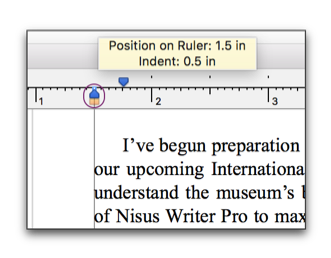
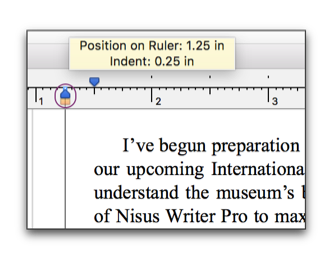
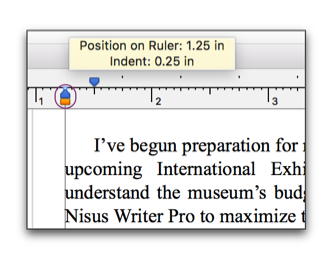
Figure 101
Moving the Conjoined Drag First Line Indent marker
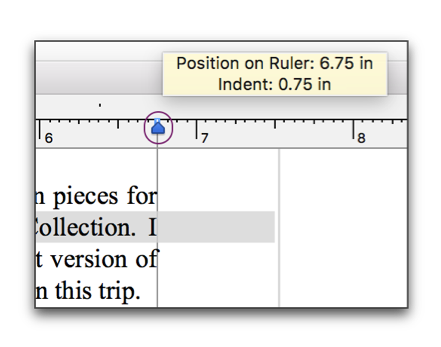
Figure 102
The Right Indent marker
☞ You can select any combination of the four indent markers by pressing ⇧ or ⌘ as you click each one.

Set the text wrap area numerically
1. Double click any of the indent markers.
2. Enter the settings you want in the Edit Line Wraps and Indent dialog that opens.
You can display the values either as they appear
◦ from the edge of the paper: choose Position on Ruler
◦ or from the margin: choose Inset from Margin.
You can display the units either as they are preset on the ruler (Ruler Units), or any of the other units supported: Centimeters (cm), Inches (in), Millimeters (mm), Picas (pc) or Points (pt).
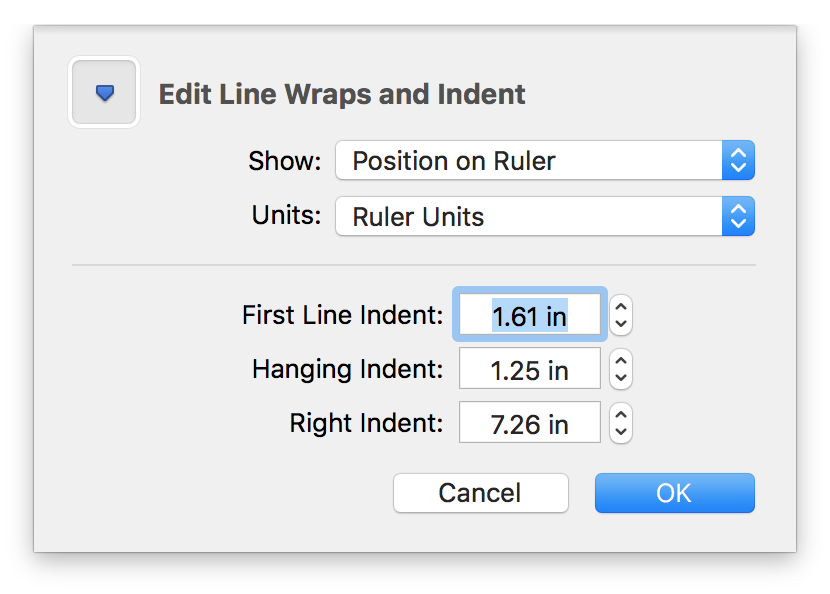
Figure 104
The Edit Line Wraps and Indent dialog in a left to right section

Figure 105
The Edit Line Wraps and Indent dialog in a right to left section
Set the text wrap area using the keyboard
1. Select any of the indent markers (either individually, or more than one by pressing ⌘ or ⇧).
2. Press the right or left arrows on the keyboard to move the markers a short distance to the right or left respectively.
☞ You can move the left indent marker and first line indent of selected text by pressing ⌥ →. This moves the left indent marker and first line indent in one-half and one-quarter inch increments (respectively) to create a “hanging indent”.
Alternatively, press ⌥ ← to move the left indent marker and first line indent out one-half and one-quarter inch increments (respectively) (until both are flush left).
Set the text wrap area using the Paragraph palette
1. Click the Indents reveal triangle in the Paragraph palette as illustrated in Figure 106.
2. Select the text (lines or paragraphs) you wish to change.
3. Click the various “steppers” or enter the precise values to achieve the settings you want.
☞ Press ⌘ when you click a palette stepper’s up or down arrow to apply the shown value uniformly to all selected paragraphs, instead of adjusting all selected values independently.
.png)
Figure 106
The Paragraph palette with the Indents section showing
All of the indent controls are also available from the menu: Format > Paragraph Indents. However, they use preset amounts to increase and decrease the indents. You can have better control using the Paragraph palette, or manipulating the ruler directly.
Use the Paragraph palette in the Palette Dock to set paragraph justification and specify how lines in a paragraph line up based on the left and right line wrap indicators. The choices are left, center, right, and full justification. Fully justified type causes uneven word spacing with even line widths, while unjustified (or “ragged”) type causes even word spacing with uneven line widths. You can also access these commands by choosing them from the menu Format > Paragraph Alignment.
.png)
Figure 107
The Paragraph palette with the Spacing section showing
► Click alignment buttons on the Paragraph palette.
|
Alignment Buttons on the Paragraph Palette |
||
|
Left align |
|
Click to align text along the left indent marker allowing for a ragged right edge of text. |
|
Center align |
|
Click to center text around the midpoint between the first line indent and the right indent for the first line of a paragraph and between the two indent markers for all subsequent lines. |
|
Right align |
|
Click to align text along the right indent marker allowing for a ragged left edge of text. |
|
Full justify |
|
Click so that text justifies along the edges of text causing it to line up along both the right and left indent markers, creating a rectangle of text, except, of course the last line. |
Table 4
Alignment buttons on the Paragraph palette
The following examples show how the different types of alignment affect your text with Show Invisibles (as explained on page 589) turned on.
.png)
Figure 108
Example of Left Justification (with show invisibles turned on)
.png)
Figure 109
Example of Center Justification (with show invisibles turned on)
.png)
Figure 110
Example of Right Justification (with show invisibles turned on)
.png)
Figure 111
Example of Full Justification (with show invisibles turned on)
All of the alignment controls are also available from the menu Format > Paragraph.
Line height, known to typesetters as leading (because of the pieces of lead placed between the lines of type) refers to the vertical distance between the top of one line and the top of the following line.
Use options of the Spacing portion of the Paragraph palette illustrated in Figure 112 below to change the spread between lines, above paragraphs and below selected paragraphs.
► Click the “steppers” to apply varying amounts of spacing you want between lines and paragraphs or type the number of lines or points appropriate in the text edit box to the left of each “stepper”.
☞ Press ⌘ when you click a palette stepper’s up or down arrow to apply the shown value uniformly to all selected text, instead of adjusting all selected values independently.
.png)
Figure 112
Change Line Height (with show invisibles turned on)
☞ The unit of measurement in the Line height edit box changes by .1 line increments to a maximum of four lines. You can select the text in the Line height edit box and type the number you want.
Keep your lines from spreading when using superscript or footnotes/endnotes
If you use superscripted ordinal numbers (Nisus Writer Pro can maintain these for you automatically as explained in QuickFix Preferences on page 581) or footnotes/endnotes, you can keep your line spacing from spreading.
► Select the paragraph(s) you want to prevent spreading and choose Fixed Line Height from the pop-up menu at the top of the Spacing portion of the Paragraph palette.
► Select the paragraph(s) you want to prevent spreading and choose the menu command: Format > Paragraph Spacing > Fixed Line Spacing. This command toggles on and off.
Allow your lines to spread when using superscript or footnotes/endnotes
► Select the paragraph(s) you want to permit to spread and choose Line Spacing from the pop-up menu at the top of the Spacing portion of the Paragraph palette.
► Select the paragraph(s) you want to prevent spreading and uncheck the menu command: Format > Paragraph Spacing > Fixed Line Spacing. This command toggles on and off.
Set spacing between paragraphs
The Space Before ¶ (above) “stepper” affects the space between the first line of the selected paragraph(s) and the last line of the preceding paragraph.
%20Paragraph%20(with%20show%20invisibles%20turned%20on).png)
Figure 113
Space Before (Above) Paragraph (with show invisibles turned on)
► Click the “steppers” to apply varying amounts of spacing you want between paragraphs or type the number of points appropriate in the text edit box to the left of each “stepper”.
☞ Press ⌘ when you click a palette stepper’s up or down arrow to apply the shown value uniformly to all selected text, instead of adjusting all selected values independently.
The Space After ¶ (below) “stepper” affects the space below the last line of each selected paragraph and the first line of any succeeding paragraph.
%20Paragraph%20(with%20show%20invisibles%20turned%20on).png)
Figure 114
Space After (Below) Paragraph (with show invisibles turned on)
All of the spacing controls are also available from the menu Format > Paragraph Spacing. However, they use preset amounts to increase and decrease the spaces. You can have better control using the Paragraph palette.
Control how paragraphs split and stick together
If you use Nisus Writer Pro to put text on paper, you will probably want to make sure that the printed version of your file looks good. Among the concerns are whether headings remain with the paragraphs they introduce and other, similar issues. These tools are gathered in the Grouping section of the Paragraph palette illustrated in Figure 115. If you use any of these tools Nisus Writer Pro adds a “Paragraph Grouping” invisible character in the left margin when the command Show Invisibles is turned on, as illustrated in Figure 31 on page 32. You can learn more about Invisibles in the section: “Determine whether or not “Invisibles” display in all new files” on page 589.
.png)
Figure 115
The Paragraph palette with the Grouping section showing
There is some disagreement as to the exact meaning of the word widow in a typesetting context:
• the last line or word of a paragraph appearing at the top of a page, with the remainder appearing on the preceding page
• a single word or syllable (some say 7 characters or less) left alone at the bottom of a paragraph.
There is, however, general agreement about what constitutes an orphan:
• a heading or the first line of a paragraph or verse at the foot of a page.
1. Click your insertion point in the paragraph (or select a range of paragraphs).
2. Either…
▷ click Prevent widow/orphan in the Paragraph palette, or,
▷ choose the menu command: Format > Paragraph > Prevent Widows & Orphans.
☞ This only controls for the first definition of widow but also controls for orphans. This prevents them from splitting to another page or column by themselves. The first or last line of a paragraph can still appear on another page or column (away from the majority of the paragraph) so long as they have company.
Keep selected paragraphs together
Use this set of commands to make sure that an entire paragraph appears on the same page or column.
1. Click your insertion point in the paragraph (or select a range of paragraphs).
2. Either…
▷ click Keep ¶ together in the Paragraph palette, or,
▷ choose the menu command: Format > Paragraph > Keep Paragraph Together.
Keep one paragraph with the following one
Use this set of commands to make sure that headings stay with the text that follows, or to guarantee that a caption stays on the same page or column as the illustration to which it is associated.
1. Click your insertion point in the paragraph (or select a range of paragraphs).
2. Either…
▷ click Keep with next ¶ in the Paragraph palette, or,
▷ choose the menu command: Format > Paragraph > Keep With Next Paragraph.
☞ This keeps the selected paragraph on the same page as the first line of the next paragraph. How that first line is placed is determined by whether or not it is controlled by either (or both) Keep ¶ together or Prevent widow/orphan.
Ensure and/or force a break before a selected paragraph
If you have a paragraph that should be preceded by a break you can ensure or enforce that.
1. Click your insertion point in the desired paragraph.
2. Either…
▷ click Ensure Break before 
This means that Nisus Writer Pro will make sure a page break exists before the paragraph. It will first check if there is a manually inserted break, and if so just let it stand. If no break character exists, then a break will be forced. Or…
▷ click Force Break before 
This means that Nisus Writer Pro will always add a break no matter what, regardless of what comes before it. Even if there's a manual break character, a break will be added, resulting in two breaks.
You can use any of these commands to create styles that control the overall shape of your document. When you do this you do not need to concern yourself each time you have a potential layout problem. This procedure is explained in “Edit a style” beginning on page 144.
Use tabs to align columns of text. Pressing ⇥ lines up the text that follows at the next tab indicated above the ruler. Nisus Writer Pro offers four types of tabs you can place on the ruler. The tabs differ in the manner in which they align text.
Automatic tabs appear every half inch after the last manually set tab.
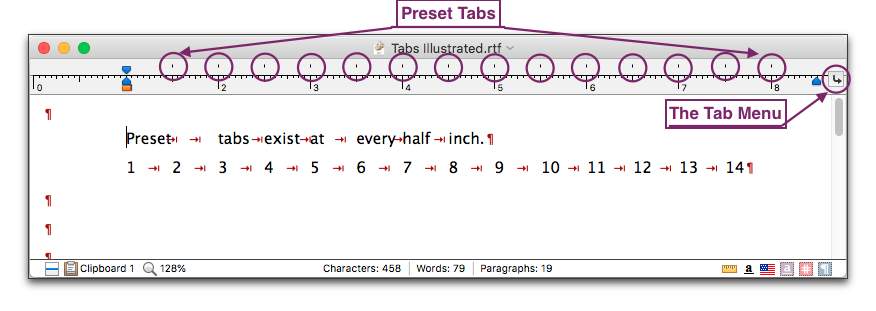
Figure 116
Preset tabs above the ruler (with Show Invisibles turned on)
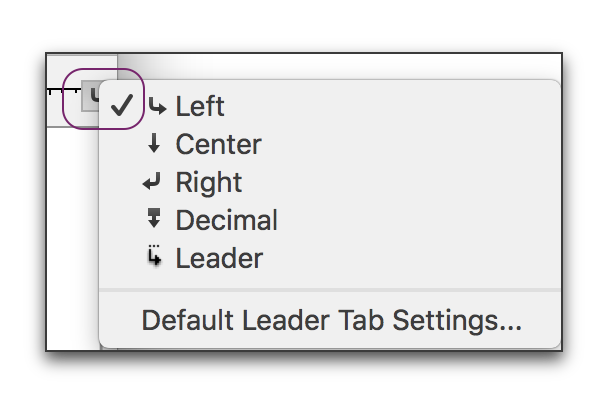
1. Choose the desired tab indicator from the Tab pop-up menu at the right edge of the ruler above the Vertical Scroll Bar.
The options available are:
2. Click above the ruler where you want your tab to appear.
Any preset tabs that existed to the left of your tab disappear. The pre-set tabs that follow the ones you insert remain.
1. Choose the menu command: Format > Paragraph Indents > Add Tab Stop….
2. Choose the settings you want from the Edit Tab sheet that appears as illustrated in Figure 118.
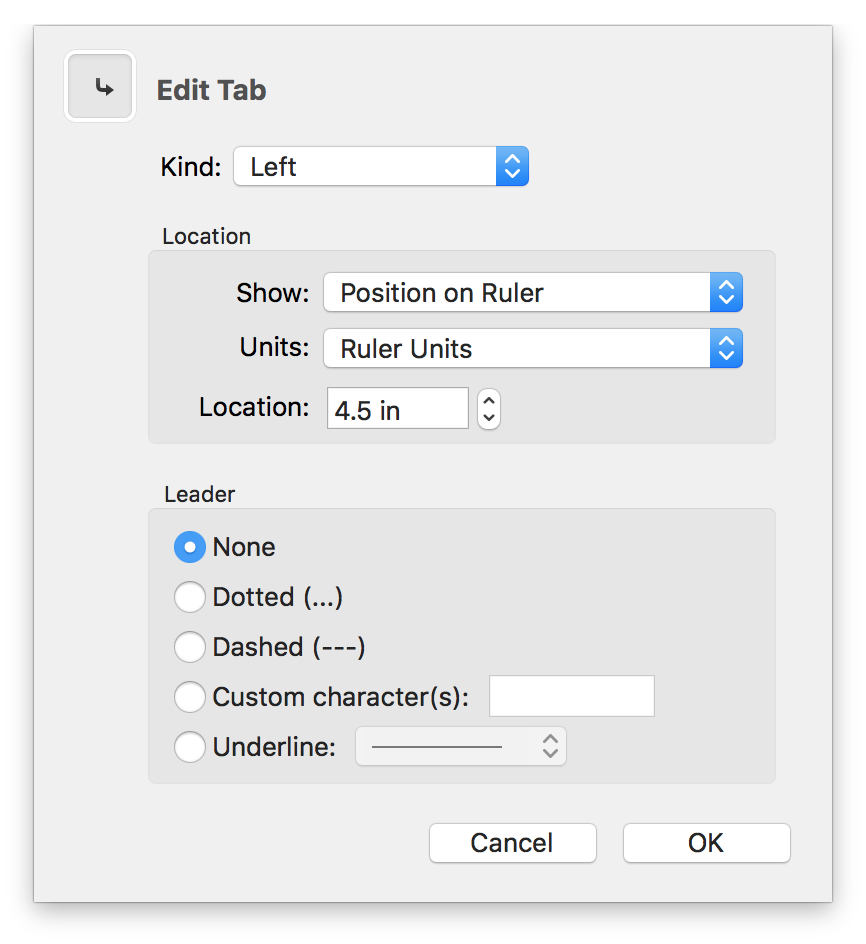
Figure 118
The Edit Tab sheet (the tab style illustrated uses the Left Kind chosen)
.png)
Figure 119
Tab stop justification (with show invisibles turned on; with and without leader)
Nisus Writer Pro places no limit to the number of tabs you can set on a ruler.
If you do not set any tabs, you can use the built-in tab feature. Built-in tabs are left aligned.
In tables of contents, indexes and columns of numbers you may want to have something to lead the reader’s eyes from one part of tabbed text to the next. These guides are called Leader Tabs. You can either set a series of Tab Indicators as Leader Tabs or change a plain tab to a Leader Tab at a later time.
► Choose the menu command: Tab > Leader and click on the ruler the same as with any other tab.
Set the type of leader before placing a tab
1. Choose the menu command: Tab > Default Leader Tab Settings….
2. Choose the kind of leader you want from the sheet that appears.
3. Click any one of the following
◦ Custom character(s) (and enter the character(s) you want to use)
◦ Underline (and choose the style of line you want from the pop-up menu)
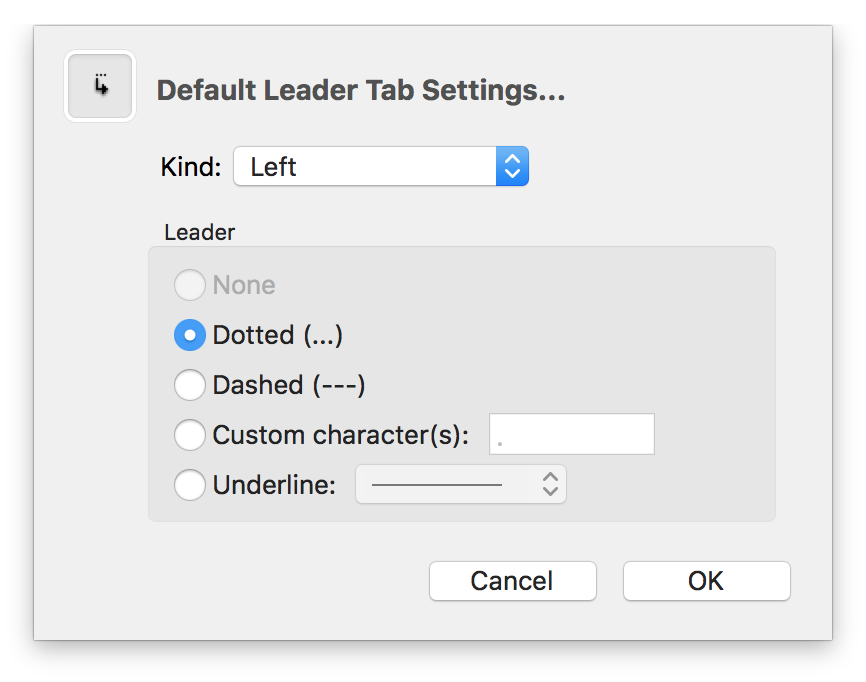
Figure 120
The Default Leader Tab Settings sheet (the tab style illustrated uses the Kind chosen)
You can choose from a wide variety of graphic underline options from the Leader Tab Settings sheet.
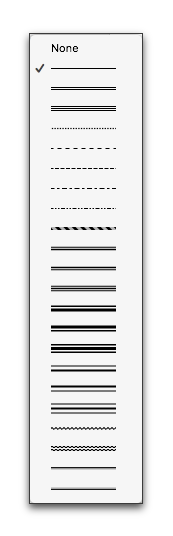
Figure 121
Default Leader Tab underline pop-up menu
Move a tab indicator using the mouse or trackpad
► Drag the Tab Indicator to its new location.
You can select multiple Tab Indicators then move them simultaneously if you press ⇧ or ⌘ as you click the Tab Indicators.
Nisus Writer Pro displays a vertical line to indicate where the tab will align the text.
Move a tab indicator using the keyboard
1. Select any of the tab indicators (either individually, or more than one by pressing ⇧ or ⌘).
2. Press the right or left arrows on the keyboard to move the indicators a short distance to the right or left respectively.
☞ You can select any combination of the tab indicators and the four indents and line wrap indicators by pressing ⇧ or ⌘ as you click each one.
Edit a tab’s location numerically
1. Double-click the Tab Indicator.
The Edit Tab dialog indicates what kind of tab you have clicked and allows you to change it using the pop-up menu presented.
2. Enter the value for the location you want.You can display the values either as they appear
◦ from the edge of the paper: choose Position on Ruler
◦ or from the margin: choose Inset from Margin.
You can display the units either as they are preset on the ruler (Ruler Units), or any of the other units supported: Centimeters (cm), Inches (in), Millimeters (mm), Picas (pc) or Points (pt).
You can paste a numerical value into the dialog. This enables you to match a tab’s location in one part of your document with that from another part of the document.
► Drag the Tab Indicator off the ruler, or, select the ones you want to remove and press ⌫ (the delete key). Select multiple Tabs by pressing ⇧ or ⌘ as you click the tab, or select them all by pressing ⌥ as you click any tab.
► Choose the menu command: Format > Paragraph Indents > Remove Tab Stops to remove all the tab stops controlling the selected paragraph(s).
Selecting paragraphs with different formatting
When you select paragraphs with different ruler formatting, the Ruler at the top of the document window and the Paragraph palette display the line wrap and indent, line height and paragraph spacing of the first selected paragraph. Other formats that are common to all selected paragraphs, such as Tab Indicators, also display. If you change the format to selected paragraphs with different rulers the new format affects all the selected text.
Set the same format for a group of differing paragraphs
1. Select the paragraphs
2. Change the format by modifying the ruler.
If the indentation differs for selected paragraphs, the Ruler at the top of the document window and Paragraph palette reflect the settings of the first selected paragraph. Changing an indent affects all selected paragraphs.
☞ The head and tail text wrap indicators determine the physical length of your line on the page. These markers determine where the lines of your paragraphs will “wrap.” Drag these indicators along the Ruler to change their settings.
| Previous Chapter Format Characters |
<< index >> |
Next Chapter Style Sheets |


