
Nisus Writer Pro enables you to create various kinds of lists with automatically created list bullets, or automatically counted list numbers or letters. The list bullet or number at the start of each paragraph is called a list item.
Lists in Nisus Writer are always managed through list styles. Just as with other types of styles, list styles ensure consistency throughout your document. A list style governs aspects of all list items using that style, including:
• The numbering format of the list items. For example: (1, 2, 3, ...) vs (a, b, c, ...)
• How the list items are indented, along with the indent of text following the item.
• Textual formatting of the list items like their font and color.
Several list styles are distributed with the default document template. For example: the “Number List” list style. You can use these styles out-of-the-box as described in “Using lists”. If you want to modify these default styles, or create entirely new list styles, see the section “Modify list styles”.
You can combine list styles and other styles to create a wide variety of listing capabilities. All of the figures, tables, numbered (and unnumbered) instructions, and bulleted lists in this document are controlled by the list and style tools of Nisus Writer Pro.
The following screenshots show the primary tools for editing lists in Nisus Writer Pro. They are explained in greater detail in the following section.
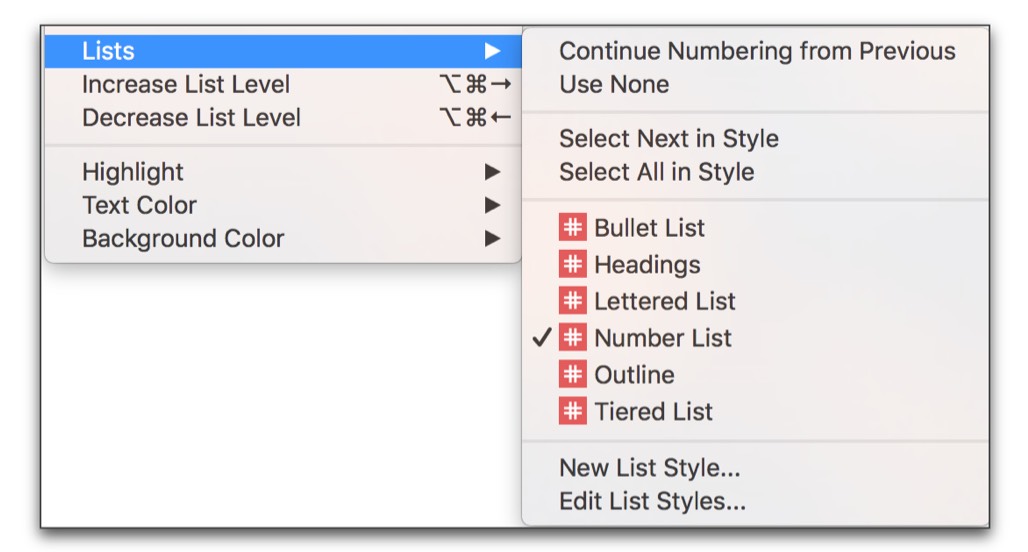
Figure 50
The Lists submenu of the Format menu
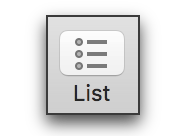
Figure 51
The List button on the Toolbar
To start a list you simply apply a list style to your text. The list item will automatically spring into existence immediately. If your selection (or insertion point) rests in a single paragraph a single list item will appear; if your selection spans multiple paragraphs they will all be given list items.
There are many ways to apply a list style:
► Use the menu Format > Lists to choose a list style.
► Use the List toolbar button to choose a list style.
► Use the Lists palette to choose a list style.
► Use the list style tag from the Tool tags at the bottom right of the document window.
To continue your list just press Return ⏎. The new paragraph will be in the same list style and will automatically be given a list item as needed.
To remove one or more paragraphs from a list, and delete their list items, remove the list style. You can do so by changing the list style to none, using any method described in “Start a list”. For example, by choosing the menu Format > Lists > None.
Add list bullets to paragraphs
To add list bullets to a series of paragraphs, select the paragraphs and apply a bulleted list style. You can apply the list style using any method described in “Start a list”. For example, by choosing the menu Format > Lists > Bullet List.
To modify the list bullet (• vs ◆) you will need to either:
► Change the list level of the selected paragraphs.
► Modify your list style to use a different bullet for the current list level.
Add list numbers to paragraphs
To add automatically counting list numbers (or letters) to a series of paragraphs, select those paragraphs and choose an appropriate list style. You can apply the list style using any method described in “Start a list”.
The following counted list styles are supplied with the default document template:
• Numbered List: This list style uses numbers (1, 2, 3, etc) for list items in its first level. Inner list levels use a variety of numbering formats including letters and roman numerals.
• Lettered List: This list style uses letters (a, b, c, etc) for list items in its first level. Inner list levels use a variety of numbering formats including numbers and roman numerals.
• Outline: This list style uses roman numerals (I, II, III, etc) for list items in its first level. Inner list levels use a variety of numbering formats including numbers and letters.
• Tiered List: This list style uses numbers (1, 2, 3, etc) for list items in its first level. Inner list levels also use numbers, but include outer list items, eg: 1.3.3.
• Headings: This list style is like the Tiered List style in that its inner levels include outer list items (eg: 1.3.3). However it will continue its numbering across document content, as is appropriate for use when numbering headings.
Any list in your document text can have multiple list levels. List items on outer list levels enclose list items on inner list levels. A simple example may be illustrative:
1. Fruits
a. Apple
b. Orange
The list items for “Apple” and “Orange” are on an inner list level; the outer list item “Fruits” encloses them. A list style controls settings for each of its list levels separately, which allows each level to have a different numbering format, indents, text formatting, etc.
The list items shown by paragraphs using inner list levels can include list items from outer list levels. In this way an inner list item can display a tiered or compound list item, eg: 1.3.3.
To change an existing list item so it uses the next inner list level (also called demoting), you can do any of the following:
1. Position the insertion point after the list item and press the Tab ⇥ key.
2. Use the menu Format > Increase List Level.
3. In the Lists palette, next to the Level label, click the right-pointing arrow > button.
☞ You can select multiple paragraphs and cause them all to change at once.
☞ Usually increasing the list level will indent the list items, so they appear “under” the outer list level. If you do not see such a change occur then your list style’s levels (and their indents) are probably configured incorrectly. There is no firm rule that forces inner list levels to appear a deeper ruler indent.
To change an existing list item so it uses the next outer list level (also called promoting), you can do any of the following:
1. Position the insertion point after the list item and press the Delete key.
2. Position the insertion point after the list item, hold the Shift ⏎ key, and press the Tab ⇥ key.
3. Use the menu Format > Decrease List Level.
4. In the Lists palette, next to the Level label, click the left-pointing arrow < button.
☞ You can select multiple paragraphs and cause them all to change at once.
Generally list items are numbers (or letters) that automatically count upwards through your text, eg: 1, 2, 3, etc. The list item for a particular paragraph gets its number by incrementing the number shown by the previous paragraph using the same list style and list level.
You can restart numbering for your lists in one of two ways:
1. To manually restart numbering for a particular paragraph, place the selection in that paragraph and use one of these commands:
a. In the Lists palette, under Paragraph Numbering, engage the Restart At option.
b. Use the menu Format > Lists > Restart Numbering.
2. To automatically restart numbering any time there is an interruption in the list style (ie: there is at least one intervening paragraph that does not use the list style) configure your list style to disable the option Continue numbering across document content in your style sheet, as described in “modify list styles”.
A list may naturally restart its numbering if a break in the list occurs (one or more intervening paragraphs do not use that same list style). You can instead continue numbering in the following ways:
1. To automatically continue numbering for all paragraphs using the list style, regardless of any intervening content, configure the list style to enable the option Continue numbering across document content in your style sheet, as described in “modify list styles”.
2. To manually continue numbering only for a particular paragraph, place the selection in that paragraph and use one of these commands:
a. In the Lists palette, under Paragraph Numbering, engage the Continue Numbering option.
b. Use the menu Format > Lists > Continue Numbering from Previous.
☞ Many of the aforementioned list commands, including those that restart and continue numbering, are available if you select a list item in your text and display the contextual menu.
☞ The commands Restart Numbering and Continue Numbering from Previous toggle, so only a single command is shown at once, depending on the state of the paragraph you have selected.
List styles allow for a wide variety of automatic numbering formats. Each list level can have a different numbering format, and inner levels may display list items from outer levels. In this way you can configure a list style to use any mix of these numbering formats.
These same numbering formats are also used by other features like footnotes and sections.
|
Arabic |
|
|
Lowercase Roman |
|
|
Uppercase Alphabetical |
|
|
Uppercase Roman |
|
|
Arabic - Indic |
|
|
Arabic - Indic Eastern |
|
List styles enforce not only automatic numbering and textual formatting for your list items, but also paragraph indents for document text. When you make changes to a list style, all lists using that style will be updated automatically for all text in your document.
To modify your document’s list styles:
1. Switch to your document’s style sheet, e.g.: using the menu View > Style Sheet.
2. From the list of styles on the left, under List Styles, click to select a single list style.
3. You can now modify the list style’s settings using the options on the right.
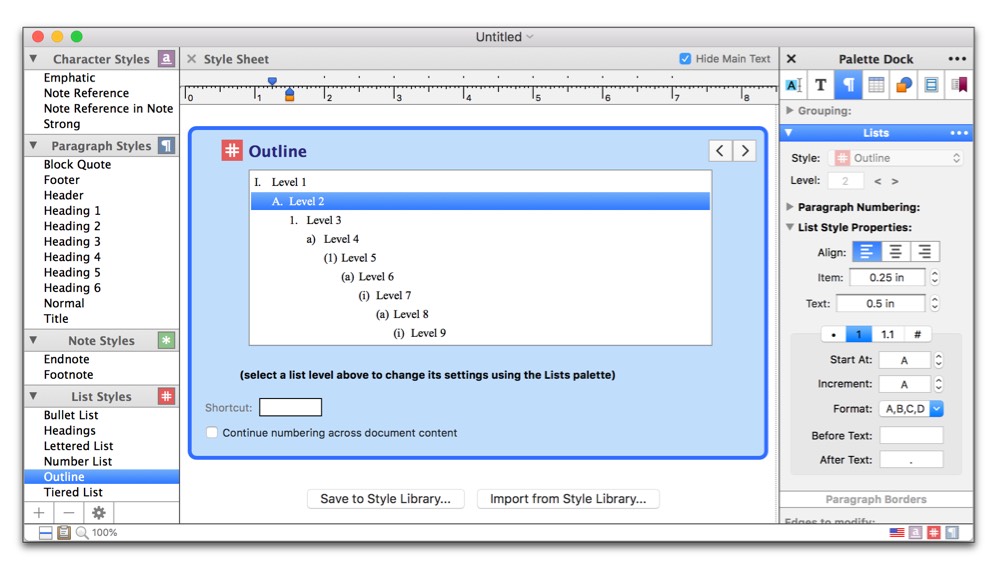
Figure 52
The list style editor in the Style Sheet. The Lists palette shows settings for the selected list level.
Once you have a list style selected for editing in the style sheet, you can edit a few settings that apply to the entire list style:
• The list style’s name, shown along the top of the list preview.
• The list style’s keyboard shortcut.
• The option to Continue numbering across document content. When this option is enabled all list items in the list style will always continue numbering, even if your list is interrupted by intervening paragraphs that do not use the same list style.
To really configure a list style you will need to edit its list levels. Each list style has multiple list levels, and each list level maintains separate settings and formatting. To edit a list level select its corresponding text in the style preview area like so:
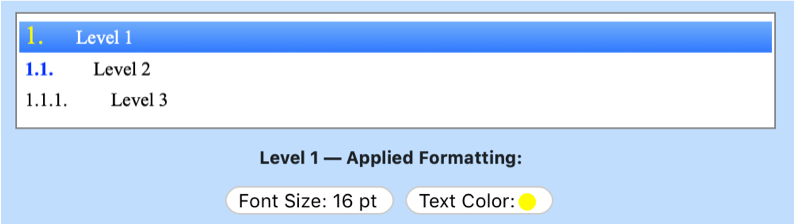
Figure 53
List level 1 selected in a list style editor. Text formatting for the level is shown below.
Once you have selected a level in the list style editor (as shown in Figure 53 above), you can configure the list level’s settings. Those options are described in the following sections.
☞ You can select multiple list levels at once to configure them en-masse, e.g.: to enforce a consistent font size for all levels at once.
List level settings for list items
List levels control the automatically generated list items at the start of your paragraphs. To choose the list item format look at the Lists palette, under List Style Properties. Near the bottom you’ll see a row of icons allowing you to choose from four list item flavors.
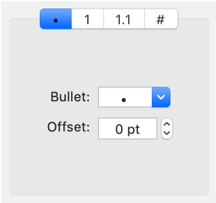

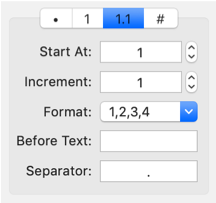
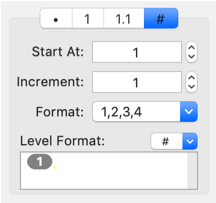
Figure 54
The four list item flavors available in the Lists palette. From left to right: bullet, number, tiered, and custom.
Only the active (selected) flavor is enforced for list items in the list level. Each flavor allows you to choose from a variety of settings described below. Not all settings are available for all flavors.
|
Purpose |
|
|
The fixed text to use for list bullets. |
|
|
The baseline offset of list bullets, to raise or lower them. |
|
|
The starting list item number, used for the first paragraph in the list and whenever numbering is restarted. |
|
|
The number added to the prior list item to calculate the next list item. 1 is standard, but -1 will count backwards. |
|
|
The numbering format to use for list items. |
|
|
The fixed text shown before the dynamically calculated list item. |
|
|
The fixed text shown after the dynamically calculated list item. |
|
|
The fixed text shown between list items from different list levels. |
|
|
A customizable template that allows a list item to display any mix of fixed text and dynamically calculated numbers. |
Each list level enforces indents that control the position of the list item and the following paragraph text. You can set these indents by either:
► In the Lists palette, under List Style Properties, adjust the Item and Text indent values.
► Use any of the methods described in setting the “text wrap area”. The list item’s location corresponds to the first line indent. The paragraph text’s location corresponds to the hanging indent (aka: left indent).
List levels cannot control other paragraph formatting. For more see “List level paragraph formatting”.
List level character formatting
A list level can enforce character formatting (like font and color) for all its list items. Once you’ve selected a list level in the list style editor (as shown in Figure 53 above) you can use all the usual formatting tools like the Format menu, Character palette, etc. This formatting is only automatically applied to the generated list items, not to paragraph text after the list item.
☞ To remove enforced formatting, click the formatting “bubble” that appears beneath the list level preview to select the bubble, and press the Delete key to remove it.
List levels can also enforce the removal of formatting, e.g.: unbold. This is useful when combining list styles and paragraph styles. For example: perhaps your document headings should be bold, but list items for those headings should not be bold. To enforce such removals:
1. Select the list level in the list style editor.
2. Apply the formatting as usual, e.g.: use the Bold menu to enable bold.
3. Toggle the formatting off to enforce its removal, e.g.: activate the Bold command a second time.
You should see a formatting “bubble” appear that displays the negated formatting like so:
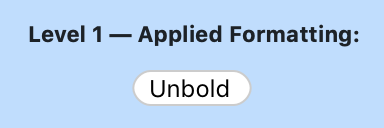
Figure 55
A list style level enforcing Unbold, so its list items are never bold.
List level paragraph formatting
List levels can only control paragraph indents as described in “List level indents”. List levels cannot control other paragraph formatting like paragraph alignment, line height, or spacing before the paragraph.
To consistently regulate all aspects of lists in your document text you can use paragraph styles and list styles in tandem. Paragraph styles (like “Heading 1”) can enforce a list style and list level. In this way your paragraph style indirectly enforces list properties, while also controlling any desired paragraph formatting.
Use list styles to automatically number figures, tables, etc.
In Nisus Writer Pro you can have as many automatically numbered items as you like. All you need do is create a new list style for each set of numbered objects (as in this document, which has “figures” and “tables” as well as many sets of numbered instructions).
1. Display Style Sheet view of your document as explained in “See the Style Sheet associated with a document” on page 143.
2. Choose the menu command: Insert > New Style > List Style.
3. Give your new style a meaningful name for example: “Caption Figure” or “Caption Table”.
4. Choose Numbered from the Kind pop-up menu.
5. Check (turn on) Continue numbering across document content.

Figure 56
Creating a numbered list style
You would probably want to apply some identifying text to appear before the number.
7. Select the Level 1 item in the List style’s hierarchy.
8. Open the Lists palette and type
Figure
in the Before Text text edit box.
9. Press ⇥ or ⏎ to move your selection to the After Text field and remove the period if you want.
10. Press ⇥ or ⏎ to confirm your entry as illustrated in Figure 57 below.
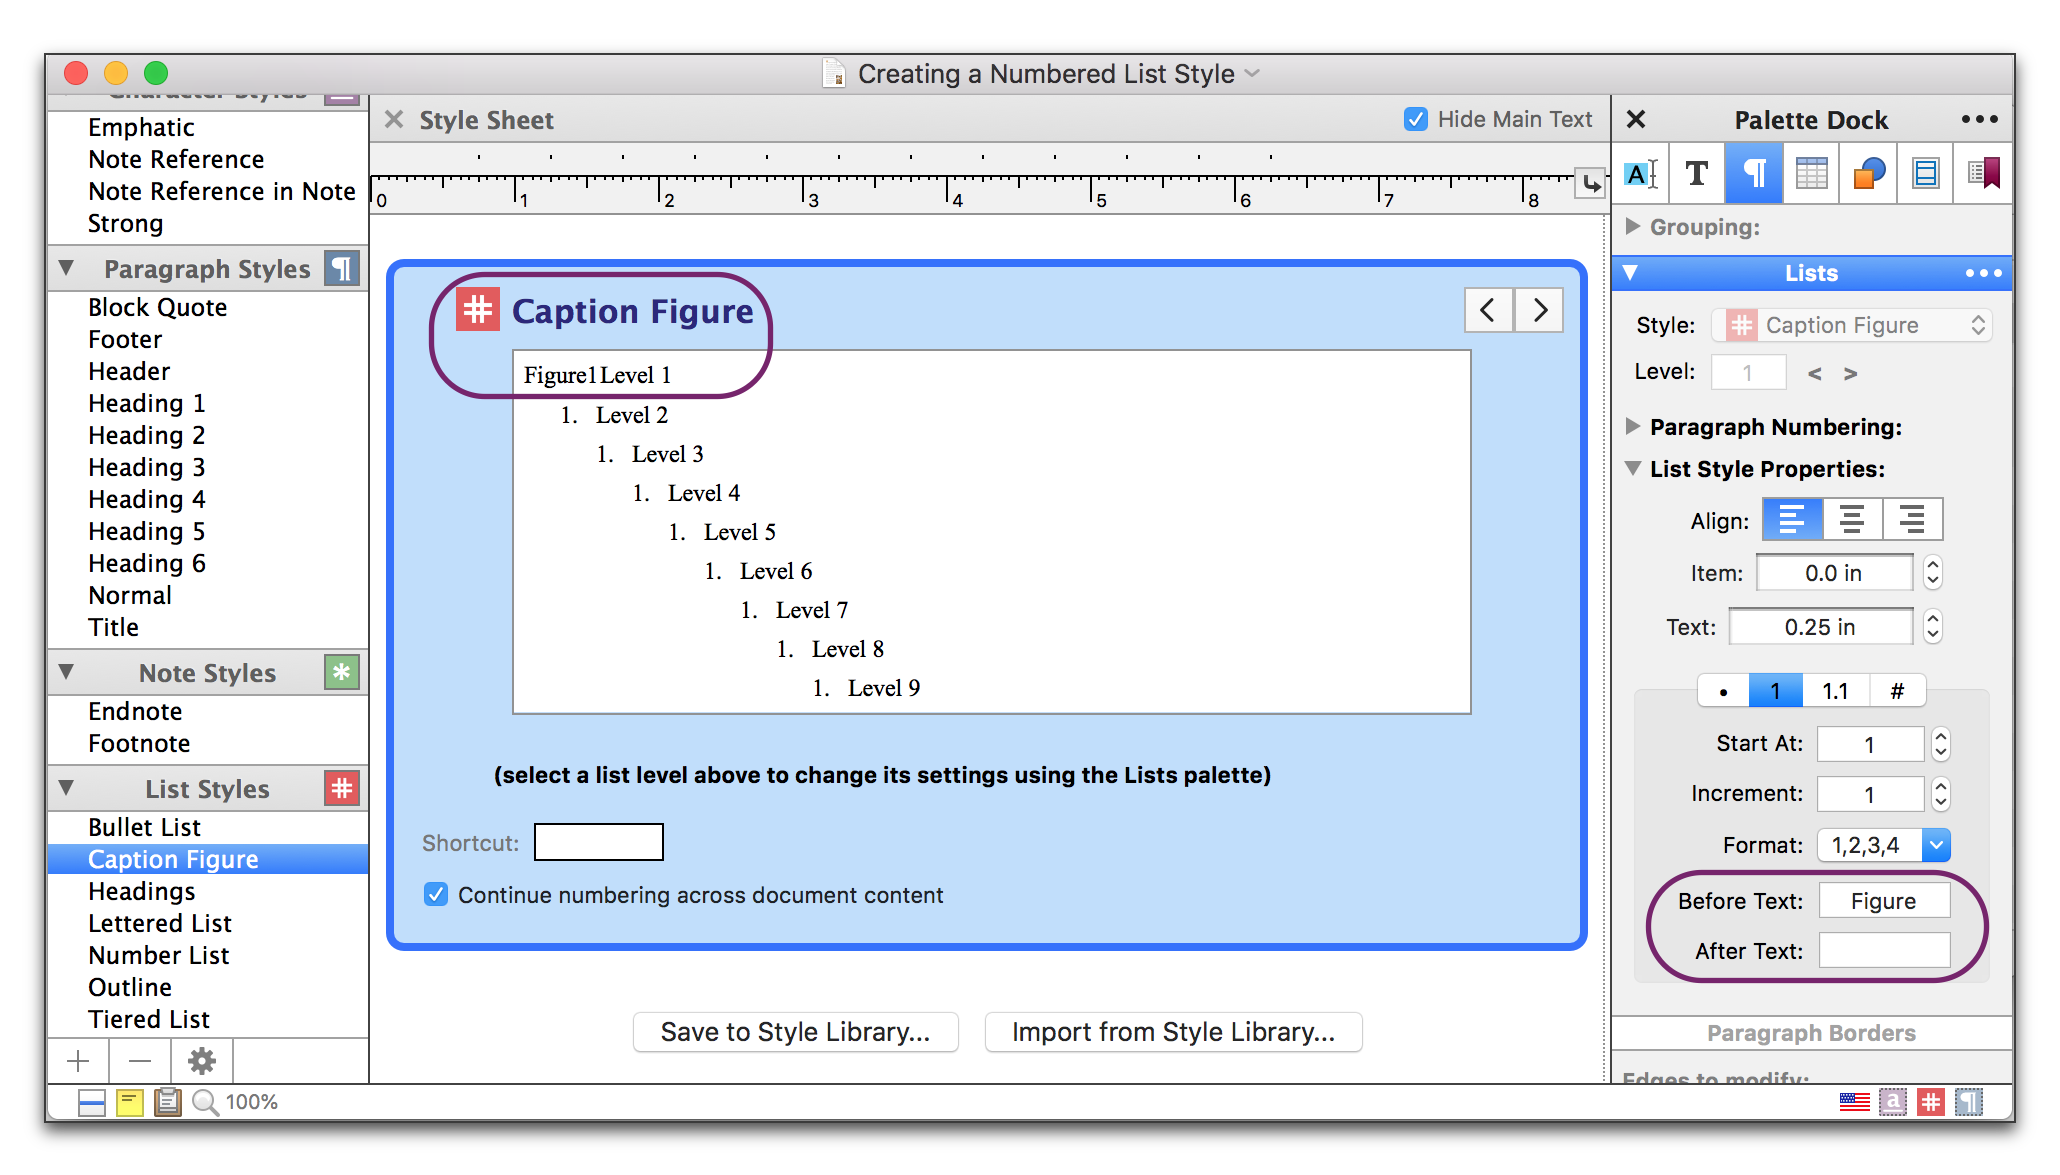
Figure 57
Assigning text to appear before a numbered list style
You can now cross-reference to these automatically numbered items as explained in the section “About Cross-References”.
☞ You can also use the shapes tools of Nisus Writer Pro to add captions to floating images as explained in “Add a caption to your images” on page 233.
Create numbered lists that may have a component missing
You may need to create a list that skips a level. For example, it may need to have a number like “3.2.0.a” or “3.2 a” when a component is missing (an item in level 4 without a corresponding entry in level 3).
For the first example “3.2.0.a” you need to customize the tiered list style so that it starts numbering at 0 by default, instead of 1.
1. Switch to the stylesheet view.
2. From the list on the left, select your list style.
3. From the preview on the right, select a single list level.
4. From the Lists palette, change the "number" to 0.
5. Repeat steps 3 and 4 above for all list levels you intend to use.
6. Next, customize your heading paragraph styles so they enforce not only the list style, but also a starting number of 1.
7. Switch to the stylesheet view.
8. From the list on the left, select your paragraph style (e.g.: “Chapter”).
9. Using the Lists palette, apply your list style.
10. Also in the Lists palette, the Paragraph Numbering portion change the Restart Numbering number to 1.
Now when you are working in your main document, just apply your paragraph style to enforce the list style and regular 1-based numbering.
For the second example “3.2 a” you want your list style’s default starting number to remain at 1. However you’ll want to customize the level numbering format enforced by your paragraph styles.
1. Switch to the Style Sheet view.
2. From the style list on the left, select your paragraph style, e.g.: “Data - No Subsection”.
3. Using the Lists palette, apply your list style.
4. Also in the Lists palette, adjust the list level as needed, i.e.: increase the list level to 4.
5. Also in the Lists palette, customize the numbering format:
6. Switch to the “custom” format by clicking the tab labelled “#”.
7. Edit the Level Format field to cut out the list level numbers you are not interested in showing. To achieve “3.2 a” you would want to replace the level number bubble “(3)” with a space.
Now when you are working in your main document, just apply your “Data - No Subsection” paragraph style to enforce the list format that does not show any sub-section number.
Align a numbered list along a period
Numbered or lettered lists (with periods) can align along the period rather than the left edge.
► Set the alignment in the Lists palette to right as illustrated in the list in the right column below:
Aligned along the left edge of the number:
7. this
8. that
9. another
10. more
11. again
Aligned right, along the period:
7. this
8. that
9. another
10. more
11. again
Figure 58
Left and right (along the period) aligned lists
Figure 59
List Styles explained
| Previous Chapter Using the Clipboards |
<< index >> |
Next Chapter Recover From Mistakes |