Use footnotes and/or endnotes to refer readers to supplemental notes. Each note in your document has both a note reference and its corresponding note text.
Note references appear in your main text and are usually superscripted numbers like 1, though a variety of symbols are available. Nisus Writer Pro automatically renumbers note references when you add, move, or delete them.
Note text appears in a separate note area. Footnotes appear at the bottom (foot) of the page on which you insert them; endnotes appear at the end of the section or document. The note text for each note includes the same automatically updated reference as shown in the main text, so readers can identify the note.
1. Put the insertion point where you want the note to appear.
2. From the Insert menu choose Footnote or Endnote.
→ A note reference is inserted. The corresponding note area gains focus.
3. Type the note text.
When linger the mouse cursor over a note reference in your main text, Nisus Writer Pro displays a help tag with the contents of the note text.
Return to the document from the note text
When your insertion point is in the footnote or endnote text it is easy to get back to the note reference in the main text using any of the following methods:
► Choose the menu command: View > Go to Note Reference or from the Notes tag on the Status Bar.
► Press ⌃, click the text of the note and choose Go to Note Reference from the contextual menu that appears, or choose the menu command: View > Go to Note Reference.
► Double-click the note reference.
This selects the corresponding note reference in the main text.
Return to a specific note from its marker in the document
When your insertion point is in the document text you can easily move to the footnotes or endnotes.
► Select the note reference, or put your insertion point immediately to the right or left of the note reference, press ⌃, click the text of the note and choose Go to Note Text from the contextual menu that appears or choose the menu command: View > Go to Note Text.
► Double-click the note reference.
This selects the text of that note.
► Put your insertion point in the notes area and edit the text.
The sequential symbols (e.g.: 1, 2, 3) used to automatically mark your note references are controlled by your note styles. See the Number Format option.
You can customize the symbols used by one or more notes, to override the automatically counted symbols enforced by your styles. See “Use an asterisk or other custom symbol for note references”.
The text formatting (e.g.: font) of note references is also controlled by styles. Each note style has two corresponding character styles for its references. These character styles can enforce any desired character formatting like superscript, color, font, etc.
For example, the default “Footnote” note style has two associated character styles called “Note Reference” and “Note Reference in Note”. The former style controls the appearance of note references in your main text; the latter does so in the note text.
☞ Which character styles are used by note references is completely customizable. You can choose to use character styles with any names you like.
Once you’ve identified the appropriate character styles, you can edit their enforced text formatting the same way you edit any other style, as explained in “Edit a style”.
The formatting of text in your note areas (i.e.: the actual text of your notes) is controlled by note styles. Note styles control both the character and paragraph formatting of your note text. For example, by default the note style called “Footnote” controls the formatting of footnotes in your document.
You modify the formatting enforced by your note styles the same way as with other paragraph styles, as explained in “Edit a style”.
In addition to text formatting, note styles also control all other aspects of notes in your document. This section describes the available options.
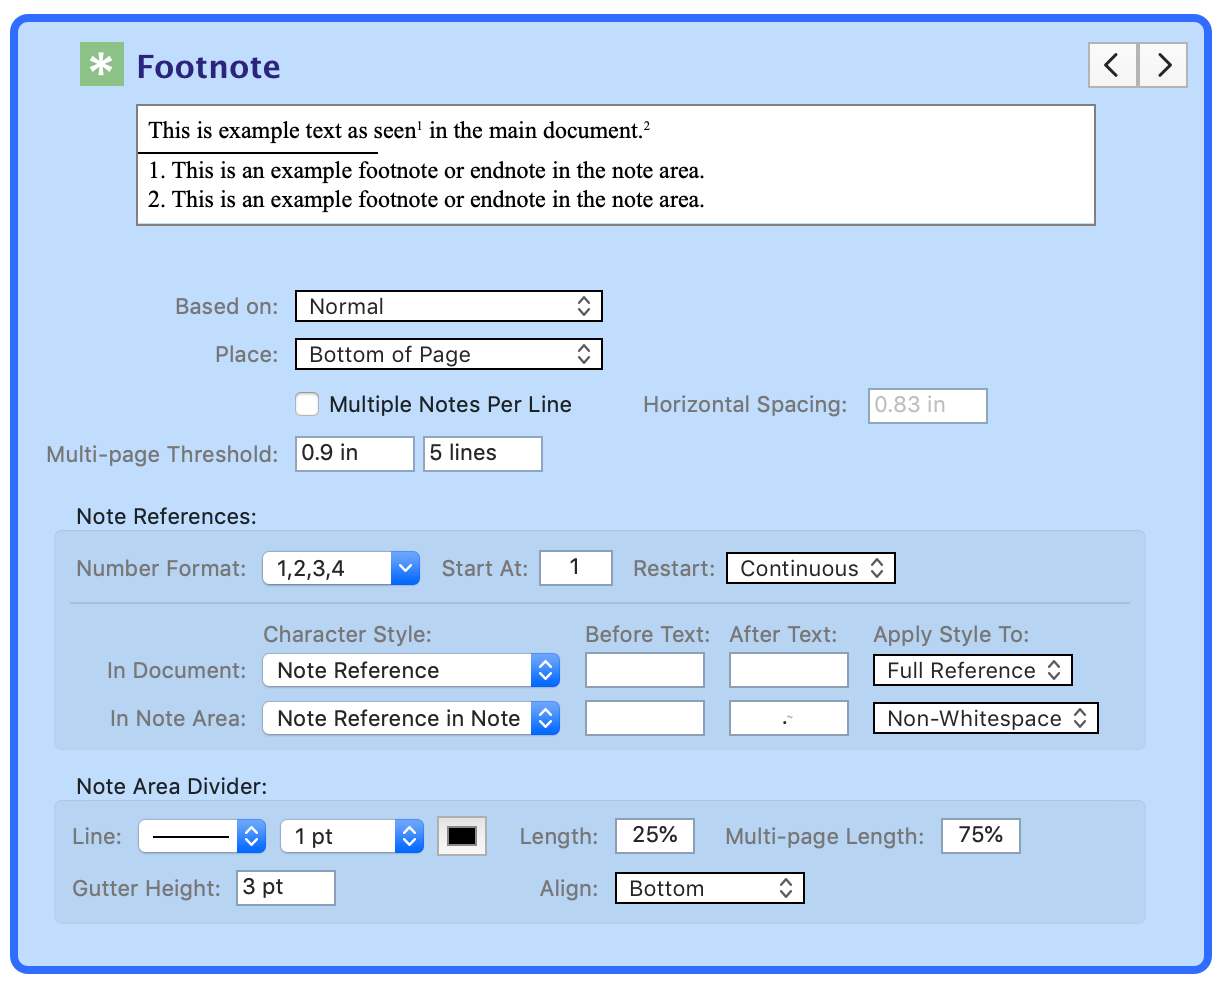
Figure 237
The default “Footnote” style and its associated settings in the Style Sheet.
Each note style in the Style Sheet allows you to configure:
Based on: the paragraph style whose text formatting should be inherited by your note style.
Place: where notes in this style should be placed. Footnotes can only be placed at the Bottom of Page. Endnotes can be placed either End of Section or End of Document.
Multiple Notes Per Line: whether multiple notes are allowed on a single line, if there is enough room. By default this option is not checkmarked, and thus each note always appears on its own line.
Horizontal Spacing: if multiple notes are allowed per line, how much horizontal space should be used between them.
Multi-page Threshold: whether a single note is allowed to span multiple pages. That is, whether a note’s text can be split between two or more pages, so part of the note’s text is no longer on the page of its note reference.
The threshold amounts control how easily a note is split between pages; a higher threshold means less splitting will occur. There are two thresholds: the number of lines of text in the note, and the note’s height (in ruler units). A note that meets or exceeds either threshold may be split between pages; a note that does not meet either threshold will never be split between pages.
As an example consider a multi-page threshold of 5 lines. A footnote whose text has 4 lines will never be split between pages. However, if this footnote increases in length to 5 (or more) lines of text it may be split and flow between pages.
These options control settings for note references using this note style.
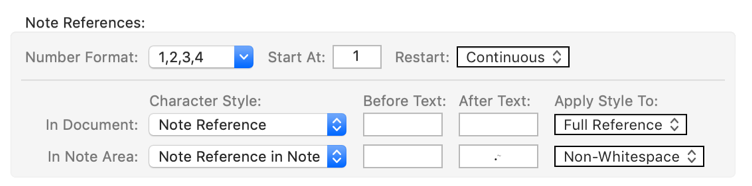
Number Format: the sequence of symbols (e.g.: 1, 2, 3) to use for this note’s references. For a list of all formats see “Automatic numbering formats”.
Start At: the number to use for the first note reference.
Restart: when to restart counting for note references. The options are Continuous (never restart), Per Page, or Per Section.
Character Style: the styles to apply to note references in your text. These styles enforce text formatting like font. You can set two character styles:
In Document for references in the main text.
In Note Area for references the note text.
Once you choose which character styles to use, you can edit the formatting they enforce in the same way as any other style, as explained in “Edit a style”.
Before Text: the fixed text to include before the automatically generated note reference.
After Text: the fixed text to include after the automatically generated note reference.
Apply Style To: what portion of the note reference should have the character applied. The options are Full Reference to apply the style to the entire reference (including the fixed before and after text), Number Only to exclude the before and after text, or Non-Whitespace to exclude surrounding whitespace.
☞ As with the character style, you can control the before text, after text, and apply style to settings separately for the document text and note area.
These options control the divider area and divider line which separates the note area from the main document text.

Line: options for the line appearance, thickness, and color.
Length: horizontal length of the divider line, expressed as a percentage of the page width.
Multi-page Length: the length of the divider line for any notes that span multiple pages.
Gutter Height: the height of the gutter (space) between the main text and notes area.
Align: where the divider line appears inside the gutter area.
Make sure your notes have a uniform appearance
You may collect your notes from a variety of existing sources (prior documents you’ve written, references on the Web, PDF documents). When you do this, the attributes associated with those notes are pasted into your current Nisus Writer Pro document. This can cause formatting difficulties.
Standardize the paragraph formatting of all notes
1. Click your insertion point in a note which satisfies your aesthetic requirements.
2. Choose the menu Edit > Copy > Copy Paragraph Formatting.
3. Use the menu Edit > Select > Select All (or its keyboard shortcut) twice:
a. Choose Select All once to select the entire note.
b. Choose Select All again to expand the selection to all notes.
4. Use the menu Edit > Paste > Paste Paragraph Formatting.
This will make sure that your notes share the same paragraph formatting. Character formatting will not be affected by this process.
Use note styles to standardize formatting
Instead of using the above instructions to manually ensure consistent paragraph formatting, you can alternatively rely upon note styles. Note styles can enforce both character and paragraph formatting, just like regular paragraph styles. You can configure such formatting using your document’s style sheet.
To delete a footnote or endnote just delete its reference, e.g.: select the reference and press the Delete key. You can do so in the main document text or the notes area.
Use an asterisk or other custom symbol for note references
In addition to using numbers sequentially for footnotes and endnotes, you can use an asterisk or other custom character to mark several or all footnotes or endnotes with the same symbol.
1. Select the note reference(s) in the body of the document.
☞ Use non-contiguous selection to select a range of text and affect number of notes at once.
2. Click and hold your mouse or trackpad on the Footnote tag on the Status Bar.
3. Choose Set Custom Note Reference… from the pop-up menu as illustrated in Figure 238.
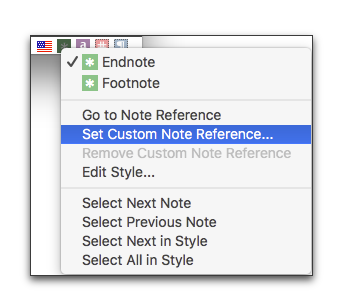
Figure 238
The Footnote tag pop-up menu
4. Enter (type or paste) an asterisk or any other character you wish to use in the sheet that appears as illustrated in Figure 239.

Figure 239
The Custom Footnote Character sheet
☞ The command Set Custom Note Reference… is also available from the menu Format > Note Style.
Edit a custom symbol that marks footnotes and or endnotes
You can change the symbol you have used at any time
1. Select the note reference(s) in the body of the document.
☞ Use non-contiguous selection to select a range of text and affect number of notes at once.
2. Click and hold your mouse or trackpad on the Footnote tag on the Status Bar.
3. Choose Edit Custom Note Reference… from the pop-up menu as illustrated in Figure 238 above.
4. Enter (type or paste) an asterisk or any other character you wish to use in the sheet that appears as illustrated in Figure 239.
☞ The command Edit Custom Note Reference… is also available from the menu Format > Note Style.
Change endnotes to footnotes, or vice versa
You can change the location of any and/or all of your notes at any time.
While in the primary text area of your document:
► Select the footnote or endnote reference you wish to change, press ⌃ and choose Convert to Endnote or Convert to Footnote (depending).
While in the notes areas of your document:
Change one footnote to an endnote
1. Click your insertion point anywhere in the text of that footnote
2. Choose Endnote from the Notes tag  on the Status Bar.
Change one endnote to a footnote
1. Click your insertion point anywhere in the text of that endnote
2. Choose Footnote from the Notes tag  on the Status Bar.
Change all footnotes to endnotes
1. Click your insertion point anywhere in the text of the footnotes.
2. Use the Select All to select the entire footnote (eg: use the menu Edit > Select All)
3. Use Select All a second time to expand the selection to all footnotes.
4. Choose Endnote from the Notes tag  on the Status Bar.
Change all endnotes to footnotes
1. Click your insertion point anywhere in the text of the endnotes.
2. Use the Select All to select the entire endnote (eg: use the menu Edit > Select All)
3. Use Select All a second time to expand the selection to all endnotes.
4. Choose Footnote from the Notes tag  on the Status Bar.
☞ You can change specific notes by selecting (even as a multipart selection) those notes you want to change.
Continue footnote or endnote numbering across consecutive files
Suppose you have a document that is more than 1000 pages long. For the sake of facilitating use, you have decided to break the text up into several files. You can have your footnotes and/or endnotes continue numbering from one section to the next, or, restart at any assigned page number using any footnote or endnote number you want.
Restart footnotes or endnotes at an assigned page number
Accomplishing this task uses a combination of sections and note styles. As explained in “Restart page numbering at 1” on page 188 you’ll see that in the Sections palette you can type in whatever number you want that portion of your document to use as its first page.
1. Set the Restart At page number in the Sections palette as desired for the beginning of the new section or document.
If the new document is a continuation of another document, it can begin at the number of the final page of the preceding document, plus 1.
2. In the Style Sheet view of the document
a. Make sure the Number Format matches that of the previous section or document.
b. Enter the Start At number that continues from the last footnote of the previous section or document.
c. Choose Continuous from the Restart pop-up menu as illustrated in Figure 240.
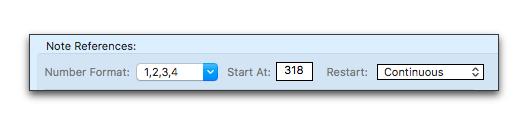
Figure 240
Continuing footnote or endnote numbering across consecutive files
Restart footnotes or endnotes at an assigned note number
► This process is essentially the same as the one for “Restart footnotes or endnotes at an assigned page number”, specifically step 2 above.
Restart endnotes at an assigned endnote page number
Because endnotes appear at the end of each particular document there is no way to have the endnote pages numbered appropriately sequentially other than adding a section break between the end of your text and the beginning of the endnotes and setting the start page number of those sections as needed.
Find the next footnote in your document because it shares the selected style
You may have your insertion point in a particular footnote on one page and want to find the next footnote of your document.
► Choose the menu command: Format > Note Style > Select Next in Same Style or
► Choose Select Next in Same Style from the Notes tag  on the Status Bar.
This selects next instance of text in your document which shares that style.
Learn whether or not a document has notes
You might receive a document from a friend or colleague and not know at first glance whether or not it has footnotes. To quickly check:
► Choose the menu command: View > Notes.
If the Notes submenu is enabled, your document has at least one footnote.
► If the Notes tag  on the Status Bar is present, there is at least one footnote or endnote.
| Previous Chapter Number Sections |
<< index >> |
Next Chapter Tables |