
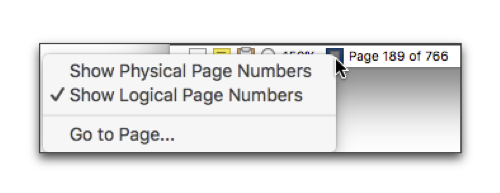
When in Page View, Nisus Writer Pro keeps track of the page numbers of your documents and displays them (the “current” out of the “total”) on the left side of the Status Bar.
Figure 171
Page number display and its menu showing physical, then logical numbers of the same page of a document
Nisus Writer Pro also provides customizable tools for automatically numbering objects. The most common form is page numbering. You will find these automatic numbering features in the menu Insert > Automatic Number.
Headers and Footers are those parts of your document where you most often place information that is likely to vary. These may include such items as:
• the current page of your document
• the current section of your document
• the total number of pages in the current section (or the entire document if it is all one section).
Most documents contain variables such as page numbers. Here’s where to find the variables used in headers and footers:
• Section number
the menu command: Insert > Automatic Number > Section Number
• Pages in Section
the menu command: Insert > Automatic Number > Pages in Section
☞ Pages in section always displays the actual physical number of pages independent of what value you set in the Increment text box of the Sections palette. If the document begins on page one and you have the increment set to 3 and there are only 5 pages in the section, the last page of the section could display “page 13 of 5”.
◦ Page number
the menu command: Insert > Automatic Number > Page Number
☞ Most aspects of page numbering utilize headers and/or footers; see “Headers and Footers” beginning on page 181.
Insert the current page number (once) on a specific page
► Choose the menu command: Insert > Automatic Number > Page Number.
The current page number appears at your insertion point.
Display the current page number on every page
1. Click your insertion point in the area indicated “Click for Header” or “Click for Footer” as illustrated in Figure 165 on page 182.
2. Choose the menu command: Insert > Automatic Number > Page Number.
You can click and insert the automatic page number in any of the header or footer areas and the consecutive number will appear on all pages.
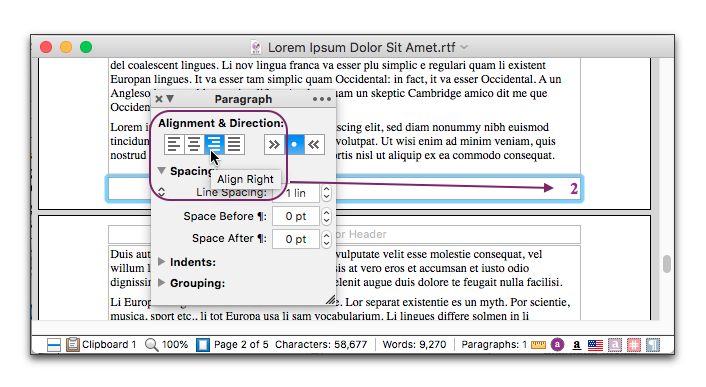
Figure 172
Aligning text inside the footer area
Restart page numbering for a new section
1. Place your insertion point at the end of the paragraph immediately before where you want the new section to begin.
2. Choose either Next Page, Odd Page, Even Page or Same Page from the menu Insert > Section Break.
3. Make sure your insertion point is in the new section.
5. Click the Page Numbering reveal triangle in the Section palette.
6. Click Restart At and choose the numbering format you want from the Format pop-up menu in the Section palette.
The various number formats available are detailed in “Automatic numbering formats” on page 63.
7. Enter the number you want to have as the first page number of this section in the Section palette.
8. If you want the page numbers to increment at something other than 1, enter that value in the Increment box in the Section palette.
9. Click your insertion point either in the header or the footer (depending on where you want the number to appear).
10. Choose the menu command: Insert > Automatic Number > Page Number.
11. Format the number any way you like (align right, left or center, change the font, etc.).
The following instructions presume that you already have page number in your header or footer as explained in “Display the current page number on every page” on page 187.
1. Put your insertion point at the beginning of the paragraph where you want the page numbering to restart.
2. Choose the menu command: Insert > Section Break > Next Page.
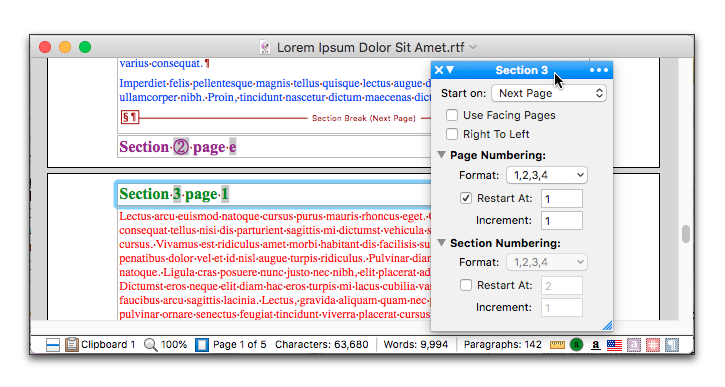
Figure 173
Pages from two sections spanning a section break
3. Put your insertion point in the header or footer of the section you want to change (either on the page before or after the section break).
5. Click the Page Numbering reveal triangle in the Section palette.
6. Choose the numbering format you want from the Format pop-up menu in the Section palette.
The various number formats available are detailed in “Automatic numbering formats” on page 63.
7. Click Restart At and enter a 1.
8. If you want the page numbers to increment at something other than 1, enter that value in the Increment box in the Section palette.
☞ Be careful not to delete the Return character above the section break unless you want to remove the section divider.
Display the current page number and the total number of pages in the section (or document) on every page
In addition to the instructions immediately above
1. Put your insertion point in the header or footer of your document.
2. Choose the menu command: Insert > Pages in Section.
The shaded numbers in Figure 173 (②, e, 3 and 1)are the automatic numbers that Nisus Writer Pro keeps track of. You can turn this shading on or off in Preferences. The Pages in Section number is the actual number of pages in that section.
Determine the format of page numbers
Nisus Writer Pro enables you to display the section and/or page numbers of your document in a wide variety of formats (these are maintained throughout the document, even though you may have section breaks).
1. Open the Section palette.
2. Put your insertion point in the section of your document where you want to change the format of the automatic number.
3. In the Page Numbering portion of the Section palette, choose the format you want from the Format pop-up menu.
The various number formats available are detailed in “Automatic numbering formats” on page 63.
Determine the format of section numbers
Nisus Writer Pro enables you to display the section and/or page numbers of your document in a wide variety of formats (these are maintained throughout the document, even though you may have section breaks).
1. Open the Section palette.
2. Put your insertion point in the section of your document where you want to change the format of the automatic number.
3. In the Section Numbering portion of the Section palette, choose the format you want from the Format pop-up menu.
The various number formats available are detailed in “Automatic numbering formats” on page 63.
Use Automatic Numbers, Date & Time Variables and Document Properties in Headers/Footers
The Nisus New File shipped with Nisus Writer Pro in Figure 12 on page 8 is simple. It includes a few standard styles, margins at 1" on either side and a .5" at the top and bottom with room for a header and footer of .75" each. It is little more than a blank piece of paper. When you write and print a variety of multiple-page-documents, it may be difficult to know at a glance what page of which document follows another page. Nisus Writer Pro can help you keep track of your documents and when printed, easily identify which document and version you have in hand.
As explained in “Edit your Nisus New File” on page 595, you can customize the file that opens when you choose the menu command: File > New. The Nisus New File illustrated in Figure 176 displays (in the footer) the file’s location as well as the date it was created, last saved and printed in addition to (in the header) the file’s name and the current and total number of pages. Adding these “variables” to your Nisus New File, Nisus Writer Pro can automatically keep the information current and accurate as illustrated in Figure 177. However, because this information is continuously in flux as you edit your document, such automatic content (page numbers, cross-references, etc.) is updated only on demand and before printing, instead of live during editing. “Stale” automatic content is displayed in the document with a rectangular (red) border that you can change in the Appearance preferences as explained in “Appearance Preferences” on page 570.
Update stale automatic content
As you edit your document, your automatic content can become stale (outdated). All this information is updated when you choose the menu command: File > Print…. However you can cause it to update whenever you wish.
► Choose the menu command: Tools > Automatic Content > Update All Stale Content.
Update only selected stale content
1. Select a range of text that has automatic content you wish to update.
2. Choose the menu command: Tools > Automatic Content > Update Selected Stale Content.
While all content is always updated before printing (or saving as a PDF), you can set the frequency of some of these, on a per-document basis, in the Automatic Content Update Preferences dialog.
Set automatic content update policies
► Choose the menu command: Tools > Automatic Content > Automatic Content Update Preferences….
The various options available are illustrated in Figure 174. They include:
◦ List Items / Bullets
set to update immediately.
◦ Footnote & Endnote References
set to update immediately.
◦ Generated TOCs and Indexes
set to update when printing or saving to a PDF
The remainder:
◦ Information Stamps (such as those items inserted into your document using the Date and Time and Document Property submenus of the Insert menu) can be set to update either:
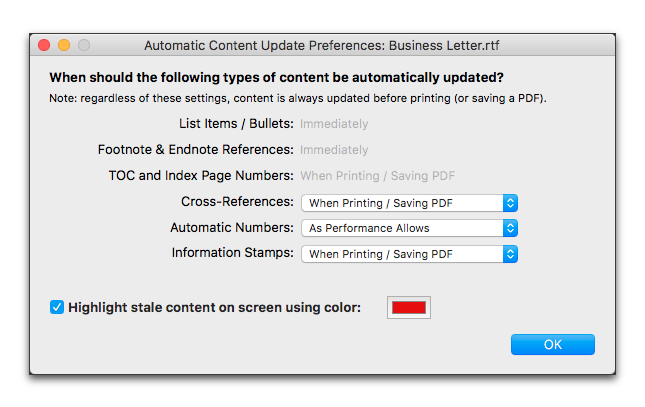
Figure 174
The Automatic Content Update Preferences dialog
The more often Nisus Writer Pro updates this information, the more time it spends on these tasks instead of paying attention to your keystrokes and/or editing actions.
Determine the display and highlight color of stale content
You can specify whether stale content displays as highlighted (and in what color), by configuring the “Stale automatic text” color in your Appearance Preferences. You can also make that choice in the Automatic Content Update Policy dialog.
► Check Highlight stale content on screen using color: to display the highlight.
► Uncheck Highlight stale content on screen using color: to turn off the display highlight.
► Click the color swatch to open the Colors panel and choose a different color.
Convert automatic content to static text
You may need to send a portion of a document to someone. The part of the document in question has cross-references to elsewhere in the document you are not sending. It may also include other automatic content such as a variable date, or the number of total characters in the document. If you simply copy that text out and paste it into an email message or another Nisus Writer Pro document your automatic content will be replaced by:
[Referenced content is missing.]
The phrase “[Referenced content is missing.]” also appears if you delete a bookmark to which you have added a cross-reference. In that case a help tag appears when your mouse hovers over the selected text as illustrated in Figure 175.
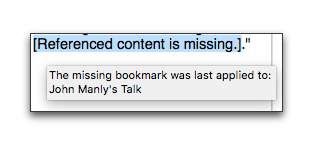
Figure 175
A missing bookmark help tag
You can prevent this happening by converting the automatic content to static content before copying the text and then undoing the action immediately following the copy action.
1. Select the range of text you want to copy and send or put in a new document.
2. Choose the menu command: Tools > Automatic Content > Convert to Fixed Content.
3. Choose the menu Edit > Copy (or, if you want, Edit > Cut) to put your selected text on the Clipboard.
4. Choose the menu command: Edit > Undo.
Choosing Undo does not affect what is on the Clipboard, but it does restore the “automatic” nature of the text in your document.
5. Switch to the window in which you wish to paste the text and choose the menu command: Edit > Paste.
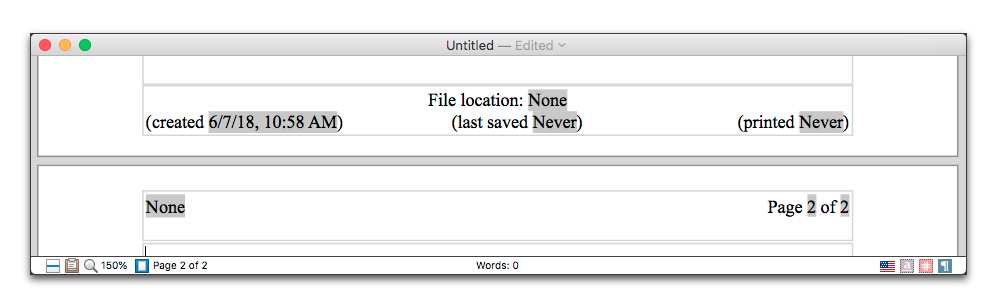
Figure 176
Date & Time Variables and Document Properties in headers and footers
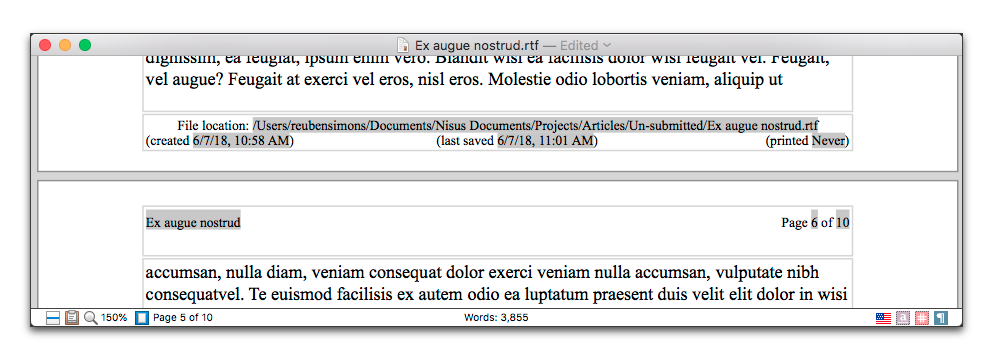
Figure 177
Date & Time Variables and Document Properties in headers and footers filled in
Figure 178
“Stale” cross-references and other automatic content displaying their borders
| Previous Chapter Delete Headers and Footers |
<< index >> |
Next Chapter Graphics: Images and Shapes |