How to Copy a File Path in the Finder

Maybe I should file this under “old news that I should be ashamed I didn’t already know”, but I recently learned you can easily copy the path of any file or folder in the Finder:

1. Select the file or folder in the Finder.
2. Hold down the Option key on the keyboard (and keep it down until you finish step 3).
3. Choose the menu Edit > Copy “Your File” as Pathname.

The item’s path has been placed onto the clipboard.

This same menu command is also available from the item’s contextual menu. As with the main menu, you have to hold down the Option key to see the alternative command (it supplants the normal Copy command).

The only remaining question is who at Apple decided to call this a pathname? That is a real term, but nobody calls it that. “Certainly milord, I shall fetch your pathname posthaste!” 🎩 Round these parts we just call ’em paths.

Scan Paper Documents with Your Mac

It’s a beautiful thing to go completely paperless when it comes to personal documents. No more monthly statements, yearly declaration packets, and other junk cluttering your space. One of my New Year’s Resolutions was to finally digitize old accrued papers. It’s like a weight loss program for filing drawers– let’s feel the burn! 📄🔥

Did you know that you can scan papers by taking photos with your iPhone? The results are pretty good. There’s some filtering that increases contrast to hide lighting irregularities and sharpen text. You can add scans on your iPhone using the Notes app.

What’s even nicer is that you can initiate scans from your Mac using something called Continuity Camera. This mode will save the scan results directly to your Mac. Here’s the incredibly useful workflow:

1. Switch to the Finder and right-click on the Desktop or any other folder.
2. Choose the contextual menu command Import from iPhone > Scan Documents
   → Scanning mode will be activated on your phone.
3. Using your iPhone take photos of your paper documents, and click Save when finished.
   → A PDF file will be saved to the folder you used in step 1 above.

The resulting PDF will contain all of your scans, one photo per PDF page.

Nisus Writer Font Previews

Nisus Writer’s font menu has long been WYSIWYG (What You See Is What You Get, for any kids out there). But that isn’t always helpful. You don’t want to see how a list of font names will look. You actually want to see how your text will look.

This is where Nisus Writer’s font preview can help. For example, let’s say that you select a text equation in your document and use the menu Format > Font > Show Font Previews. You’ll see a dialog like this:

This dialog lets you pick a great looking font for your particular text. The previews also take into account whatever other formatting is already applied to your text, e.g. font size, color, underline, etc, so you can maximize WYSIWYGNESS and save yourself a bit of fiddling time.

How to Reopen Closed Safari Windows

Maybe file this tip under “just open your eyes dummy” but I recently learned that Safari on macOS has a feature that allows you to reopen recently closed windows. That doesn’t mean just a single web page. You can restore a window fully, including the many tabs that were inside the window.

You can use this Safari feature via the menu History > Reopen Last Closed Window, or more generally via History > Recently Closed. I don’t expect to use this often, but we’ve all had that moment of regret after accidentally closing a window with like 10 tabs we still needed to review 🤬

Thanks to a Nisus user who tipped me off to this feature. That user was actually requesting that we add the same feature to Nisus Writer, in case a window with many tabbed Nisus documents is accidentally closed. We’ll certainly consider it as a potential future enhancement.

If you’d like to see Nisus add this feature (or any others) please get in touch with us. We love to get feedback from our users! You can leave a comment here on our blog, chat on our user forum, or contact us directly.

How to Insert Overline Characters

In certain kinds of writing (e.g. mathematics or linguistics) it can be useful to insert characters with a line on top. This line is known by several names like an overbar, overline, or macron. Here are some examples of such characters:

ā ō n̅

You can easily enter such characters in Nisus Writer and other Mac apps.

How to type standard overline characters:
If you’re using a recent version of macOS like Catalina or Big Sur you can type several standard overline characters simply by holding down a letter key on your keyboard. As explained in Apple’s support document on typing accents, you hold down the letter key (e.g. the “A” key) for a few seconds. A popover will appear with several character variations:

You can now either click the desired character, or press the corresponding number key, to insert it.

How to add an overline to any character:
The standard keyboard only allows easy access to certain popular overline characters. But you can use a combining overline character to place a line over virtually any other character. Here’s how you can insert a combining overline:

1. Type the base character, e.g. the letter “N”.
2. Show Apple’s Unicode/emoji character palette. There are a variety of ways to do this. One way is to use the menu Insert > Special Character > Show Character Catalog.
3. The search field at the top of the character palette has focus. Type the phrase “combining overline”. (You could also just type “overline” but the results will show multiple lines and it’s hard to tell which one is combining)
4. Insert the overline by clicking it with your mouse, or pressing the Return key.

If you use overlines frequently you may want to add it to Nisus Writer’s special characters list. You can customize the list via the menu Insert > Special Character > Customize Special Characters. Once the character is added it will be available on the special characters menu and palette. That means you can optionally assign it a customized keyboard shortcut in our Menu Key preferences

Two Mac Tips To Brighten Your Day

Here are two quick Mac tips that will give you strength, whiten your teeth, and eliminate doggy breath.

Adjust Your Mac’s Volume in Fine Increments.
Want to fine tune the volume on your Mac? Press shift+option while pressing the volume or brightness keys. It will adjust in quarter increments instead of full increments.

This also works with the Touch Bar.

Open The Current Application’s Preferences.
If you need to get to an application’s preferences, simply type command+, (comma). I had no idea this existed until a few days ago. I mean, it’s not like I could have known about this, right?

Do you have a favorite tip to share? Let us know in the comments below!

Quick And Useful Mac Tips

I’m lazy. So, instead of writing about hideous Safari 15 tabs like everyone else, I’m going to share a few Mac tips.

App Switcher
The App Switcher shortcut (Command + Tab) is a handy tool. Want to quit an app while in the App Switcher? Type the letter Q while the Command key is still held down to quit the highlighted app. 

Copy Current URL
To copy the current URL in Safari, hit Command + L to highlight the current URL. Then press Command + C to copy the URL to the clipboard. That tip has saved me quite a bit of time.

Screenshots
Lastly, this is a new one for me. The normal screenshot shortcut is Shift + Command + 3, which takes a screenshot of your desktop. Shift + Command + 4 allows you to select an area of the screen. If you press the spacebar you get a screenshot of just that window or whatever area you have highlighted.

Bonus tip: Command + Control + Shift + 4 takes a screenshot and copies it to the clipboard.

If you have a tip to share please add it to the comments below. We are always up for new tips!

Nisus Writer and Custom Keyboard Layouts

A topic that recently arose on the Nisus user forums is whether or not Nisus Writer comes with any custom keyboard layouts. While we don’t provide any keyboard layouts, Nisus Writer does support all layouts that are available system-wide on macOS. That includes all the default layouts provided by Apple as well as any customized keyboard layouts.

To enable additional keyboard layouts (also called input sources) on your Mac you can visit the macOS system Keyboard preferences. You’ll see a host of keyboards available:

Once you’ve enabled a keyboard layout for your Mac you can use it all your apps. In addition Nisus Writer has special language features that can help you automatically switch the keyboard layout based on the language of your document text.

You can also create your own keyboards using tools like Ukelele or search for existing pre-made custom keyboards. For example, here’s a custom Yiddish keyboard layout for the Mac.

The sky is the limit when it comes to customizing text entry.

Multi-Key Keyboard Shortcuts

I’m a big fan of learning keyboard shortcuts. It’s nice to save time and avoid reaching for the mouse. Apple provides some basic macOS system preferences to customize keyboard shortcuts across apps, but Nisus Writer’s enhancements go much further.

Nisus Writer of course lets you customize the keyboard shortcut for any menu command. But an even bigger help are our multi-key shortcuts. You can choose whatever mnemonic is clearest to you. For example Command + H1 can apply the “Heading 1” paragraph style. To activate this shortcut:

1. Press and hold down the Command key.
2. Type the H key (press down and release up).
3. Type the 1 key (press down and release up).
4. Release the Command key (so it is now up).

Nisus Writer collects together all the pressed keys while the Command key is down and then matches the full shortcut at the very end, once the Command key is released.

Aside from activating any single regular menu command, you can also assign keyboard shortcuts to intermediate submenus. For example you might assign Command + OR to show the “Open Recent” menu. Once the menu is expanded on screen you can use the up/down arrows (or autocomplete typing) to select the desired submenu and open the corresponding file.

All these little tricks may take some small time to learn and set up, but once you do we hope you’ll see how much of a pleasure writing can be with Nisus Writer.

Big Sur and Sandbox Folder Names

Apple made some changes to the file system for macOS Big Sur. The big underlying change is the new cryptographically signed system volume that prevents tampering with system data (for better and worse). There is also another little change to what you see in the Finder when you browse sandbox folders.

As you may know, every app that adopts macOS sandboxing is given its own sandbox folder. This folder holds all local information for the app, like your app preferences. If you don’t ever give a sandboxed app access to additional files or folders (eg: by choosing extra locations in file handling dialogs), then you can be sure that everything the app stores on your Mac is kept in its sandbox. It’s a great idea. Not only does it increase security, but it also makes apps easier to uninstall: just delete the app and its sandbox.

Each sandbox folder’s name corresponds to the app’s internal identifier. For example: Nisus Writer Pro’s sandbox folder name is com.nisus.NisusWriter. That’s perhaps a little obscure, but it ensures sandbox folder names are unique. All sandbox folders are stored in a single location on your Mac, inside your home folder at:

~/Library/Containers

Big Sur changes how container names inside that folder are displayed in the Finder. Instead of showing identifiers you’ll see actual app names. That is generally an improvement, but it does also create some confusion.

The above Big Sur folder listing shows the problem: apps with related services may have several sandbox folders, which now all display using the same name. There’s one for Mail’s Spotlight importer, another for Mail’s sharing extension, and so on. But there’s no way to know which folder is the primary sandbox for Apple Mail.

This impacts InfoClick, our email search app, because it’s no longer obvious which Mail sandbox folder stores your emails. The Finder and standard file dialogs on Big Sur simply won’t show you the real folder names. Luckily there is still a way to choose the proper folder using the Go To Folder command. You can still paste the folder’s path to ensure you select the proper folder.

Extract Text from Images

Nisus Writer recently added a feature that allows you to extract editable text from your photos, scans, PDFs, and other images. This process is often called optical character recognition (aka OCR).

Let’s see how text extraction works using a COVID relief notice I recently received from the United States government:

Once the image is in Nisus Writer Pro document, select it and use the Extract Text From Image command to generate an editable text version of the image:

Most of the text is correct and in sequence. There are a few minor errors and text misplacements, like the number 6 appearing before the title– perhaps caused by the Treasury Department’s seal alongside the main textual content.

Let’s try a few others images, like this paperback book and store receipt:

Overall pretty good! Usually editing extracted text is a better starting point than retyping something entirely.

The accuracy of the extraction will depend on a variety of factors including the quality of the image, whether text is slanted or rotated, the language and words in the text, and your system version. Nisus Writer uses Apple’s machine learning capabilities to accomplish this task, and requires at least macOS 10.15 Catalina.

Hopefully you’ll find a good use for this new feature.

Jump Around Quickly While Writing

One of my favorite new features in Nisus Writer Pro 3 is the Go To Content command. Whenever I’m writing a reasonably complex document I often want to jump around it, to consult material from other sections or simply work on different parts of the text. Nisus Writer has a Navigator sidebar that can aid in this task, showing key document structure like the Table of Contents or Bookmarks. But I wanted a faster workflow.

You can use the new Go To Content menu to see a list of available destinations, like all your Table of Contents headings. Or perhaps all text using a particular paragraph style:

This listing allows you to quickly filter by keyword or partial text, so you only have a few destinations to look through. This is a great way to find the desired heading (or other special content) and jump right to it.

Skip the Mouse
One thing I love about the new Go To Content command is that I can keep my hands on the keyboard the whole time. Using Nisus Writer’s multi-key shortcuts I’ve established a few shortcuts to trigger variants of the Go To Content command. For example: Command + GT for Go to Text in TOC, and Command + GB for Go to Bookmark.

Once a “Go To” dialog is open, it’s quick to finish the job via the keyboard:
1. Type a few keywords to narrow down the list of destinations.
2. Press the Down Arrow key to select the desired destination.
3. Press Return to jump to the destination text.

Okay, so maybe it doesn’t take that long to grab your mouse and click around, but it feels really great when you get something done using only the keyboard. You stay more focussed on your writing– in the flow. If you haven’t bothered to train your habits to reduce mouse usage, I suggest you give it a try. It can be a revelation!

Learn More
For more details on this new feature in Nisus Writer Pro, please see the Go To Content section of our user guide. It goes over some other details and tricks, like using the Go To Content dialog to produce a list of specialized search results.

Nisus Writer’s Improved Document Versioning

Nisus Writer adopts macOS autosave, which means copies of your document are automatically and periodically saved while you’re editing. The system preserves earlier autosaved copies so you can restore prior document versions. These prior versions aren’t kept forever (only Apple might say how long), but they’re incredibly useful if you realize you made a mistake or otherwise need to access earlier work.

Overall this arrangement works very well. However, there is one aspect of it that always seemed needlessly frustrating to us. When you enter Apple’s document version browser to compare earlier versions side-by-side, it’s not clear exactly how many versions exist, nor when they were created. There is only a graphical timeline along the side of the screen that looks like this:

That might look cool, but it’s not a great interface for finding a version from exactly the right date. It also won’t let you compare more than a single prior version at once; you can only compare the current document with a single prior version. It would be nicer if you could open and inspect any number of prior versions, in a space that’s not constrained by the version browser.

To fix these problems we added a dedicated version listing to Nisus Writer Pro version 3.1 and Nisus Writer Express version 4.1. The list shows you exactly what versions are available:

Nisus Writer’s list makes it so much easier to get an overview of what’s available, so you can pick out a significant version. You may open any number of prior versions in read-only mode so you can compare them at your leisure, extract earlier content, or save a copy elsewhere. Nisus Writer’s listing also marks versions that are exact duplicates, so you don’t need to bother looking at them.

We hope this improvement and all the other smart considerations in Nisus Writer help you with your writing!

Stepper Buttons in Nisus Writer

Even if you’re not familiar with the term, you almost certainly know how to use steppers. They are those little up and down arrow buttons you see next to numeric controls on your Mac. For example, you’ll see steppers next to the paragraph spacing controls in Nisus Writer:

As you probably already know (or can guess!) clicking the arrow buttons changes the spacing by ±1 point.

What’s new in Nisus Writer Pro 3.1 and Nisus Writer Express 4.1 is an enhancement for steppers that refines how they react to clicks. By holding down a modifier key as you click, you can increase or decrease the adjustment amount:

• Hold the Control key to trigger smaller changes.
For example, the font size will change from 12 points to 12.1 points.

• Hold the Option key to trigger larger changes.
For example, the paragraph spacing will change from 6 points to 12 point.

The adjustment amounts are sensitive to context and ruler units. For example, changing the paragraph indent using the Option key may result in a difference of ±1 centimeters vs ±0.5 inches.

There are a few mnemonics to help you recall which modifier key does what. You will notice that the relative order of the Control/Option keys on your keyboard matches that of the minus/plus keys. This is in harmony with the Control key triggering smaller changes (minus), and the Option key triggering larger changes (plus). Another way to think about it is that the Control key gives you greater control over the measurement, since the adjustment is finer.

We hope this improvement helps you dial in exactly the measurement you want, and reduces some repetitive clicking.

How to Change the Font Size of Comments

Nisus Writer Pro users often write in and ask us how they can increase the font size of comments in their document. The good news is that it’s easy to change the font size (and other formatting) of all comments in your document en-masse.

Whenever you add a comment to a document, Nisus Writer Pro will automatically apply a paragraph style called “Comment” to your new comment. By default this single style controls the formatting of all comments in your file. So to change the font size of all comments you need only edit this style like so:

1. Switch to your document’s style sheet, eg: use the menu View > Style Sheet
2. From the list of styles on the left, select the “Comment” paragraph style.
3. Edit the style’s formatting by using any available tools, eg: the menu Format > Size, the Character palette, etc.

In most situations that’s all you need to do. Once you switch out of Style Sheet view you should see that all your comments have been updated to account for the edited style’s formatting.

Manual Formatting and Comments
One potential complication is manual formatting, which is merely formatting that is not enforced by a style. In other words, the formatting was applied directly to text. That kind of formatting will override formatting in the “Comment” paragraph style.

This is an infrequent occurrence for comments, but you may encounter it in files imported from other apps. If your comments don’t react to your style changes, you may need to remove manually applied formatting. Luckily that’s easy too.

To remove manual formatting from all comments in your document:

1. Place the insertion point (caret) inside any comment.
2. Select the entire comment using the menu Edit > Select > Select All.
3. Use Select All again to expand the selection to all comments in your file.
4. Remove all overrides via the menu Format > Remove Formatting Except Styles.

After removing all non-style formatting, the formatting enforced by your “Comment” style should shine through as intended.

How to Batch Rename Files

Have you ever wanted to rename more than one file at a time? Me too. So how do you accomplish this?

  • Switch to the Finder.
  • Locate the files you want to rename.
  • Select all the files you want to rename.
  • Use the menu File > Rename X Items, where X is the number of files you’ve selected, eg: “Rename 2 Items”.
  • A dialog box will appear. Choose from the many options as desired and click the “Rename” button.

That’s it! Your files will be renamed the way you chose. 

If you have a tip or a trick please let us know. We would love to feature your tip in our newsletter and our blog.

Quick Tip: Hide the Menu Bar

Did you know you could hide the menu bar on your Mac? You can! Open System Preferences > General and checkmark “Automatically hide and show the menu bar”.

Bonus tip: you can customize the order of icons on the right side of the menu bar. Hold down the command key as you click an icon to start dragging it. If you drag the icon off the menu you can eliminate it altogether.

Nisus License Lookup Tool

There are times, for whatever reason, that you need to find the license for your Nisus app. For example, you would like to upgrade to the latest version of Nisus Writer Express or Nisus Writer Pro. Perhaps you’re moving to a new computer and you need to install a fresh copy of InfoClick. How do you find your license?

Our Nisus License Lookup Tool, located on our main support page, will allow you to find your license and have it emailed to you. You just need the email address you used when you purchased your Nisus application and you will receive an email containing your license.

Letter Case Conversions

Sometimes you need to fix text with the wrong letter case. Maybe you copied text that’s all uppercase letters, but you need lowercase letters (eg: change “EXAMPLE” to “example”). Nisus Writer has two ways to help you convert such text.

Character Conversions
Most often you will want to do a one-shot conversion of your text using the menu Edit > Transform Text. For example, using the To Lowercase command. That will convert the underlying characters to their lowercase counterparts (eg: “A” to “a”) at the single moment in time when you activate the command.

Text Display Conversions
Instead of converting the underlying letters, Nisus Writer can also display a converted version of your text. In this way your text remains unchanged; it’s just the display that changes on screen (and in PDFs and printouts).

You enforce such display conversions using the menu Format > Letter Case. Commands on that menu operate like other kinds of text formatting (eg: bold font) in that they are continual. If you retype the text to which that formatting is applied, what you see immediately undergoes the same transformation. The newly typed text will be converted for display automatically, without reapplying the command.

Typically these kinds of display conversions are employed via styles. It’s nice when (for example) your headings have consistent uppercasing, no matter what’s been typed in your document. This also makes it easy to change your mind– just edit your style and all your text will be updated as needed automatically.

Small Capitals
One very popular kind of text display conversion is small caps. That’s where all letters in your text are displayed using capitals, but lowercase letters appear smaller:

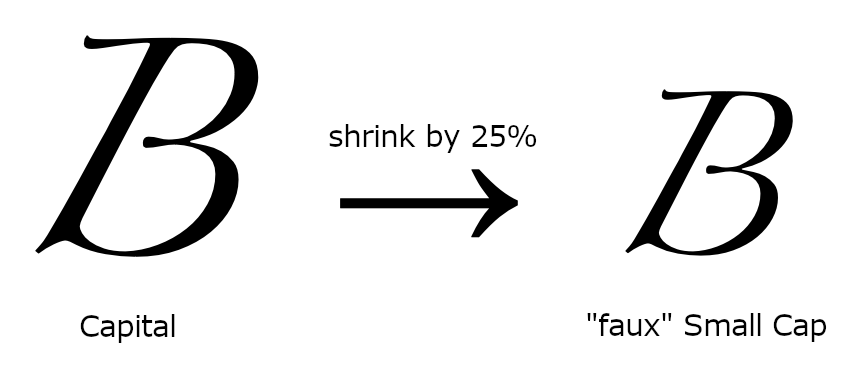
Nisus Writer supports small caps for all text and fonts. Proper typographic small caps will be used if a font provides them. If a font lacks typographic small caps Nisus Writer will synthesize their display by shrinking the font size like so:

The above screenshot shows a “faux” small cap for the Zapfino font. It’s somewhat surprising that Zapfino lacks typographic small caps considering all its other font features like crazy ligatures.

You might wonder, what are proper typographic small caps? Aren’t all small caps just shorter versions of uppercase letters? Typographic small caps may have been customized by the font designer, usually so the small caps are more distinctive. Here’s a screenshot showing Adobe Garamond Pro:

The small caps F (rightmost blue) may look like it’s simply a smaller version of the capital F (leftmost yellow), but it’s not. The middle image above shows a shrunken capital F overlaid on top of the small caps F. You can see the small caps F is actually quite a bit heavier.

Hopefully this shows you some of the many ways Nisus Writer can help you process your text and the intricacies involved. If you have any questions please let us know by commenting below, joining our forum discussion, or contacting us directly.

Line Wraps and the Zero-Width Joiner

Sometimes the most exciting thing about an iOS update is all the new emojis. In recent history the new emojis in iOS 13.2 included several interesting characters:

sloth emojiice cube emojiringed planet emoji

That last one is technically called the Ringed Planet emoji; but let’s get real, that’s Saturn. Even in emoji-form the cosmos is beautiful. These photos of Jupiter taken by the Juno probe are particularly stunning in their detail.

What does this have to do with line wrapping? We’ll get to that. First let’s explain a technical detail about emojis. Most Unicode characters and emojis have a distinct Unicode code point (aka character code). Each code tells software what character to display. The number 127823 is an apple, while 129411 is a turkey. But sometimes a new emoji will not have a new code. Instead the emoji is designated using a composite of existing codes. For example, the female chef emoji does not have a distinct code. Instead it combines the woman emoji with the frying pan emoji:

how the female chef emoji is composed

How does does an emoji do that in text? By using a zero-width joiner character between its constituent characters. That way software knows to display all the codes together as a single glyph or image on screen. This joiner trick is used for a variety of purposes like skin tone and gender modifiers.

Now to the part where we explain how the zero-width joiner character can help your writing. In certain situations you might consider inserting a joiner character to change where line wrapping occurs. The joiner acts as a signal to the text layout engine that the adjacent characters should be joined. You can think of the joiner like a glob of glue that keeps its neighbors together. The characters won’t display a single image as with emoji, but rather they will be kept together on the same line.

Consider the following example text:
text example

The page margins may cause an undesirable wrapping point at the slash, so the words “when” and “if” are split across lines like so:
text badly wrapped to margins

To prevent that you can place the insertion point after the slash character and insert a zero-width joiner character. That instructs text layout to keep the slash character together with the “i” in “if” like so:
fixed line wrapping by using zero-width joiner

To insert the joiner character in Nisus Writer Pro you can use the menu Insert > Special Character > Spaces > Zero Width Joiner, or use our customizable Special Characters palette.