Nisus Writer Updates for Big Sur

Nisus Writer Pro and Nisus Writer Express recently added support for Apple Silicon and macOS Big Sur. But those versions still had some rough edges to smooth out when running on Big Sur. Today we’re happy to release Nisus Writer Pro 3.2.1 and Nisus Writer Express 4.2.1 to fix the most commonly reported Big Sur issues.

Aside from improving app behavior on Big Sur, these updates include a variety of other fixes which you can read about in the full Nisus Writer Pro release notes or Nisus Writer Express release notes.

Happy Holidays from all of us at Nisus!

Apple Silicon Support for InfoClick and Thesaurus

If the elves brought you a shiny new Apple Silicon Mac we have some app updates for you. The new versions of InfoClick (our email search tool) and Nisus Thesaurus now run natively on Apple Silicon.

Aside from Apple Silicon support, InfoClick version 1.2.6 includes a handful of bug fixes which are listed on the InfoClick release notes page. There are no other changes for Nisus Thesaurus.

Nisus Writer Updates: Dark Mode, Big Sur, and Apple Silicon

We are happy to announce the release of Nisus Writer Pro 3.2 and Nisus Writer Express 4.2. These new versions are significant updates that add support for Dark Mode, macOS Big Sur, and Apple Silicon among other new features.

If you’re a Nisus Writer Pro user:
• Take a brief tour of what’s new.
• Get the update inside the app, direct download, or the Mac App Store.

If you’re a Nisus Writer Express user:
• Take a brief tour of what’s new.
• Get the update inside the app, direct download, or the Mac App Store.

Big Sur and Apple Silicon Updates Coming Soon

This week Apple released macOS Big Sur. If you’re a Nisus customer you may want to hold off on updating your system, as we’re aware of some issues. Most of the problems are minor, but one potentially significant issue is that Nisus Writer Pro may be unable to import and export certain document file formats– notably DOC and DOCX.

This week Apple also revealed new Macs with Apple Silicon (M1 chip). Early reports suggest that these new Macs will be fast. It’s an exciting change! But there’s a potential downside as well, if your software isn’t compatible and can’t be run using Apple’s Rosetta translator.

Nisus Software is on top of both of these big changes. We expect to have app updates available very soon, to provide both Big Sur compatibility and native support for Apple Silicon.

Nisus Writer’s Improved Document Versioning

Nisus Writer adopts macOS autosave, which means copies of your document are automatically and periodically saved while you’re editing. The system preserves earlier autosaved copies so you can restore prior document versions. These prior versions aren’t kept forever (only Apple might say how long), but they’re incredibly useful if you realize you made a mistake or otherwise need to access earlier work.

Overall this arrangement works very well. However, there is one aspect of it that always seemed needlessly frustrating to us. When you enter Apple’s document version browser to compare earlier versions side-by-side, it’s not clear exactly how many versions exist, nor when they were created. There is only a graphical timeline along the side of the screen that looks like this:

That might look cool, but it’s not a great interface for finding a version from exactly the right date. It also won’t let you compare more than a single prior version at once; you can only compare the current document with a single prior version. It would be nicer if you could open and inspect any number of prior versions, in a space that’s not constrained by the version browser.

To fix these problems we added a dedicated version listing to Nisus Writer Pro version 3.1 and Nisus Writer Express version 4.1. The list shows you exactly what versions are available:

Nisus Writer’s list makes it so much easier to get an overview of what’s available, so you can pick out a significant version. You may open any number of prior versions in read-only mode so you can compare them at your leisure, extract earlier content, or save a copy elsewhere. Nisus Writer’s listing also marks versions that are exact duplicates, so you don’t need to bother looking at them.

We hope this improvement and all the other smart considerations in Nisus Writer help you with your writing!

Call For Localizers

Nisus Writer Pro 3.1 (and Nisus Writer Express 4.1) were just released and added several non-English localizations. We are interested in adding additional translations, so more people can enjoy using Nisus Writer in their native language.

If you might be interested in helping out, please let us know. You can contact us any way you like, including an email to the following address:

This is purely volunteer work. We aren’t able to pay for the translation, sorry.

Stepper Buttons in Nisus Writer

Even if you’re not familiar with the term, you almost certainly know how to use steppers. They are those little up and down arrow buttons you see next to numeric controls on your Mac. For example, you’ll see steppers next to the paragraph spacing controls in Nisus Writer:

As you probably already know (or can guess!) clicking the arrow buttons changes the spacing by ±1 point.

What’s new in Nisus Writer Pro 3.1 and Nisus Writer Express 4.1 is an enhancement for steppers that refines how they react to clicks. By holding down a modifier key as you click, you can increase or decrease the adjustment amount:

• Hold the Control key to trigger smaller changes.
For example, the font size will change from 12 points to 12.1 points.

• Hold the Option key to trigger larger changes.
For example, the paragraph spacing will change from 6 points to 12 point.

The adjustment amounts are sensitive to context and ruler units. For example, changing the paragraph indent using the Option key may result in a difference of ±1 centimeters vs ±0.5 inches.

There are a few mnemonics to help you recall which modifier key does what. You will notice that the relative order of the Control/Option keys on your keyboard matches that of the minus/plus keys. This is in harmony with the Control key triggering smaller changes (minus), and the Option key triggering larger changes (plus). Another way to think about it is that the Control key gives you greater control over the measurement, since the adjustment is finer.

We hope this improvement helps you dial in exactly the measurement you want, and reduces some repetitive clicking.

How to Change the Font Size of Comments

Nisus Writer Pro users often write in and ask us how they can increase the font size of comments in their document. The good news is that it’s easy to change the font size (and other formatting) of all comments in your document en-masse.

Whenever you add a comment to a document, Nisus Writer Pro will automatically apply a paragraph style called “Comment” to your new comment. By default this single style controls the formatting of all comments in your file. So to change the font size of all comments you need only edit this style like so:

1. Switch to your document’s style sheet, eg: use the menu View > Style Sheet
2. From the list of styles on the left, select the “Comment” paragraph style.
3. Edit the style’s formatting by using any available tools, eg: the menu Format > Size, the Character palette, etc.

In most situations that’s all you need to do. Once you switch out of Style Sheet view you should see that all your comments have been updated to account for the edited style’s formatting.

Manual Formatting and Comments
One potential complication is manual formatting, which is merely formatting that is not enforced by a style. In other words, the formatting was applied directly to text. That kind of formatting will override formatting in the “Comment” paragraph style.

This is an infrequent occurrence for comments, but you may encounter it in files imported from other apps. If your comments don’t react to your style changes, you may need to remove manually applied formatting. Luckily that’s easy too.

To remove manual formatting from all comments in your document:

1. Place the insertion point (caret) inside any comment.
2. Select the entire comment using the menu Edit > Select > Select All.
3. Use Select All again to expand the selection to all comments in your file.
4. Remove all overrides via the menu Format > Remove Formatting Except Styles.

After removing all non-style formatting, the formatting enforced by your “Comment” style should shine through as intended.

App Store reviews and an odd request

Submitting your app to Apple for sale on the Mac App Store is always a roll of the dice. You never know if your app will sail through the App Store review process in a matter of hours, or if you’ll be dealt a setback that takes you days to resolve.

These days App Store review delays and outcomes are pretty good. There’s still the occasional significant setback, if Apple decides to disallow the use of certain system resources that were previously permitted. Finding replacement solutions and rewriting your code can be non-trivial. But mostly there are minor changes to make, if any.

During a recent App Store review, we were given a strange request: please submit a video of your app using the Touch Bar. In all the years we’ve been releasing on the App Store we’ve never been asked for any kind of video before.

We do indeed support the Touch Bar in Nisus Writer, but its basic usage is obvious; you press buttons to take built-in actions like creating a new document tab. Some of our available Touch Bar items are actually straight from Apple and macOS, like the ability to fix spelling mistakes in your text. It didn’t make any sense that Apple would need a video to confirm this. They could simply test the Touch Bar during review like any other feature.

The only aspect of Touch Bar support in Nisus Writer Pro that’s more involved is a unique feature that lets you create custom Touch Bar items. You can turn any menu into a new Touch Bar icon.

This is nice if you have certain commands that you want to access frequently.

Whatever the reason for Apple’s unexpected request, there was no getting around it. You can’t release an app on the App Store without approval. We were going to have to make this video.

I don’t currently have access to a MacBook with a Touch Bar, now that I’m working from home full time because of COVID-19. Luckily there are other ways to interact with the Touch Bar, like the simulator in Apple’s developer tools, or the Touché utility app that allows anyone to use the Touch Bar on any Mac.

Ultimately it didn’t take long to produce the video and pass review, but it was strange. Jumping through Apple’s hoops and satisfying their fancies is just something you have to accept if you’re developing apps for their devices.

Letter Case Conversions

Sometimes you need to fix text with the wrong letter case. Maybe you copied text that’s all uppercase letters, but you need lowercase letters (eg: change “EXAMPLE” to “example”). Nisus Writer has two ways to help you convert such text.

Character Conversions
Most often you will want to do a one-shot conversion of your text using the menu Edit > Transform Text. For example, using the To Lowercase command. That will convert the underlying characters to their lowercase counterparts (eg: “A” to “a”) at the single moment in time when you activate the command.

Text Display Conversions
Instead of converting the underlying letters, Nisus Writer can also display a converted version of your text. In this way your text remains unchanged; it’s just the display that changes on screen (and in PDFs and printouts).

You enforce such display conversions using the menu Format > Letter Case. Commands on that menu operate like other kinds of text formatting (eg: bold font) in that they are continual. If you retype the text to which that formatting is applied, what you see immediately undergoes the same transformation. The newly typed text will be converted for display automatically, without reapplying the command.

Typically these kinds of display conversions are employed via styles. It’s nice when (for example) your headings have consistent uppercasing, no matter what’s been typed in your document. This also makes it easy to change your mind– just edit your style and all your text will be updated as needed automatically.

Small Capitals
One very popular kind of text display conversion is small caps. That’s where all letters in your text are displayed using capitals, but lowercase letters appear smaller:

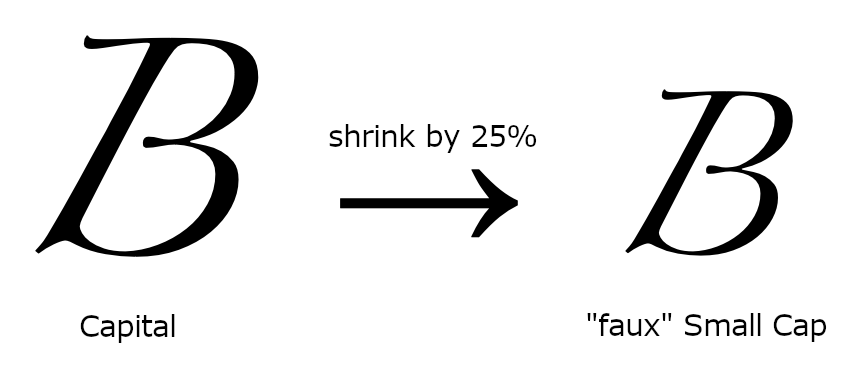
Nisus Writer supports small caps for all text and fonts. Proper typographic small caps will be used if a font provides them. If a font lacks typographic small caps Nisus Writer will synthesize their display by shrinking the font size like so:

The above screenshot shows a “faux” small cap for the Zapfino font. It’s somewhat surprising that Zapfino lacks typographic small caps considering all its other font features like crazy ligatures.

You might wonder, what are proper typographic small caps? Aren’t all small caps just shorter versions of uppercase letters? Typographic small caps may have been customized by the font designer, usually so the small caps are more distinctive. Here’s a screenshot showing Adobe Garamond Pro:

The small caps F (rightmost blue) may look like it’s simply a smaller version of the capital F (leftmost yellow), but it’s not. The middle image above shows a shrunken capital F overlaid on top of the small caps F. You can see the small caps F is actually quite a bit heavier.

Hopefully this shows you some of the many ways Nisus Writer can help you process your text and the intricacies involved. If you have any questions please let us know by commenting below, joining our forum discussion, or contacting us directly.

Trump and Two Spaces

I recently came across a copy of the COVID-19 economic relief explanation letter being sent out by the White House here in the United States:

economic relief explanation letter

What was interesting to me was not the contents of this letter, but rather the spacing after each period.

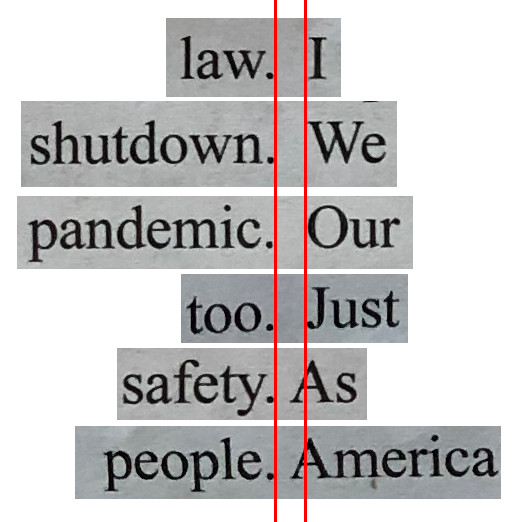
You can see that there are two spaces after nearly every period. That standard is passé now (so much so that Microsoft Word is now flagging two spaces after a period as an error). The use of two spaces was not surprising. What is unexpected is that sentences starting with the letter “A” don’t appear to be preceded by two spaces:

In the above comparison you’ll see that the bottom two sentences have less space after the period, before the letter A. It looks like a single space to me. Only sentences beginning with the letter A have this reduced spacing.

These spacing differences could be explained by kerning if they occurred within a word. Fonts usually customize the space between adjacent printable characters based on the actual letter geometry, so everything looks nice and neat. But I don’t think kerning can account for the big differences seen in this letter, especially considering the spacing variations occur for whitespace, not printable characters.

Ultimately this is pretty strange. I’ve never seen a single document intentionally use both single and double spaces after a period.

Line Wraps and the Zero-Width Joiner

Sometimes the most exciting thing about an iOS update is all the new emojis. In recent history the new emojis in iOS 13.2 included several interesting characters:

sloth emojiice cube emojiringed planet emoji

That last one is technically called the Ringed Planet emoji; but let’s get real, that’s Saturn. Even in emoji-form the cosmos is beautiful. These photos of Jupiter taken by the Juno probe are particularly stunning in their detail.

What does this have to do with line wrapping? We’ll get to that. First let’s explain a technical detail about emojis. Most Unicode characters and emojis have a distinct Unicode code point (aka character code). Each code tells software what character to display. The number 127823 is an apple, while 129411 is a turkey. But sometimes a new emoji will not have a new code. Instead the emoji is designated using a composite of existing codes. For example, the female chef emoji does not have a distinct code. Instead it combines the woman emoji with the frying pan emoji:

how the female chef emoji is composed

How does does an emoji do that in text? By using a zero-width joiner character between its constituent characters. That way software knows to display all the codes together as a single glyph or image on screen. This joiner trick is used for a variety of purposes like skin tone and gender modifiers.

Now to the part where we explain how the zero-width joiner character can help your writing. In certain situations you might consider inserting a joiner character to change where line wrapping occurs. The joiner acts as a signal to the text layout engine that the adjacent characters should be joined. You can think of the joiner like a glob of glue that keeps its neighbors together. The characters won’t display a single image as with emoji, but rather they will be kept together on the same line.

Consider the following example text:
text example

The page margins may cause an undesirable wrapping point at the slash, so the words “when” and “if” are split across lines like so:
text badly wrapped to margins

To prevent that you can place the insertion point after the slash character and insert a zero-width joiner character. That instructs text layout to keep the slash character together with the “i” in “if” like so:
fixed line wrapping by using zero-width joiner

To insert the joiner character in Nisus Writer Pro you can use the menu Insert > Special Character > Spaces > Zero Width Joiner, or use our customizable Special Characters palette.

How to Search for Menu Commands and Help Topics

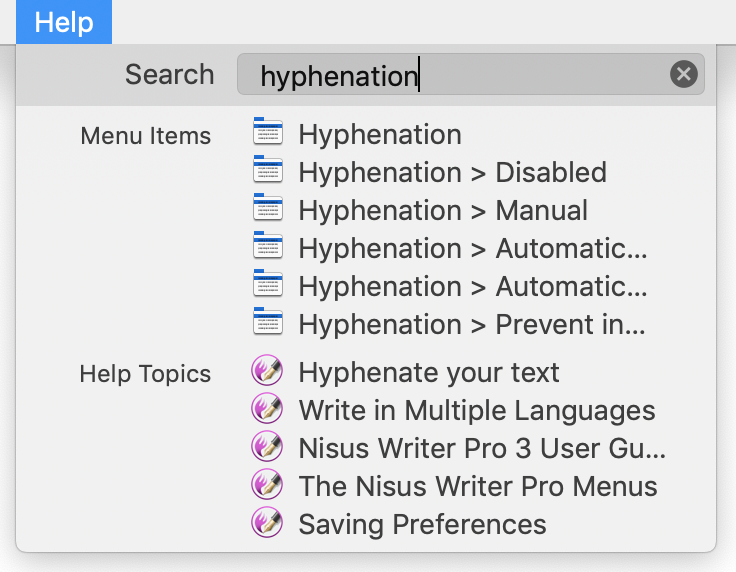
At some point you’ve probably forgotten where a particular menu command is located. The good news is that you can quickly use Nisus Writer’s Help menu search to find it. Just open the Help menu and type a word or two into the search field like so:

The above screenshot shows a search for the word “hyphenation” which turns up the relevant menu commands. You can do two things with the list of matching menu commands:

1. Let your mouse pointer linger over the command to see its location in the main menu structure. A large arrow indicator appears like so:

2. Click the command to activate it, as if you’d used it normally.

For an app like Nisus Writer Pro that has a full user guide you will also see a list of associated help topics in the search results. If you click any of those results you’ll be taken directly to the associated help topic in your web browser (Safari by default).

You can use this Help menu search in any macOS apps that support it. It’s relatively standard and nearly all apps from Apple provide it, including Apple Mail, Numbers, Finder, etc.

New Indian Rupee Currency Symbol

New Indian Rupee SymbolA competition to design a new symbol for the Indian Rupee just came to a close. The new symbol is distinct from the generic rupee symbol (“Rs” / &#x20a8, Unicode U+20A8) used by a variety of rupee currencies and is destined for inclusion in the Unicode standard.

Personally I think the new symbol looks quite nice and is the best of the five finalists, though I prefer the fluid handwriting appearance shown in the finalist graphic. But then, that’s why fonts exist.

Mutant Gummies

Whenever I pass through my local Cost Plus World Market, a place of wonderful things, I always take a walk through the candy aisle. Obviously we’re pocky fans around here, but I’ve always been more a gummy man myself. It might be my German heritage, but indeed Haribo macht mich froh.

So upon a recent visit a happy “oooh” (or perhaps OOo) was uttered when I beheld the king of gummy bears:
Giant Gummy Bears

That greeting card is standard size mind you. Each bear packs in a whopping 105 grams of sugar- let the gummy feast begin!