Find and Replace Text and Formatting
Find and Replace Text and Formatting 305
Enter something into the Find box 307
Enter something into the Replace box 307
Find text, or find and replace text 307
Find and/or replace the next occurrence(s) of the Find expression
308
Use the “Find what” and “Replace with” menus 316
Examples of putting PowerFind to use 329
Exercises, or examples of putting PowerFind Pro to use 334
Advanced exercises, or more examples of putting PowerFind to use
340
Use the Formatting Examiner 342
Understand and Modify the Appearance of Your Document 342
The Formatting Examiner Interface 342
In Nisus Writer Express, if you can describe a text pattern, you can probably find it. If you can find it, you can almost definitely change it to any other text pattern you can describe. Nisus Writer Express offers three ways to find and replace text Normal Find, PowerFind™, and PowerFind Pro (regex). For the purpose of brevity, “PowerFind Pro (regex)” will be called “PowerFind Pro”. Normal Find meets the needs of most searches for words. Use PowerFind and PowerFind Pro for text patterns, such as a series of numbers (where you know how many digits, but you don’t know what they are).
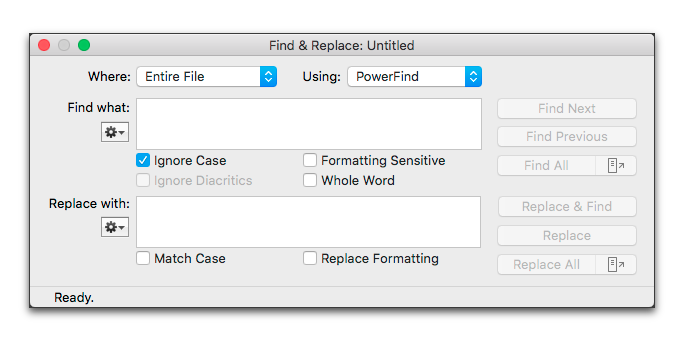
• The title bar of the Find & Replace window identifies what document it will search in.
• When the Find & Replace window is active the Zoom commands of the View menu will enlarge or diminish the display.
• You can resize the Find & Replace window by dragging any of its edges, if your Find or Replace Expression is too large to display in the text boxes a scroll bar appears.
• You can Show Invisibles in the Find & Replace window; this can help clarify the text you are searching for.
• The lower left corner of the Find & Replace window indicates its “state”. Before you start to find and/or replace anything it indicates that it is “Ready.” Once you have searched for something the Find & Replace window displays the number of items it has found or replaced (even if it has Found no occurrences).
• None of the options enabled in the QuickFix preferences except for the use of “smart punctuation” and the superscripting of ordinals work in the Find & Replace window.
Figure 271
The Find & Replace window of an Untitled document
To learn more about PowerFind and PowerFind Pro, see “PowerFind” on page 314 and “PowerFind Pro” on page 334.
☞ The Find & Replace window is very versatile.
• You can choose the menu command: View > Show Invisibles when the Find & Replace window is open to make viewing distinct characters and spaces, etc. easier.
• You can resize the window by dragging the lower right corner.
• You can magnify the contents of the window by choosing the zoom percentage you want from the menu View > Zoom.
| Previous Chapter Clean Up Documents |
<< index >> |
Next Chapter Normal Find |