Introduced at the beginning of the section: “Format Text” on page 93, the Formatting Examiner can help you diagnose a variety of formatting issues you might encounter.
Understand and Modify the Appearance of Your Document
When we speak, our words (our texts) are formatted, “clothed”, in timbre (harsh/soft), volume (loud/quiet), velocity (fast/slow) and pitch (high/low). When we write, we clothe our words visually using fonts, sizes, cases, and various other attributes: bold, italic, color, line wraps and indents, and more. Current word processors enable us to collect these various formatting attributes into “Styles”. At times our texts can display in such a wide variety of formatting (especially if we copy and paste portions of texts between documents and collect texts from the Web) that we need help sorting everything out. For many years, the venerable WordPerfect touted its Reveal Codes. Rather than force users to examine arcane codes, Nisus Writer Express enables you to examine each individual character and larger blocks of text in your document using the Formatting Examiner palette.
The Formatting Examiner Interface
The Formatting Examiner displays two primary types of information: Applied Formatting and Displayed Formatting.
☞ To explore the use of the Formatting Examiner further, the “Sample Chicago Style Paper” file is used to experiment and illustrate.
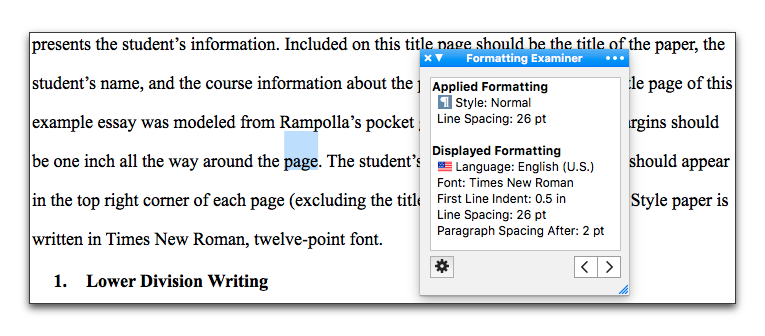
Figure 304
A document with “Normal” text, modified, selected
As explained in the section: “Style Sheets” beginning on page 128, the Nisus New File that comes with Nisus Writer Express has built into it a number of useful styles. When you apply these styles to your text these style’s names appear in the Applied Formatting portion of the Formatting Examiner. In addition it indicates all formatting you apply directly such as font changes, ruler adjustments, and more, as illustrated in Figure 304, where Line Spacing is set to 26 points (which is different from the line spacing enforced by the Normal style).
The second portion of the Formatting Examiner shows the various attributes that make up the Applied Formatting (and more), that is the underlying formatting that is used to display your text when you apply any particular style. For example, if a Heading 1 style is applied to some text, it enforces a larger font size for that text. Thus this area shows all the formatting enforced by the applied styles (and more).
Other adjustments may also be at work for the Displayed Formatting portion of the Formatting Examiner. First off there’s the obvious: manually applied formatting (aside from styles) such as the Line Spacing set to 26 points in Figure 304. But there are other possibilities like font substitution (explained on page 100), that is, if the applied or enforced font cannot display the text and another backup font is chosen.
Additional Tools and Displays in the Formatting Examiner
The Formatting Examiner offers a variety of tools for working with the formatting of your document.
• A Gear menu in the lower left corner of the Formatting Examiner contains the menu commands:
◦ Remove Selected Formatting
Removes any formatting selected in the Formatting Examiner palette’s list. It will not be enabled if any Display Formatting is selected.
◦ Remove Formatting Except Styles
Removes all formatting, except “language” from selected text except for applied Styles.
◦ Remove Formatting and Styles
Removes all formatting (both character and paragraph, but not “List” styles and not language) from selected text and applies the “Normal” style to the selection.
When you select special kinds of objects in your document, the Formatting Examiner identifies them as well.
| Previous Chapter PowerFind Pro |
<< index >> |
Next Chapter Work with Multiple Documents |