Apple Store in New York During COVID-19

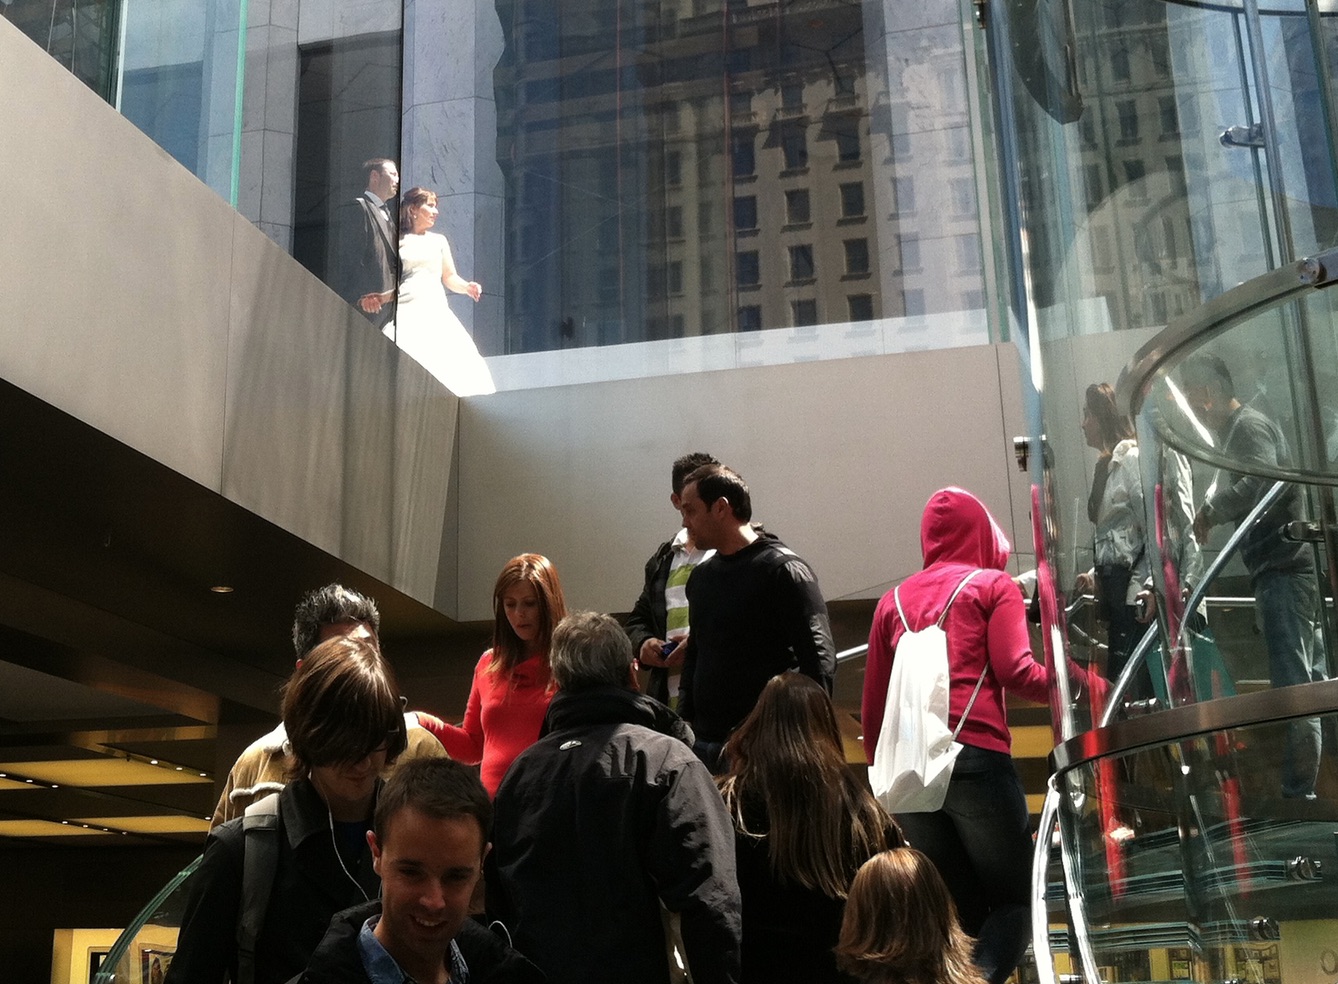
When my wife and I moved back to Manhattan in 2007, the Apple Store on 5th Ave became my primary store. Over the years I had been to the store in SoHo, Chelsea, on the Upper West Side, Grand Central Terminal, and the Upper East Side. But the 5th Ave store, which was open 24/7 was always my go-to store. Others also flocked to this store. In 2011 it was the most photographed building in NYC. People always crowded down and up the circular glass stairwell and used it as the setting for wedding photos.

Sometime by May of 2017 it was closed for renovation. The entire cube was removed. The store shifted to cramped quarters in what had been the FAO Schwartz toy store nearby. And then by September 2019, a new cube, hidden behind white plastic sheets appeared.

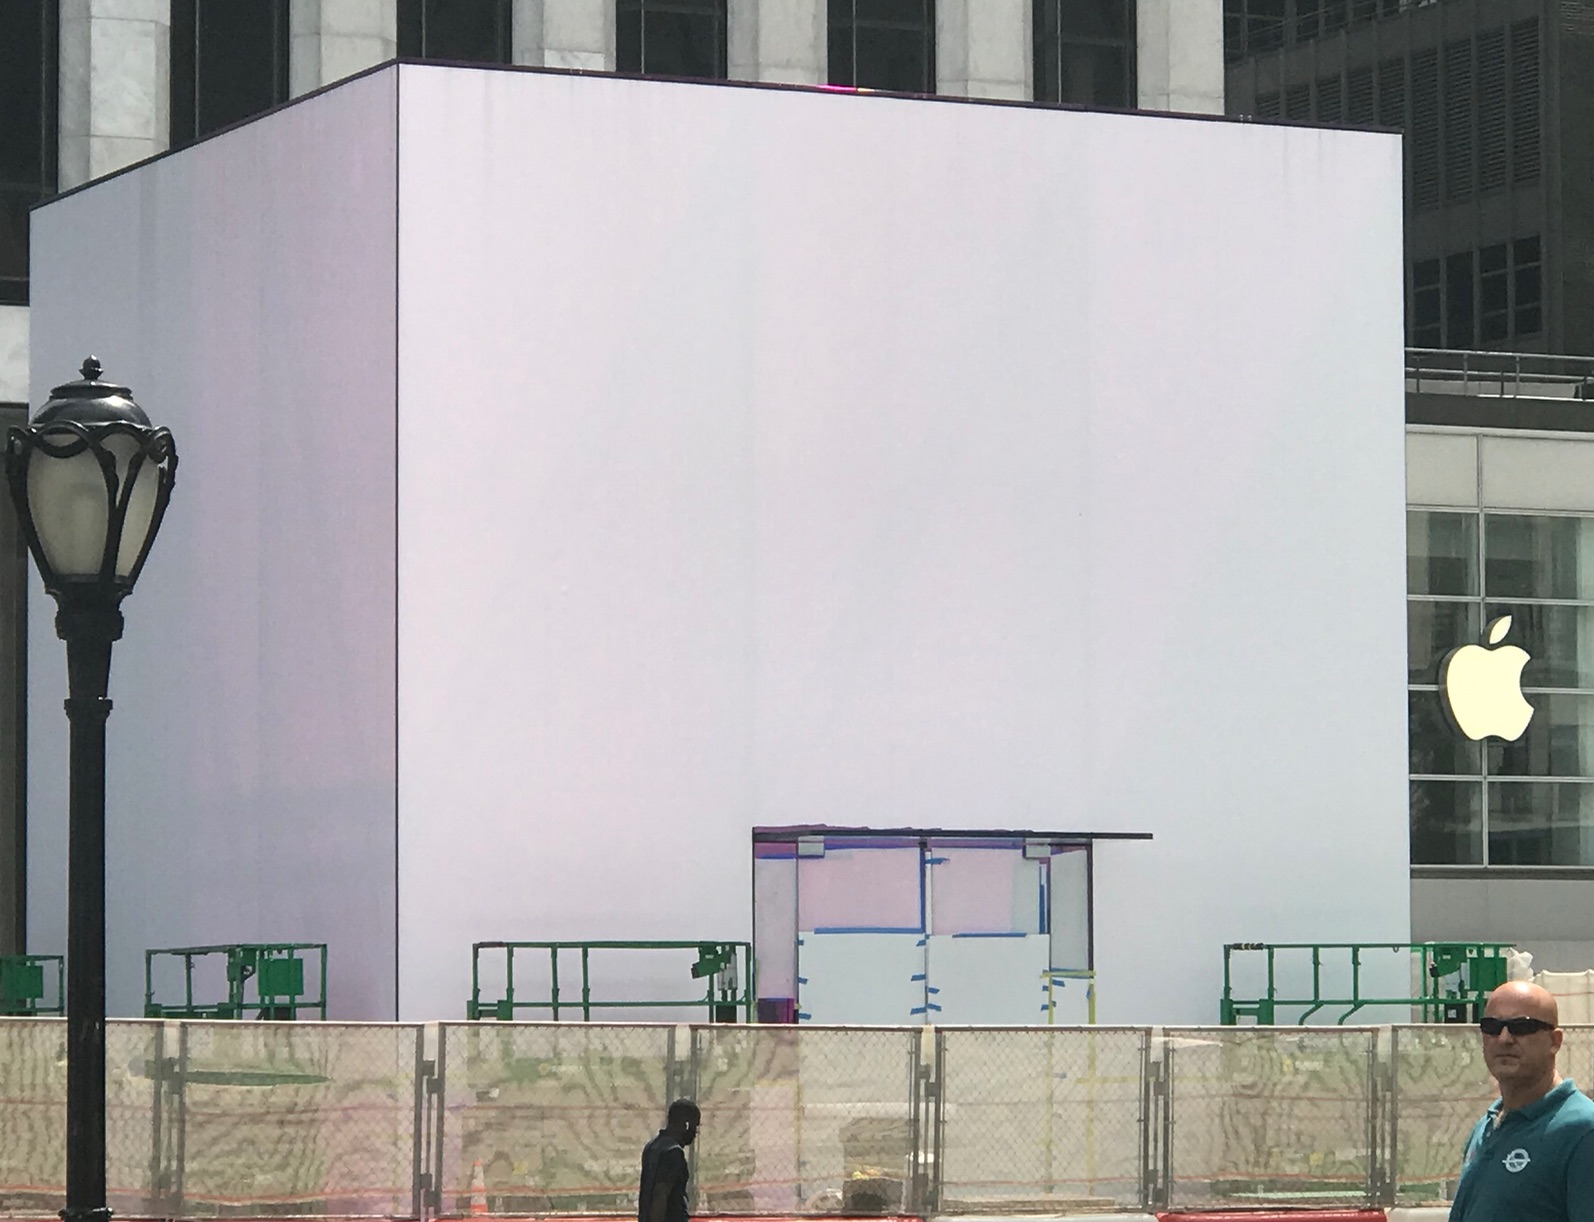
A short time later, when the white sheets were removed, iridescent plastic remained to hide what was inside.

The store finally reopened by early November, and then COVID-19 hit. All Apple Stores closed along with everything else in NYC. Months passed and my wife and I rarely left our studio apartment. Most of our contact with the outside world was through our Apple devices… via the Internet. Then in August it became clear that my wife’s MacBook Air needed a new battery.

We contacted the 5th Ave. store and learned that its current hours, from 6:00 AM to midnight, offered the best possibility of avoiding other people. I scheduled a visit for very early in the morning to drop off the Mac. I arrived with my mask on. The ten staff members outside far outnumbered the potential customers and I was second in line in time for my appointment. My identity was checked, then my temperature. I was asked to answer a number of health-related questions. I was able to pass muster on all counts and then I was invited to go downstairs.

The tables were set with hand sanitizer in pump jars along with boxes of individually wrapped sanitizing wipes. I was welcomed graciously and asked to sit and wait for a couple of minutes. Never have I seen any Apple Store with fewer people.

Each of us sat far more than the requisite 6 feet away from one another. Our Mac was received by a “Genius” wearing a mask and immediately wiped down. I was told that the machine would likely be ready within three days. The next day I receive an email notifying me that I could come back to pick up the Mac with its new battery. I repeated the intake process. Approximately the same number of people were present. The technician presented me with my wife’s Mac, wiped it down again and I left… through a stairwell on the far side of the store, again, minimizing contact with any other people.

A friend recently asked if I knew why Apple stores don’t get robbed. It’s not because nobody is there. The answer: too many iWitnesses.

Fully Justifying Text for Arabic (and other) Poetry

Classic Days

Long ago, in the days of the Classic Mac OS, when Nisus Software Inc. first developed its tools for multilingual software, on the shores of the Pacific Ocean, we learned some interesting facts about Arabic poetry. Not only, unlike English and most other European languages, does Arabic not hyphenate words, in its poetic expressions in particular, Arabic “likes” to have its lines spread out to fill the entire space of the column. In most European languages this is accomplished by adding tiny amounts of space between words. However, in Arabic it is done by adding “kashidas” . Beginning in Nisus 3.4x we developed what we called the Full Justify Tab.

The Full Justify Tab of Nisus Writer Classic

As is clear from the illustration above, the Arabic text above the little note “Full Justify Tab” is the same text as appears below. However the text below is controlled by the tab indicator. As you dragged the tab indicator on the ruler (inside the red ring) horizontally to the right or left, the text governed by it squeezed or stretched correspondingly.

Welcome to Mac OS X

The text engine provided by Mac OS X, which Nisus Writer Pro and Express use, does not support justified tabs. Our Arabic users have repeatedly requested that we do something to alleviate their pain.

Teamwork Leads to a Solution

With the helpful testing of Nisus Writer Pro user Kamran, our lead engineer Martin prepared a set of macros that solve the problem of justifying Arabic text.

The first step is to install the “fully justify” macros. You’ll only need to do this once. Here’s what to do:

1. Download the justification macros.
2. They come in a compressed archive, which you may need to double click in the Finder to expand.
3. Switch to Nisus Writer Pro (NWP).
4. Use the menu Macros > Load Macro.
5. In the open file dialog, choose the files you downloaded/expanded earlier (eg: “Justify Fully Arabic”). You can select all the macros at once. Click the “Open” button.

From now on these macros will always be available on your Macros menu and you can safely trash the files you download.

Once you’ve typed up some poetry:

An Arabic poem (before)

1. Select the paragraphs of text you want to fully justify.
2. Use the menu Macros > Justify Fully Arabic.

When the macro is done running, your text should appear fully justified.

An Arabic poem (after)

One final note: these macros work by inserting kashida characters into your writing. It may be that you later want to go back and edit what you’ve written- having these kashidas may make that awkward. To remove them select the relevant text and use the menu Macros > Justify Fully Arabic (remove kashidas).

A Gift for English Writers As Well

While he was working on the Arabic task, Martin was able to accomplish a similar task for English poetry. The zipped collection of macros contains two additional macros: Justify Fully English and Justify Fully English (remove spaces). William Shakespeare might have used them if he had been able to write using Nisus Writer Pro.

Sonnet 18 (before)
Sonnet 18 (before)

Sonnet 18 (after)
Sonnet 18 (after)

We hope that all your writing “nisus” will be a pleasure with Nisus Writer Pro.

How do I understand those tags on the Statusbar?

A number of users have wondered how “Styles” (as contrasted with “styles” and other attributes such as fonts) interact in a Nisus Writer Express document. They also don’t understand how the Tags on the Statusbar can help them.

The various Tags of the Statusbar appear when your selected text has the attributes applied.

Believe it or not, text can have no attributes applied. Such text displays in 12-point Helvetica.

Each tag on the Statusbar controls a different kind of grouped attributes.

    Paragraph Style
    Character Style
    ruler (indents, tabs, alignment, line spacing)
    font (font family, typeface, size, variants)
    color
    highlight

The way a character is displayed is the result of a merging of all the attributes applied.

You can see which attributes are present by looking at the tags on the Statusbar.

Tags override each other moving from right to left.

In other words…
To figure out how some text will display:

  1. Take 12-pt Helvetica.
  2. Apply to it any Paragraph Style attributes using the Styles palette (which may overide the font).
  3. Apply to that a Character Style using the Styles palette.
  4. Then apply (i.e. modify) the ruler.
  5. Then change the font/size and/or style stuff (i.e. using the Character palette method, not the Styles palette method).
  6. Then modify the color.
  7. Finally add a little highlighter.

Note that Paragraph and Character Style tags are always visible, they may just be faded if no Style is applied.

Customizing your word processor – creating a “block indent” button

A user recently asked for a button that would “block indent” selected text:

First, will there be a button you can push that will indent an entire paragraph?

Second, (a more accurate description of ‘block indent’) will there be a button you can push that will indent both right and left margins of a paragraph? An example of needing this feature would be, say, if you have a quote that is too long for quotation marks, you will want to ‘block indent’ it, which means the paragraph is centered on the page, but indented on both right and left margins.

We have not made provisions for any such “buttons”. However, that does not mean that you (any user) can’t extend the “out of the box” capabilities of Nisus Writer Express to fulfill unforeseen needs.

I answered:

To paraphrase the House Un-American Activities Committee:

There is not now, nor has there ever been a button you can push that will indent an entire paragraph.

You should, however (in Nisus Writer Express 2.x), be able to create a “Style” in the “Style Sheets” view of Nisus Writer Express that will consist of an indented paragraph (you’ll set the ruler parameters along with the font, etc.) Then, you’ll be able to select a range of text (put your insertion point inside a paragraph or select portions of various paragraphs) and click that style’s name in the Style palette. There, once you’ve created the “block indent” or “block quote” style, one click achieves the desired result… almost the same as Nisus Writer Express coming shipped with a button.

Can you think of other ways to customize Nisus Writer Express that others might appreciate knowing about?

`//rite on!