Set “Defaults” for the Application
Nisus Writer Express enables you to set your preferences for new documents in a variety of ways. To set any preferences for Nisus Writer Express choose the menu command: Nisus Writer Express > Preferences > General.
General Preferences Control the Application
Each of the following sets of preferences deals with a certain aspect of Nisus Writer Express. The General preferences control how the application functions as a whole.
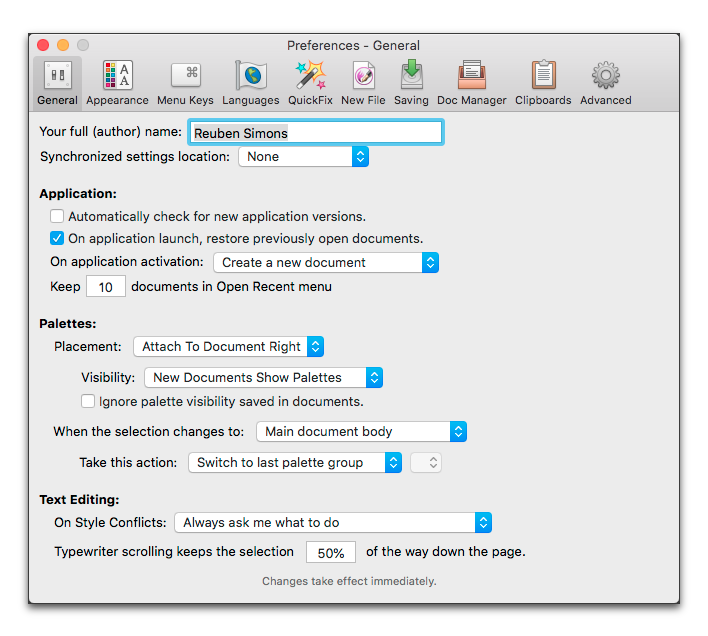
In this dialog you can determine a variety of options that control the general functioning of Nisus Writer Express. Most of these are illustrated in Figure 307.
Nisus Writer Express saves the document the way in which it appeared (window shape, size and location) on your monitor the last time you used it and uses those settings the next time you activate it.
Figure 307
The General section of the Preferences dialog
In the General preferences window you can
► determine Your full (author) name, that is, the name associated with your documents (This is the default name inserted in your document when you choose the menu command: Insert > Document Property > Author. You can override this on a per-document basis by entering a different name in the dialog that appears when you choose the menu File > Properties….)
► set the location of your various settings from the Synchronized settings location pop-up menu (also referred to as “sync settings”). The options available include:
Choosing this option puts your settings in the Application Support folder: ~/Library/Application Support.
Use this option to put your settings anywhere on your hard drive.
What you set here will store nearly all your settings, including: General preferences, keyboard shortcuts, QuickFix, templates, glossaries, style libraries, macros, customized palettes, Toolbars, and Touch Bar items. This enables you to use your customized settings on any computer you want… so long as that computer has access to the Internet.
☞ You can change these settings at any time. If you do, Nisus Writer Express will respond as follows:
• If the new folder is empty:
All your settings are copied from the current folder to the new folder.
• If the new folder is not empty, but was not previously used for Nisus Writer Express settings:
Nisus Writer Express will ask if you want to use the new folder. The dialog includes an option to create a new empty subfolder, which is the best practice so all Nisus Writer Express files are kept separate. If you do not cancel, all settings are copied from the current folder to the new folder.
• If the new folder is not empty, and was previously used for Nisus Writer Express settings:
You will see an alert that settings already exist in the new folder. You can then choose to either cancel, keep current settings (copy them to the new folder to overwrite the existing files) or load the external settings from the new folder (do not copy any files, just load what's there). If you truly want to move the files, but not overwrite the existing files, you should click Cancel and move the older files to a safe place before choosing to move the new files.
Nisus Writer Express is always under development. We, at Nisus Software Inc. continually tweak the application to make sure that it works optimally as the macOS changes.
To make sure your version of Nisus Writer Express automatically checks for new versions when you start the application (if you are online) you should turn on (check):
► Automatically check for new application versions.
Now and then you may need to quit Nisus Writer Express. When you restart, it’s always nice to quickly get back to the documents you’ve been working on.
To make sure your documents reopen on starting Nisus Writer Express turn on (check):
► On application launch restore previously open documents.
When you have been using a different application while Nisus Writer Express has been running in the background and you switch from the other application into Nisus Writer Express, you can…
cause Nisus Writer Express to:
If you have been working on a wide variety of documents, but don’t want to keep them all open, Nisus Writer Express can keep them handy in the menu: File > Open Recent.
► Enter how many files you want handy in the text box: Keep “x” documents in Open Recent menu.
Normally each file saves its own palette visibility. The Nisus Writer Express Palette Dock can be either visible or not, float or be attached to either side of your document window(s). One document may show its embedded palettes when opened, while another document hides its palettes. This works in a similar manner to other view settings, for example: is the ruler showing in the file?
► From the Placement pop-up menu choose:
◦ Floating Palette Dock
If you choose Floating Palette Dock, it (and any other floating palette(s)) remains visible with its tools available for all document windows. If you choose to have the Palette Dock attached to the right or left of the window, each document’s window has its own Dock and its palettes control only the window to which it is attached.
The Visibility pop-up menu offers two options. Choose either:
► From the Placement pop-up menu choose either:
If you choose Attach to Document Left or Attach to Document Right, different and additional options become available.
The Visibility pop-up menu offers three options. Choose either:
▷ New Documents Use Most Recent (setting)
The above settings control palette visibility for new documents. For existing documents the palette visibility is saved with each individual file. If you want to override that use the following option:
► Check Ignore palette visibility saved in documents.
◦ Leaving this setting off means that each file will save and then (on opening the file) load its own palette visibility.
◦ Alternatively, checking the option means that each file will not save and then (on opening the file) load its own palette visibility.
The palettes will always be shown or always be hidden, depending on this preference.
These settings are mirrored in the New File preferences.
You can set which palettes or palette groups are automatically associated with particular segments of the document.
1. From the When the selection changes to: pop-up menu choose:
◦ Styles in the Style Sheet view
2. To have Nisus Writer Express Take this action… either:
◦ Do nothing (don’t change the palettes)
◦ Switch to last palette group (use the palette group that was in use the last time the insertion point was in that portion of the document)
◦ Switch to palette group… (choose a specific palette group to associate with this portion of the document)
◦ Switch to group with palette… (if you have rearranged the palettes or created a custom palette group)
◦ Float the palette… (cause a specific palette to become active and allow it to float outside the Palette Dock)
If you choose one of the last three options above (those with ellipses), you need to
3. Choose from the pop-up menu immediately to the right.
◦ If you choose Switch to palette group… the pop-up menu lists the groups.
◦ If you choose Switch to group with palette… or Float the palette… the pop-up menu lists all the palettes of Nisus Writer Express.
You can set how Nisus Writer Express should function when you paste a style of the same name but different characteristics into another file as explained in detail in the section “Resolve conflicts between styles” on page 144.
► Determine a couple of settings regarding text editing.
◦ Set what happens On Style conflicts: (when you copy text with certain styles from one document and paste that text into a second document that has styles with the same names, but different formatting, as explained in “Resolve conflicts between styles” on page 144).
◦ Always ask me what to do (the default)
◦ Use existing styles in the destination document
◦ Add pasted styles to the destination document
► Determine where Typewriter Scrolling (as described on page 257) keeps the selection. Enter the desired location (expressed in the percentage of the way down from the top of the page) in the text box:
◦ Typewriter scrolling keeps the selection “x”% of the way down the page.
So, for example, 50% would cause your typing area to be centered vertically in the window. Setting this option to 20% would display your typing area near the top of the page while 80% would cause the typing area to be closer to the bottom.
| Previous Chapter Set Preferences |
<< index >> |
Next Chapter Appearance Preferences |